

It is an object ruler.


* With just the [number of lines] setting of the target ruler, you can't intuitively imagine what you can draw.
It is a material that I made for myself who was drawing every time.
It is a material that I made for myself who was drawing every time.
Because we are creating a thumbnail that matches the target ruler
A ruler that matches the image you want to draw
You can choose by visually judging from the material panel.
You can choose by visually judging from the material panel.
* This is a material that creates a ruler on an empty vector layer.
Drag and drop rulers onto other layers, or adjust them accordingly to make it easier for you to use.
Drag and drop rulers onto other layers, or adjust them accordingly to make it easier for you to use.

If it does not go as expected, please read the following [How to use and precautions].
Together
For more information about using the Shape tool, see
🔎 Please search for "clip studio target ruler " etc.
🔎 Please search for "clip studio target ruler " etc.
******************************
【How to use and precautions】
******************************
******************************
【How to use⃣ 1️】
Drag and drop from the material palette directly onto the canvas
It's a simple and easy way.
The ruler is pasted where you dropped it.
Please adjust the paste position by yourself.

________________________
【How to use⃣ 2️】
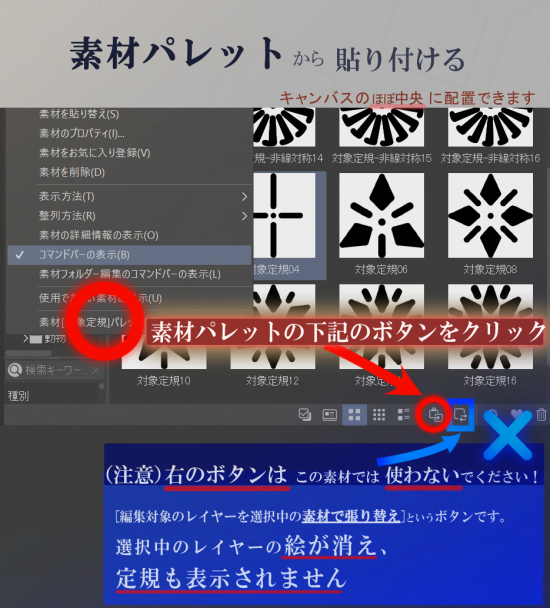
Paste from the material palette

First, turn on [show command bar] of the material palette and make it show menu.
⭕️ Select the material you want to paste and press the button in the red circle above
The selected material is attached approximately to the center of the canvas.
The selected material is attached approximately to the center of the canvas.
* Perhaps due to the convenience of the pixel, it may be slightly shifted.
(⚠️ Note)
Do not use the button next to the right with this material.
This button says [Reupholster edit object layer with selected material].
* The picture of the layer to be dropped disappears and the ruler is not displayed.
________________________
【How to use⃣ 3️】
Drag and drop directly from the material palette to the layer palette

If you drag and drop it into the layer palette,
Be sure to drop it between the layers.
* ⭕️ Please release the material after a red line appears between layers.
The selected material is attached approximately to the center of the canvas.
* Perhaps due to the convenience of the pixel, it may be slightly shifted.
(⚠️ Note)
Do not drop it on the layer.
* When the layer is surrounded by a red rectangle and the material is released
The picture of the layer you drop on disappears and the ruler does not appear.
対象定規です。
※対象定規の[線の本数] 設定 だけでは 直感的にどんなものが描けるかイメージができず、
毎回試しを描きをしていた自分用に作った素材です。
毎回試しを描きをしていた自分用に作った素材です。
対象定規に合ったサムネイルを作成しているので
自分が描きたいイメージに合った定規を
素材パネルから視覚的に判断してお選びいただけます。
素材パネルから視覚的に判断してお選びいただけます。
※空のベクターレイヤーに定規を作成している素材です。
他のレイヤーに定規をドラッグアンドドロップしたり、ご自身で使いやすいよう適宜調整してください。
他のレイヤーに定規をドラッグアンドドロップしたり、ご自身で使いやすいよう適宜調整してください。
思うようにいかない場合は以下の【使い方・注意事項】をご一読下さい。
併せて
図形ツールの詳しい操作については
🔎『 クリップスタジオ 対象定規 』 などで検索してみてださい。
🔎『 クリップスタジオ 対象定規 』 などで検索してみてださい。
******************************
【使い方・注意事項】
******************************
******************************
【使い方1️⃣】
素材パレットから キャンバスに直接ドラッグアンドドロップ
シンプルで簡単な方法です。
ドロップした位置に定規が貼り付けられます。
ご自身で貼り付け位置を調整してください。
________________________
【使い方2️⃣】
素材パレットから貼り付ける
まず、素材パレットの[コマンドバーの表示] をONにして、メニューを表示状態してください。
⭕️貼り付けたい素材を選択して、上記の赤丸のところにあるボタンを押すと
選択中の素材がキャンバスのほぼ中央に張り付けられます。
選択中の素材がキャンバスのほぼ中央に張り付けられます。
※ピクセルの都合上なのか、微妙にずれることがあります
(⚠️注意)
右隣のボタンはこの素材では使わないでください。
[編集対象のレイヤーを選択中の素材で張り替え]というボタンです。
※ドロップ先のレイヤーの絵が消え、定規も表示されません。
________________________
【使い方3️⃣】
素材パレットから レイヤーパレットへ 直接ドラッグアンドドロップ
レイヤーパレットにドラッグアンドドロップする場合、
必ずレイヤーの間にドロップしてください。
※⭕️レイヤーの合間に 赤線が出る 状態にしてから素材を離してください。
選択中の素材がキャンバスのほぼ中央に張り付けられます。
※ピクセルの都合上なのか、微妙にずれることがあります
(⚠️注意)
レイヤー上にドロップしないでください。
※レイヤーが赤い四角形で囲まれている状態 で素材を離すと
ドロップ先のレイヤーの絵が消え、定規も表示されません。
Line symmetry + concentric circle ruler 線対称 + 同心円 定規


Non-linear ruler 非線対象 定規
-
Object ruler - nonlinear symmetry 02 対象定規-非線対称02
-
Object ruler - nonlinear symmetry 03 対象定規-非線対称03
-
Object ruler - nonlinear symmetry 04 対象定規-非線対称04
-
Object ruler - nonlinear symmetry 05 対象定規-非線対称05
-
Object ruler - nonlinear symmetry 06 対象定規-非線対称06
-
Object ruler - nonlinear symmetry 07 対象定規-非線対称07
-
Object ruler - nonlinear symmetry 08 対象定規-非線対称08
-
Object ruler - nonlinear symmetry 09 対象定規-非線対称09
-
Object ruler - nonlinear symmetry 10 対象定規-非線対称10
-
Object ruler - nonlinear symmetry 11 対象定規-非線対称11
-
Object ruler - nonlinear symmetry 12 対象定規-非線対称12
-
Object ruler - nonlinear symmetry 13 対象定規-非線対称13
-
Object ruler - nonlinear symmetry 14 対象定規-非線対称14
-
Object ruler - nonlinear symmetry 15 対象定規-非線対称15
-
Object ruler - nonlinear symmetry 16 対象定規-非線対称16


Other materials by y.riku

Popular “Material catalog” materials


New materials


Badges
-
 MVP ◆This user has contributed greatly to the management of the community, by posting many great responses to the questions asked. Once every three months, MVPs are determined based on the points earned during that period and will be recognized accordingly.
 -
 New Valuable Player (NVP) ◆These are the next-best contributors to the community after MVPs. This is awarded to users who have not yet won an MVP award, based on the number of points they have earned.
 -
 Official Expert ◆Chosen out of all MVP awardees, who are already proof of excellence, this is a testimony of outstanding correspondence in the community. After careful screening, they are appointed by CELSYS and assume their position.Note: Formally called “Evangelists”
 -
 Official Moderator of CELSYS ◆Moderators are official CELSYS staff members who are fluent in Japanese as well as various other languages. Moderators are not experts on the software or illustration, so they are not able to directly answer your questions. However, moderators provide communication and language support to ensure that everyone can smoothly communicate with each other.
 -
 CELSYS official accountThe Official Administrator Account