

This is a set of brushes and auto action materials created with the thought that it would be possible to process text that can be done with a certain image editing software as if it had melted into a liquid form, and that could be done in the same way with CLIP STUDIO.


■ Recording
・auto action materials
・Brush material for processing×2
・ Color change gradient set (15 types)
※Note※
・This material collection is not designed for color illustrations.
Be sure to prepare figures/text layer drawn in either black or white.

・ Even if it is drawn in white or black, it may not be possible to process human illustrations and complex shapes and patterns with many lines, so it is not recommended to use it.
◇ How to use
--------------------------------------------------------------
(1) Create a new layer and type your favorite text or draw shapes in black and white.
* We recommend monochrome for the layer expression color.
There is no big problem with color/gray, but please note that when adding color in a later process, something like burrs will appear to border the whole.

(2) With the layer created in (1) selected,
Play the [Preparation/First Step] of the Liquid Melting Effect auto action.
At this time, if the text / figure is black, auto action [For black text / figure],
If it is white, select the auto action of [For white text / figure].

* [Currently rasterize cannot be performed. Do you want to continue? ] pop-up may appear, but please ignore it and click [Yes] to proceed.
(3) After auto action playback, the red palette color becomes a landmark layer.
Use [Melting brush #smooth] or [〃 #noise] to stretch the color as if it is dissolved in a liquid state.


[Melting brush #noise] has a slightly rough texture.
If you have your favorite color extension tool, there is no problem using it ◎
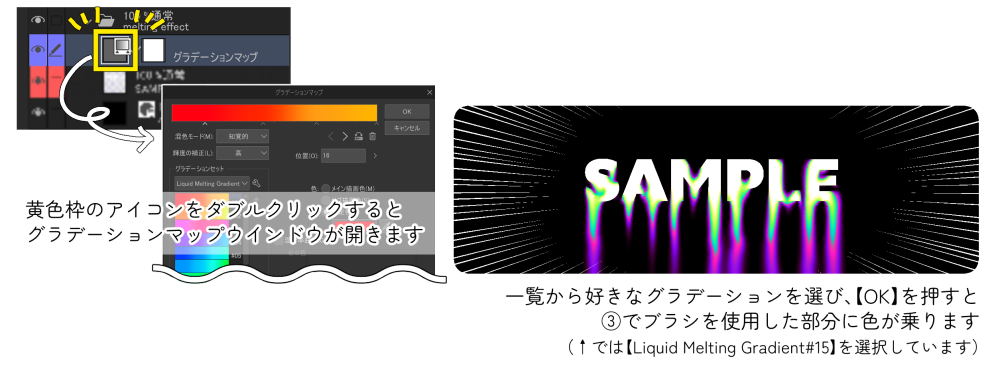
(4) Above the layer used in (3), there is a gradient map layer with a blue palette color as a landmark.
In this layer, we will add color to the melting effect part, so double-click the yellow frame icon of the image to open the gradient map window and select your favorite gradient from the list.
(It is necessary to load the gradient set material [Liquid Melting Gradient] in advance)

Fifteen types of gradations are included in the set material.
Please try various grades with your grade material and enjoy it ◎

* The work of (3) and (4) can be reversed.
(5) If you combine the layers as it is, the black/white background will remain, so crop only the effect part.
With the [Melting Effect] folder above the gradient map layer used in (4) selected, play the [Finishing Touches] of the auto action.

(6) It's done!
Now that the background color is transparent, please finish it by layering it on the illustration or laying the texture image underneath.
It is also recommended to apply noise effects and add movement to the effect part with the distortion tool.

The work layers from (1) ~ (5) will be left, so if you want to change the gradient after completion, or if you want to melt it with a brush a little more, you don't have to start over.
某画像編集ソフトで出来るテキストが液状に溶けだしたような加工を、クリスタでも同じように出来ないかと思ってつくったブラシ&オートアクション素材のセットです。
■ 収録素材
・オートアクション素材
・加工用ブラシ素材×2
・色変更用グラデーションセット(15種類収録)
※注意※
・本素材集はカラーイラスト向けに作られたものではありません。
必ず黒色または白色のどちらかで描かれた図形/テキストレイヤーを用意してください。
・白もしくは黒で描かれたものであっても、人物イラストや線の多い複雑な図形・模様などは上手く加工できない場合がございますので使用をおすすめしません。
◇ 使用方法
--------------------------------------------------------------
① 新規レイヤーを作成し、白または黒でお好みのテキストを打ち込んだり、図形を描きこみます。
※レイヤー表現色はモノクロをおすすめします。
カラー/グレーでも大きな問題はありませんが、後の工程で色を乗せる際、全体を縁取るようにバリのようなものが出てしまいますのでご注意ください。
② ①で作成したレイヤーを選択した状態で、
Liquid Melting Effectオートアクションの【下準備/first step】を再生します。
このとき、テキスト/図形が黒色の場合は【黒テキスト/図形用】のオートアクションを、
白色の場合は【白テキスト/図形用】のオートアクションを選択してください。
※ 【現在ラスタライズは実行できません。続行しますか?】というポップアップが出てくる場合もありますが、無視して【はい】をクリックして進めてください。
③ オートアクション再生後、赤色のパレットカラーが目印のレイヤーに
【melting brush #smooth】または【〃 #noise】を使用して、液状に溶けだしているようなイメージで色を伸ばしてください。
【melting brush #noise】は、少しザラザラとした質感が残るようになっています。
お好みの色伸ばし系ツールがあれば、そちらを使用しても問題ありません◎
④ ③で使用したレイヤーの上に、青いパレットカラーが目印のグラデーションマップレイヤーがあります。
このレイヤーで融解エフェクト部分に色を乗せますので、画像の黄色枠のアイコンをダブルクリックしてグラデーションマップウィンドウを開き、一覧からお好みのグラデーションを選択してください。
(あらかじめグラデーションセット素材【Liquid Melting Gradient】を読み込んでおく必要があります)
セット素材内に15種類のグラデーションを収録しています。
お手持ちのグラデ素材でもいろいろ試して楽しんでください◎
※③と④の作業は順番が逆でもOKです。
⑤ このままでレイヤーを結合すると黒/白い背景が残ったままなので、エフェクト部分だけを切り抜きます。
④で使用したグラデーションマップレイヤーの上の【melting effect】フォルダを選択した状態で、オートアクションの【仕上げ/finishing touches】を再生します。
⑥ 完成です!
背景色が透過されたのでイラストに重ねたり、テクスチャ画像を下に敷くなどして仕上げてください。
また、ノイズ効果をかけたり、ゆがみツールでエフェクト部分に動きを加えるのもおすすめです。
①~⑤までの作業レイヤーは残されますので、完成後にグラデーションを変えたくなったり、もう少しブラシで溶かしたくなった場合は最初からやり直す必要はありません。
Category 1 カテゴリ1


Other materials by 500㎖


Popular “Material catalog” materials


New materials


Badges
-
 MVP ◆This user has contributed greatly to the management of the community, by posting many great responses to the questions asked. Once every three months, MVPs are determined based on the points earned during that period and will be recognized accordingly.
 -
 New Valuable Player (NVP) ◆These are the next-best contributors to the community after MVPs. This is awarded to users who have not yet won an MVP award, based on the number of points they have earned.
 -
 Official Expert ◆Chosen out of all MVP awardees, who are already proof of excellence, this is a testimony of outstanding correspondence in the community. After careful screening, they are appointed by CELSYS and assume their position.Note: Formally called “Evangelists”
 -
 Official Moderator of CELSYS ◆Moderators are official CELSYS staff members who are fluent in Japanese as well as various other languages. Moderators are not experts on the software or illustration, so they are not able to directly answer your questions. However, moderators provide communication and language support to ensure that everyone can smoothly communicate with each other.
 -
 CELSYS official accountThe Official Administrator Account