

I made my own auto action that I often use.
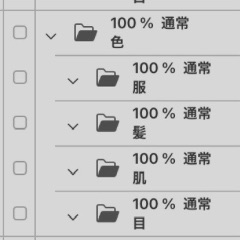

(1) Create color folder
[Color] folder creation, below it
→ [Clothes]
→ [Hair]
→ [Skin]
→ [Eye]
and create a folder.
The way to divide folders is your own way, but you can create ✨ troublesome folders in an instant.

(2) Creation of multiplication layer
Create a new layer above the selected layer.
Changed → [Clip by layer below] to [Multiply] mode.
This is done automatically.
When coloring, I layer the multiplication layer.
You can ♪ shorten the action of clipping and changing layer modes
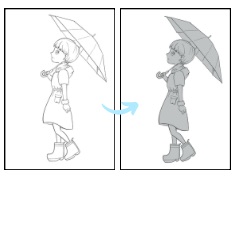
(3) Priming only the character ... Super recommended! 🤩
Create a layer with the character primed in gray.
As a preliminary preparation, leave the outside of the character with the range selected.

Then press Play auto action!

It's ✨ very easy to finish the priming.
* Supplement (what you are doing)
・ With the invert selected area ← character selected,
・new layer creation
・fill in gray
・Put the painted layer down
・ Cancel the selection
Like this!
We have picked up three auto action that I use often!
All of them are in my illustration production.
Because it's a movement that you do many times.
I've signed up and it's super time-saving 🤩
Give it ✨ a try
よく使うオートアクションを自作しました。
①色フォルダ作成
[色]のフォルダ作成、その下の階層に
→[服]
→[髪]
→[肌]
→[目]
とフォルダを作成します。
フォルダの分け方は自己流ですが、面倒なフォルダ作成が一瞬でできます✨
②乗算レイヤー作成
選択中のレイヤーの上に、新規レイヤーを作成。
[下のレイヤーでクリッピング]→[乗算]モードに変更。
ここまでを自動で行います。
色塗りをするときは乗算レイヤーを重ねていくので
クリッピングとレイヤーモードを変更する動作を短縮できます♪
③キャラのみ下塗り …超オススメ!🤩
キャラをグレーで下塗りしたレイヤーを作成します。
下準備として、キャラの外側を範囲選択した状態にしておきます。
あとはオートアクションの再生を押してください!
カンタンに下塗りが終わるからすごく楽ですよ✨
※補足(やってること)
・選択範囲を反転 ←キャラを選択した状態にして
・新規レイヤー作成
・グレーで塗りつぶし
・塗ったレイヤーを下にして
・選択範囲を解除
こんな感じです!
よく使うオートアクション3つをピックアップしました!
どれも自分のイラスト制作においては
何度もする動きなので
登録して超時短になっています🤩
ぜひお試しください✨


Popular “Auto Action” materials


New materials


Badges
-
 MVP ◆This user has contributed greatly to the management of the community, by posting many great responses to the questions asked. Once every three months, MVPs are determined based on the points earned during that period and will be recognized accordingly.
 -
 New Valuable Player (NVP) ◆These are the next-best contributors to the community after MVPs. This is awarded to users who have not yet won an MVP award, based on the number of points they have earned.
 -
 Official Expert ◆Chosen out of all MVP awardees, who are already proof of excellence, this is a testimony of outstanding correspondence in the community. After careful screening, they are appointed by CELSYS and assume their position.Note: Formally called “Evangelists”
 -
 Official Moderator of CELSYS ◆Moderators are official CELSYS staff members who are fluent in Japanese as well as various other languages. Moderators are not experts on the software or illustration, so they are not able to directly answer your questions. However, moderators provide communication and language support to ensure that everyone can smoothly communicate with each other.
 -
 CELSYS official accountThe Official Administrator Account