

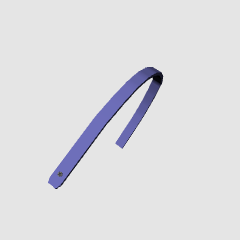
・ 6-Pattern Ribbon belt Brush
┗ Recommended vector layer
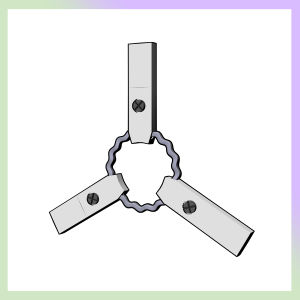
Ring 3D
┗ Off the effect of the light source in the initial state
・6パターンのリボン状ベルトブラシ
┗ベクターレイヤー推奨
・リングの3D
┗初期状態で光源の影響off

The 3D + belt part of the ring is drawn with a brush.

The part of the omission of the brush is recommended.
//////////////////////////////////////////

A combination of 3D and three-dimensional brushes
Choose a layout by placing 1.3 D.2. draw the brush vector layer . You can specify a color.3. tool property Line correction (simplification), control point (Move/width correction)

Four solid brushes
Can be used in anything. Please use it according to the orientation.

/////////////////////////////////////////
Combination of 3D and "belt part dark/pale Brush"

※ The brush is not a ring. The above sample is drawn from left to right.
Belt part dark/pale brush
Brushes are corrected to some degree, but it is better not to do it too slowly at the beginning of drawing.

///////////////////////////////////////
All 3D
For the bonus, Atari.
It is easier to use the brush above because this needs a knack for the adjustment.
Because the belt part puts a bone in rough, it is movable.


リング部分だけ3D + ベルト部分をブラシで描く。
ブラシの抜き部分は加筆おすすめ。
//////////////////////////////////////////
《3D》と《立体ブラシ》 の組み合わせ
1.3Dを配置してレイアウトを選ぶ。2.ブラシはベクターレイヤーに描く。色は指定できます。3.ツールプロパティの線修正(単純化)、 制御点(移動・幅修正)
立体ブラシ 4種類
なんにでも使えます。向きに合わせてお使いください。
/////////////////////////////////////////
《3D》と《ベルト部分 濃/淡ブラシ》 の組み合わせ
※ブラシは輪状にはなっていません。上のサンプルは左右に向かって別々に描いています。
ベルト部分 濃/淡 ブラシ
ブラシはある程度は補正されますが、描き始めはあまりゆっくりにしない方がきれいになります。
///////////////////////////////////////
All 3D
オマケ、アタリ用。
こちらは調整にコツが要るので、上記のブラシを使った方が簡単です。
ベルト部分はおおざっぱにボーンを入れているので可動。
.3D 3D

Brush ブラシ


Other materials by dpsbk


Popular “Material catalog” materials


New materials


Badges
-
 MVP ◆This user has contributed greatly to the management of the community, by posting many great responses to the questions asked. Once every three months, MVPs are determined based on the points earned during that period and will be recognized accordingly.
 -
 New Valuable Player (NVP) ◆These are the next-best contributors to the community after MVPs. This is awarded to users who have not yet won an MVP award, based on the number of points they have earned.
 -
 Official Expert ◆Chosen out of all MVP awardees, who are already proof of excellence, this is a testimony of outstanding correspondence in the community. After careful screening, they are appointed by CELSYS and assume their position.Note: Formally called “Evangelists”
 -
 Official Moderator of CELSYS ◆Moderators are official CELSYS staff members who are fluent in Japanese as well as various other languages. Moderators are not experts on the software or illustration, so they are not able to directly answer your questions. However, moderators provide communication and language support to ensure that everyone can smoothly communicate with each other.
 -
 CELSYS official accountThe Official Administrator Account