
A pen that adjusts to be a smooth line that does not tremble when it is just light force so as not to worsen the tendonitis anyway. とにかく腱鞘炎を悪化させないように、ひたすら軽い力でかいたときに、震えないなめらかな線になるように調整したペン。
If you draw long with a decent pressure, the tendonitis gets worse
Having chopsticks is also a pain in the toothbrush, so I can't hold it strong anymore.
Such as "pen for weak pressure" including myself
He taught me a nice pen, and I actually used it.
Only thin lines such as lint come out... It might be good for a person with a pressure of 0.
* Once you have reviewed the settings pen pressure detective level, there is also a thing to put neatly,
First of all, we recommend you to adjust!
→ The adjustment method was described at the bottom.
Monochrome resolution: Used for 600 ~ 1200dpi.
customize some settings and
Make it easy to use.

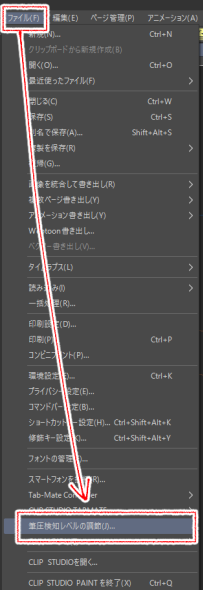
[Setting pen pressure detective level on the CLIP STUDIO side]
Even just doing this, you should be able to draw a line considerably easier!
However, it becomes a thick line at a dash when I put a force .
You might try writing a few times to find the settings you want.


↑ My settings of pen pressure example "for weak people"
For the extra pressure strong
If you do not put a strong force, setting that does not become brush size street.
You can draw thin lines even if you don't make the brush size too small! Should be!!

Adjust
What do you think? When it says...
1) is the resolution setting of the manuscript 600dpi (a common monochrome manuscript setting)?
→ The resolution dpi may be small and thicker rustling
2) to try,
Manuscript 600dpi
Set the CLIP STUDIO pen pressure detective level to the "weak for people"
Brush size 0.5
Try to draw in.
- Thin line : Tweak brush settings


- Thick lines : fiddling with pen pressure detective level settings

So that a wonderful line drawing life falls behind....
そこそこの筆圧で長時間描いていたら、腱鞘炎が悪化して
箸を持つのも、歯ブラシするの痛くてしんどい、もう、強く持てない・・・・
そんな、自分を含めた「筆圧弱太郎向けペン」
素敵なペンを教えてもらって、実際使ってみたが
糸くずのような細い線しか出てこない…という筆圧0の人にも良いかもしれない。
※一旦筆圧検知レベル設定を見直してみると、ちゃんとかけることもあるので、
まずは調整をおすすめします!!!
→調整方法を下部に記載しました。
モノクロ 解像度:600~1200dpi 用で使用中。
設定をいくつかカスタマイズして、
使いやすくしてやってください。

【クリスタ側の筆圧検知レベル設定】
これをするだけでも、だいぶ楽に線が引けるようになるはず!
ただ、ちょと力を入れると一気に太い線になるので、
何度か試し書きして自分にあった設定を見つけるとよいかと。


↑私の筆圧設定例『弱い人向け』
【番外編】筆圧強者の方向け
結構強めの力を入れないと、ブラシサイズ通りにならない設定。
これでブラシサイズを小さくしすぎなくても、細い線が描ける!はず!!

【 調整 】
なんか思った通りかけないぞ?というときは…
1)原稿の解像度設定は600dpi(よくあるモノクロ原稿設定)になっているか?
→解像度dpiが小さいと太くがさがさになる可能性あり
2)試しに、
・原稿600dpi
・クリスタの筆圧検知レベルの設定を上記の『弱い人向け』に設定
・ブラシサイズ0.5
で描いてみる。
→線が細い:ブラシの設定をいじってみる


→線が太い:筆圧検知レベルの設定をいじってみる

素敵な線画ライフがおくれますように…。


