Use of 3d materials for comics
You can only use CLIP STUDIO PAINT EX . If you are not an EX person, please refrain from purchasing.
There may be no unwanted lines or lines in the LT conversion. (The image is raster layer.) It cannot be vector layer. Please buy only a good one.
Please move gently because the material is heavy. I think it takes a little time to move the material to the canvas, especially.
(Laptop,corei3, I think to move at about64bit . (CLIP STUDIO PAINT EX Version1.10.12 producer))
The application may fall during the LT conversion. Be sure to save and use the illustrations in production.
Because I do not make the back, please use only the front.
How to use
① Large canvas (A4,600dpi , etc.) and drag the material to load and change the angle of the material. Basically use object rotation, camera zoom, move layer. The use of the mouse wheel takes a strong perspective.
Please uncheck the ② window → sub tool detail → light source → [apply light source], [shadow].
③ window → layer property → extract line (icon with two circles) → LT conversion. (Check the image below for the settings.) Be sure to raster layer. It takes about a minute. Close the other windows as much as possible and then find the LT conversion.
Change the border layer at the top of the newly created folder to the ④ layer from right-click to vector layer convert layer.
Use CTRL + CorCtrl + V to copy and paste the ⑤ material to the canvas you want to use each folder.
Select the ⑥ folder, click Zoom In, and then check the change vector width of the window → sub tool detail → transforming settings to shrink it. Note that if you shrink too much, you will not see the line. I put a check in a change vector width and am small to some extent by the reduction without putting a check.
Other
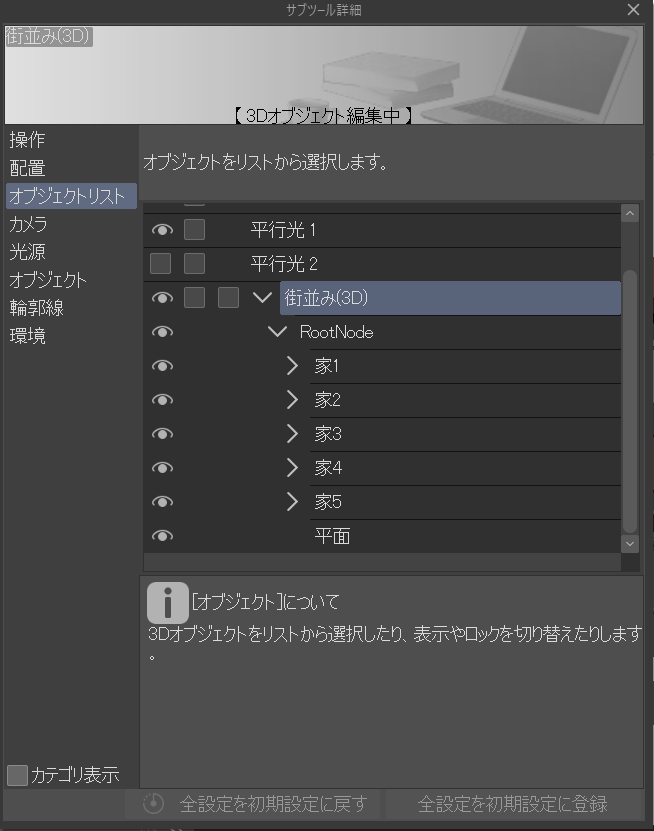
If your camera suffers from 3d , click the Object Eye icon to hide it from the window → sub tool detail → object list.

The house is divided by one, so you can move. (I think that clicking the part of the wall of object can move each house. )
You can also set it to Layout 2 .
Click the preset in the layout of the Window → tool property and choose the layout you like.
漫画用3D素材使用について
CLIP STUDIO PAINT EXを使用している方のみ使用することができます。EX以外の方はご購入をお控え下さい。
LT変換の際に不要な線が出たり、線がうまく出ないことがあります。(画像はラスターレイヤーです。)ベクターレイヤーではできません。それでもいい方のみご購入下さい。
素材は重いので優しく動かしてあげて下さい。特に素材をキャンバスへ移動する時に少し時間がかかると思います。
(ノートパソコン、corei3、64bit程度で動くと思います。(CLIP STUDIO PAINT EX Version1.10.12製作者使用))
LT変換の際にアプリケーションが落ちる可能性があります。必ず製作中のイラストは保存してからご使用ください。
背面は作っておりませんので、前面のみお使い下さい。
ご使用手順
①サイズの大きいキャンバス(A4、600dpiなど)を用意して素材をドラッグして読み込み、素材の角度を変えます。基本的にオブジェクトの回転、カメラのズーム、レイヤー移動を使用してください。マウスのホイールを使用するとパースが強くかかります。
②ウィンドウ→サブツール詳細→光源→【光源の影響を受ける】、【影】の両方のチェックを外して下さい。
③ウィンドウ→レイヤープロパティ→ライン抽出(丸が二つ重なってるアイコン)→LT変換します。(設定は下の画像を確認して下さい。必ずラスターレイヤーにしてください。)一分ほど時間がかかります。できるだけ他のウィンドウを閉じてからLT変換をして下さい。
④レイヤーに新しくできたフォルダーの一番上の輪郭線レイヤーを右クリック→レイヤーの変換からベクターレイヤーに変更してください。
⑤素材をフォルダーごと使いたいキャンバスにCtrl+C、Ctrl+Vでコピペします。
⑥フォルダーを選択し、拡大、縮小をクリック、ウィンドウ→サブツール詳細→変形設定のベクターの太さを変更にチェックを入れて縮小します。(あまり縮小しすぎると線が見えなくなるので注意してください。ベクターの太さを変更にチェックを入れて少し縮小→チェックを入れずに縮小である程度小さくなります)
その他
カメラが3Dに被る場合は、ウィンドウ→サブツール詳細→オブジェクトリストからカメラに被るオブジェクトの目のアイコンをクリックして非表示にしてください。

家が一つずつ分かれているので移動することができます。(オブジェクトの壁の部分をクリックすると家ごと移動できると思います。)
レイアウト2にも設定できます。
ウィンドウ→ツールプロパティのレイアウトのプリセットをクリックしてお好きなレイアウトをお選びください。


