

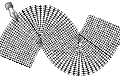
Dot pattern and brush material. ドットパターンとブラシの素材。
It is the dot image material that seems to be usable for a live background.

Flush first Use reversed

Second use (overlay)
Example of how to use 100 × 100
Prepare the painting you want to process and paste the image material (100 × 100) and then fixed aspect scale to the desired size.


↑ Set to 15
Next, I process the painting which I want to process with filter → effect → mosaic.
Block size the same number as the magnification factor.

Fine-tune the image material position to fit the block.

The mosaic image of the dot pattern was completed.
You can make an image that looks like a lightning bulletin board by processing the image that the character is written in a bright color on the black background.

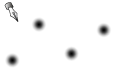
Brush

The guy who brushed the image material.
I made it because I thought that the brush was easier if it was a simple graffiti.
Shift key to use a straight line and ruler is beautiful.

All brushes except Geara 4 are sub color color compatible.
If you want to use a single color sub color select.
Because I made it for myself completely, making is sweet. Please try using it when it is likely to use.
ライブ背景などに使えそうなドット画像素材です。
どっと1つめ反転使用
どっと2つめ使用(オーバーレイ)
▼どっと100×100の使い方例
加工したい絵を用意し、画像素材(どっと100×100)を貼り付けた後、縦横比固定で好きな大きさに拡大縮小します。
↑15に設定しました
次に、加工したい絵をフィルター→効果→モザイクで加工します。
ブロックサイズは拡大率と同じ数字にします。
ブロックにぴったり合うように画像素材の位置を微調整します。
ドット柄のモザイク画像が完成しました。
黒地に明るい色で文字が書いてある画像をこれで加工すると電光掲示板っぽい画像が作れます。
▼ブラシ
画像素材をブラシにしちゃったやつ。
簡単な落書きならブラシの方が楽かと思って作りました。
shiftキーで直線にしたり定規を使ったりすると綺麗です。
ギラ4を除いたすべてのブラシがサブカラー色対応しています。
単色で使いたい場合はサブカラー選択状態で使ってください。
完全に自分用として作ったので作りが甘いです。使えそうだったら使ってみてください。
image material 画像素材


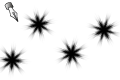
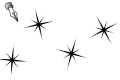
Dot brushes ドットブラシ


Gilabrasi ギラブラシ


Other materials by 107sozai


Popular “Material catalog” materials


New materials


Badges
-
 MVP ◆This user has contributed greatly to the management of the community, by posting many great responses to the questions asked. Once every three months, MVPs are determined based on the points earned during that period and will be recognized accordingly.
 -
 New Valuable Player (NVP) ◆These are the next-best contributors to the community after MVPs. This is awarded to users who have not yet won an MVP award, based on the number of points they have earned.
 -
 Official Expert ◆Chosen out of all MVP awardees, who are already proof of excellence, this is a testimony of outstanding correspondence in the community. After careful screening, they are appointed by CELSYS and assume their position.Note: Formally called “Evangelists”
 -
 Official Moderator of CELSYS ◆Moderators are official CELSYS staff members who are fluent in Japanese as well as various other languages. Moderators are not experts on the software or illustration, so they are not able to directly answer your questions. However, moderators provide communication and language support to ensure that everyone can smoothly communicate with each other.
 -
 CELSYS official accountThe Official Administrator Account