

一套刷子,用於製作各種類型和癒合程度的詳細、逼真的瘀傷,包括手術后瘀傷。 A set of brushes for making detailed, realistic bruises of all types and levels of healing, including post-surgical bruising.
這些是一套畫筆,適用於想要繪製瘀傷但關心正確瘀傷的表觀年齡、形狀完全正確或需要描繪手術后瘀傷的人。
有一個免費版本 ,它有基本的多合一瘀傷刷,適用於淺色皮膚和深色皮膚。它們比這些更容易使用,並且可能適用於幾乎所有事情。 該材料的編號為: 2077682
關於深色皮膚描述的說明:我個人的皮膚非常淺,我無法找到比中等膚色的非裔美國人更黑的人的參考資料。因此,如果您將這些用於非常非常深的膚色,您可能需要對混合模式進行一些調整。
此外,雖然死去的血液在人類身上是相同的顏色,無論它背後有多少色素,但我很難找到一種方法讓這些血在淺色和深色皮膚上看起來都很逼真。 我發現的深色皮膚的最佳解決方案是將它們放在設置為硬光混合模式的圖層上,然後降低不透明度 ,直到看起來正確為止。我盡了最大努力讓它們適用於所有膚色,但免費包有一個專門針對深色皮膚的人的刷子,您可能會發現它更容易使用。
最後,這些是針對人類瘀傷的,如果你需要畫瘀傷的外星人,你就靠自己了。😂
如何使用它們:
這些畫筆應在它們自己的圖層上使用 ,然後在必要時合併。這是因為他們使用暗淡混合模式來獲得正確的瘀傷紋理,但如果圖層上已經有東西,它看起來會很奇怪。此外,對於深色皮膚,您需要經常處理不透明度。
像往常一樣,我的畫筆, 傾斜控制大小。這意味著,例如,你可以用非常柔和的扁平筆觸來建立黃色的瘀傷邊緣,用紫色的瘀傷肉,然後用紅色添加一些更深的創傷區域。 如果完全直立使用,組合刷看起來有點奇怪, 所以盡量傾斜使用它,直到你習慣它。 對於紅色和紫色的點畫筆,傾斜度不會影響單個點的大小,只會影響它們的分佈程度,因此,如果您想要不同大小的狗,則需要更改整體畫筆大小。
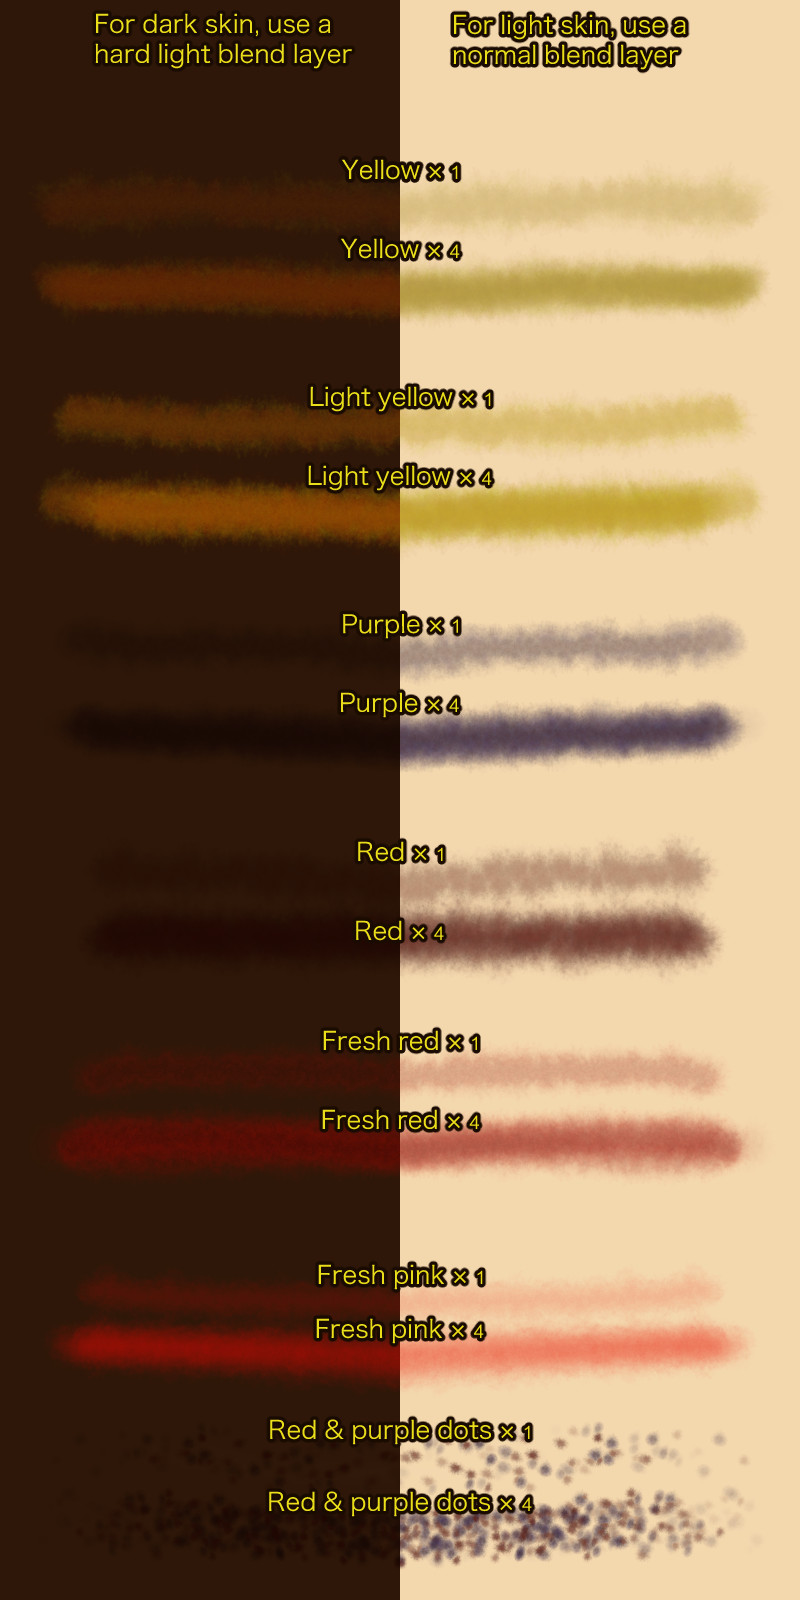
此包中總共包含九把刷子:六把基本瘀傷色刷和三把附加刷子。六種顏色:
1.發黃的瘀傷。這就是瘀傷邊緣通常的樣子,血液已經開始分解。
2.淡黃色瘀傷。 如果您想描繪淺膚色人群的術后瘀傷,這就是您需要的。那些瘀傷幾乎是螢光黃色的,我還沒有看到包含它的刷子套裝。所以就在這裡!
3.紫色瘀傷。這是人們在想到瘀傷時想到的顏色,但它本身看起來真的很奇怪。您需要至少使用一些其他顏色。
4.暗紅色瘀傷。這是剛剛開始顯現的瘀傷的顏色。還有地毯燒傷和其他此類磨損和吸力傷害。
5.新鮮紅色瘀傷。這是淺色調皮膚的顏色,因被擊打而變紅,就像有人被打了一巴掌一樣。它也可以用於較暗的色調,但您需要降低不透明度。
6.新鮮的粉紅色瘀傷。這是被輕輕打過的極淺膚色的人的顏色,或者是被狠狠打過一巴掌的邊緣區域。在較深的膚色上看起來很奇怪,但也許你會發現我沒有的混合模式秘密。
另外三個刷子是:
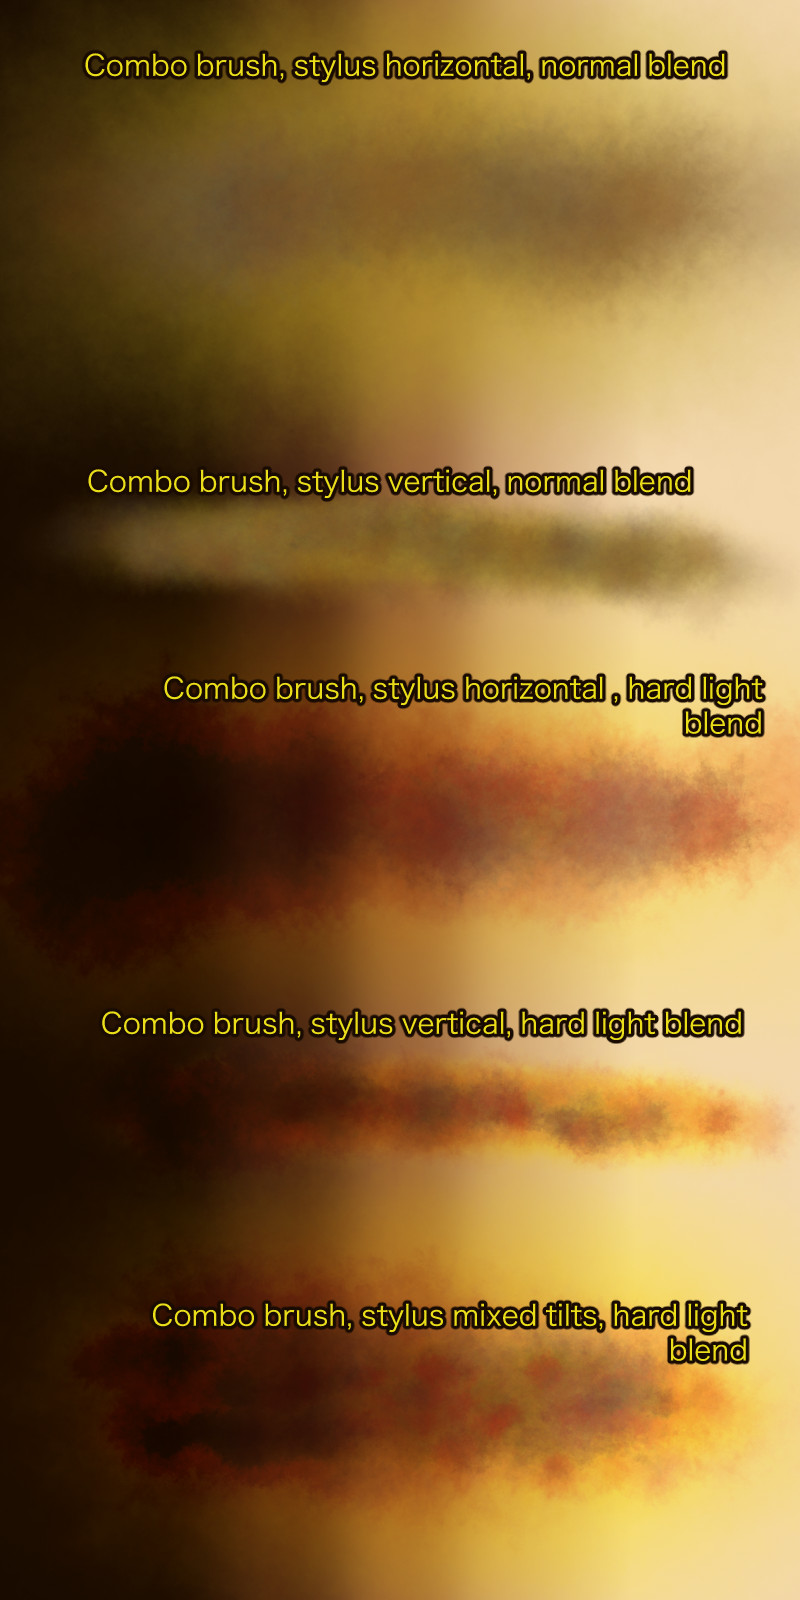
1.組合畫筆:這使用CSP的雙畫筆功能,一次性繪製整個瘀傷。在某些情況下,它比免費畫筆效果更好,但它需要非常輕的手,而且看起來很奇怪。
2.紫色和粉紅色的圓點。在皮膚非常淺的人身上,被困在毛囊底部的血液會導致這種斑駁效果。它也可以用來為深色皮膚的人的瘀傷提供更多的質感。
3.黃光攪拌機。這把刷子在這裡,以防你有點瘀傷,只是有點太鋒利了,但你不想重做整個事情。如果你用得太多,它看起來超級奇怪和假,但小劑量它可以説明解決問題。儘管有這個名字,但這個顏色會用你選擇的主色非常輕微地著色,所以你在使用它之前需要選擇一種合適的顏色。
每個尖端的顏色都是固定的,每個尖端都是獨一無二的。
這有助於瘀傷感覺更真實,因為重複次數更少,這意味著您無需擔心使用什麼顏色。(除非你畫的是一個外星人👽,然後我幫不了你。以下是您可能想要用來疊加逼真瘀傷的畫筆:六色畫筆和圓點畫筆。

這是在各種膚色上使用兩種混合模式演示的組合畫筆。

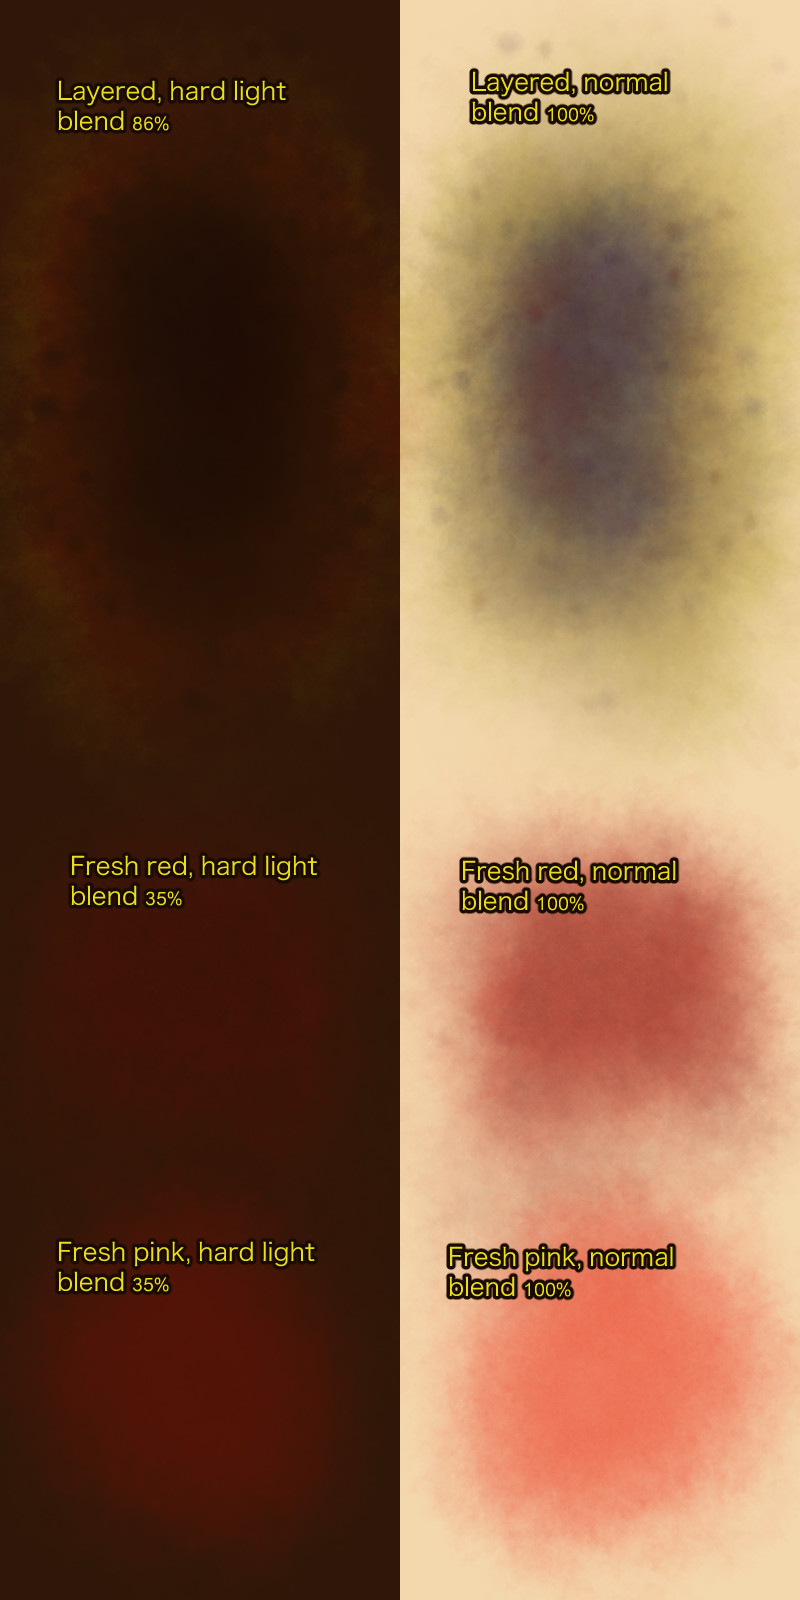
在這裡,我將演示如何降低不透明度。兩側是彼此的鏡像,只是背景膚色和圖層混合設置不同。

我希望這能説明你畫出逼真的瘀傷,減少壓力!
These are a set of brushes intended for people who want to paint bruises but care about getting the apparent age of the bruises right, getting the shape exactly right, or who need to depict post-surgical bruising.
There is a free version which has basic all-in-one bruise brushes for light skin and dark skin. They are much easier to use than these, and are probably fine for almost everything. The number for that material is: 2077682
A note about the dark skinned depictions: I personally have incredibly light-colored skin, and I wasn't able to find references for anyone darker than a mid-toned African-American person. So if you are using these for a very very dark skin tone, you might need to make some adjustments to the blending modes.
Also, although dead blood is the same color on humans no matter how much pigment is behind it, I had some trouble finding a way to make these look realistic on both light and dark skin. The best solution I found for dark skin is to put them on a layer that's set to Hard Light blending mode, and then decrease the opacity until it looks right. I did my best to make them work for all skin tones, but the free pack has a brush that is specifically for dark skinned people that you might find easier to use.
Lastly, these are for human bruises, if you need to paint aliens who are bruised, you're on your own. 😂
How to use them:
These brushes should be used on their own layer and then merged down if necessary. This is because they use the Darken blending mode to get the right texture for bruises, but if there's something already on the layer, it'll look really weird. Also, for dark skin, you'll need to mess around with opacity a lot.
As is usual for my brushes, tilt controls size. This means you can, for example, build up the yellow bruise edges with very soft flat strokes, get the meat of the bruising in with the purple, and then add some areas of deeper trauma with the red. The combo brush looks a little weird if used fully upright, so try to use it at a tilt until you get used to it. For the red & purple dots brush, tilt does not affect the size of the individual dots, only how spread out they are, so you'll need to change the overall brush size if you want a different size of dog.
There are nine brushes included in this pack in total: six basic bruise colof brushes and three additional brushes. The six colors:
1. Yellowed bruising. This is what the edges of bruises usually look like, where the blood has started to break down.
2. Light yellow bruising. This is what you need if you want to depict post-surgical bruising on light-skinned people. Those bruises are almost fluorescent yellow, and I haven't seen a brush set that includes that. So here it is!
3. Purple bruising. This is the color people think of when they think of bruises, but it looks really weird by itself. You'll want to use at least a little of the other colors with it.
4. Dull red bruising. This is the color of bruises that have just started to show. Also rug burns and other such abrasion and suction injuries.
5. Fresh red bruising. This is the color of light-toned skin that's reddened from being struck, like if someone has been slapped. It can be used on darker tones too but you'll want to crank down the opacity.
6. Fresh pink bruising. This is the color of extremely light-skinned people who have been lightly slapped, or the area around the edges of a harder slap. Looks pretty weird on darker skin tones but maybe you'll find a blending mode secret I didn't.
The three additional brushes are:
1. Combo brush: this uses CSP's dual brush feature to paint an entire bruise at one go. For some situations it works better than the free brushes, but it needs a very light hand and can look bizarre really fast.
2. Purple & pink dots. On very light-skinned people, the blood that gets trapped in the bottom of hair follicles causes this mottled effect. It can also be used to get a bit more texture into bruises on dark-skinned people.
3. Yellow light blender. This brush is here in case you get a bit of bruise that's just a little too sharp-edged but you don't want to redo the whole thing. It looks super weird and fake if you use it too much, but in small doses it can help fix things. This one tints things very lightly with your selected main color despite the name, so you'll want to select an appropriate color before you use it.
The colors of each of them are fixed, and each tip is unique. This helps the bruise feel a little more real, because there's less repetition, and means you don't need to worry as much about what color to use. (Unless you're painting an alien 👽, and then I can't help you.)
Here are the brushes that you might want to use to layer up a realistic bruise: the six color brushes and the dots brush.
Here is the combo brush demonstrated with both blend modes on a range of skin tones.
Here I'm demonstrating how you might want to decrease the opacity. The sides are mirror images of each other, just with a different background skin tone and layer blend settings.
I hope this helps you paint realistic bruises with less stress!
基本瘀傷顏色 Basic bruise colors


附加效果 Additional effects


「kalany」的其他素材


「素材集」的人氣素材


最新素材


徽章
-
 MVP ◆針對問題投稿了眾多適切的回答,對社群有顯著貢獻的用戶。每3個月一次,會依據期間內獲得的點數選出MVP用戶,並進行表揚。
 -
 NVP(New Valuable Player) ◆繼MVP後,對社群營運做出良好貢獻的用戶。將從不曾獲選為MVP的用戶中,依據獲得的點數進行評選、表揚。
 -
 官方推廣大使 ◆從被證明為優良回答用戶的MVP獲獎者中選出社群中最優異的回答者。並經審查後由本社委託就任。※舊名稱為「Evangelist」
 -
 CELSYS公認Moderator ◆Moderator為會使用日文及其他語言的CELSYS公認工作人員。由於並非軟體或創作的專業人士,Moderator無法直接為用戶解決疑問,但能在語言、交流方面提供支援,幫助用戶們順利地進行溝通。
 -
 CELSYS官方為與營運相關的官方帳號。