

嗨嗨,我在這裡有一個自動操作,可以將您的透明圖像(或一般圖像 tbh)變成補丁樣式的圖像! Hi hi, I'm here with an auto-action that will make your transparent image (or image in general tbh) into a patch-styled one!
請注意,預設解析度為 300dpi :)
>如何:
1.

選擇影像層次(如果您希望面片遵循形狀,請確保影像位於透明背景上)
2. 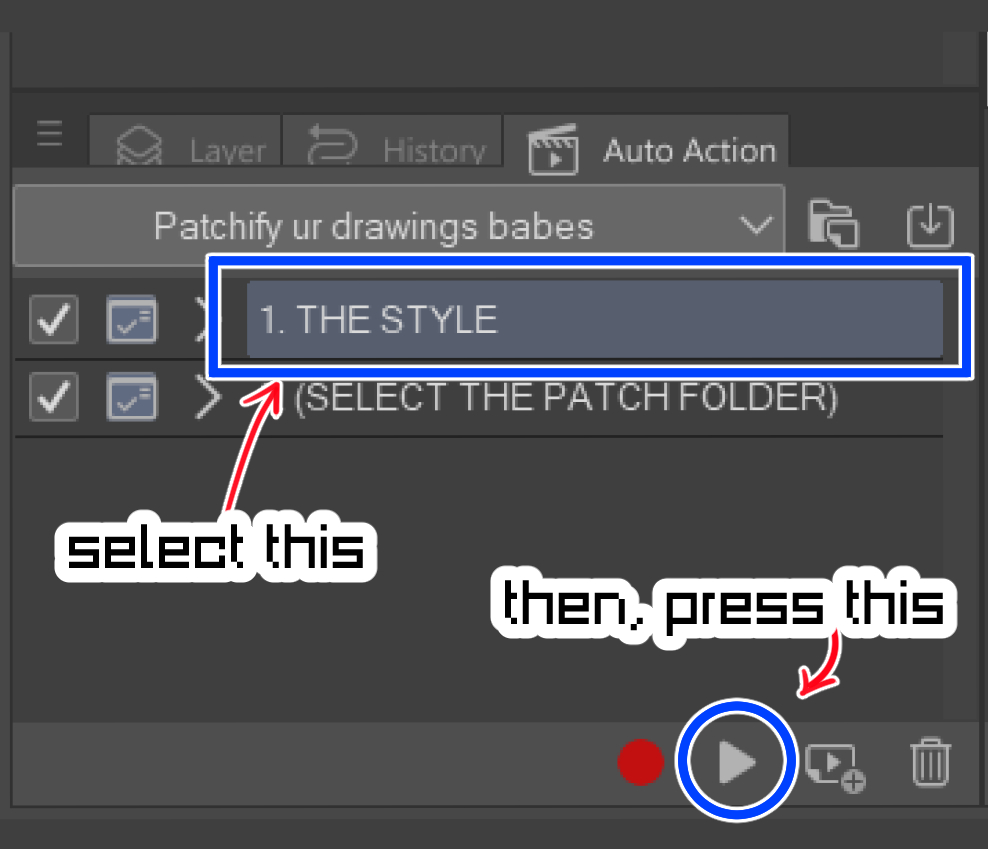

應用 [1.THE STYLE] 自動操作
3.

根據需要調整線條和顏色設定 。(這將決定你的補丁看起來有多淩亂/乾淨)
4.

您可以在圖層屬性效果上調整補丁外側的邊框,更改顏色或粗細等。
5. 

為了獲得額外的效果,請選擇 [THE PATCH] 資料夾,然後應用 [2.(選擇補丁資料夾)]自動操作
6.

這是一個補丁!!:D
Please note the default resolution is 300dpi :)
>How to:
1.
Select your image layer (if you'd like the patch to follow the shape, make sure the image is on a transparent background)
2.
Apply the [1. THE STYLE] auto-action
3.
Adjust the line and color setting as you'd like! (this will determine how messy/clean your patch looked like)
4.
You may adjust the border of the outer side of the patch on the layer property effect, changing the color or thickness etc.
5.
For extra effect, select the [THE PATCH] folder, and apply the [2. (SELECT THE PATCH FOLDER)] auto-action
6.
It's a patch!! :D


「sdfjmeng」的其他素材


「自動動作」的人氣素材


最新素材


徽章
-
 MVP ◆針對問題投稿了眾多適切的回答,對社群有顯著貢獻的用戶。每3個月一次,會依據期間內獲得的點數選出MVP用戶,並進行表揚。
 -
 NVP(New Valuable Player) ◆繼MVP後,對社群營運做出良好貢獻的用戶。將從不曾獲選為MVP的用戶中,依據獲得的點數進行評選、表揚。
 -
 官方推廣大使 ◆從被證明為優良回答用戶的MVP獲獎者中選出社群中最優異的回答者。並經審查後由本社委託就任。※舊名稱為「Evangelist」
 -
 CELSYS公認Moderator ◆Moderator為會使用日文及其他語言的CELSYS公認工作人員。由於並非軟體或創作的專業人士,Moderator無法直接為用戶解決疑問,但能在語言、交流方面提供支援,幫助用戶們順利地進行溝通。
 -
 CELSYS官方為與營運相關的官方帳號。