
엘리스 아티스트 마커 (버전 1.0) (Elise Artist Marker (Version 1.0)) Elise Artist Marker (Version 1.0)
콘텐츠 ID:2247296
-
9,377

아날로그 전통 매체 품질을 가진 아티스트 마커 세트. 엘리스가 만들었어. Artist marker set that has an analogue traditional media quality. Made by Elise.
아티스트 마커 펜 세트 (이전 버전 1.0)

저는 종이에 아티스트 마커로 그림을 그리는 느낌을 재현할 수 있는 사용하기 쉬운 붓을 원했어요!
그 외관은 마른 마커와 알코올 잉크 펜 사이 어딘가에 있습니다.

== 붓 종류 ==

1. 아티스트 마커: 원조 마커펜!
2. 하이라이트 마커: 불투명한 마커펜 버전이에요. 이 펜은 흰색이나 연한 색을 표현하는 데 좋습니다.
3. 블렌더: 부드럽지만 질감이 있는 느낌을 주는 블렌더 펜입니다.
4. 지우개: 마커와 잘 어울리는 텍스처 지우개입니다.
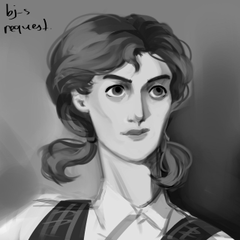
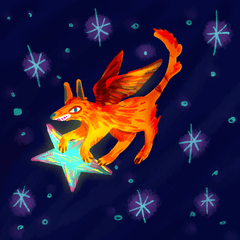
== 타임랩스 예시 ==

이 예시 이미지는 전부 이 아티스트 마커 세트로 색칠되었습니다!
* 그 아래에 베이스 페이퍼 레이어가 있습니다.
* 저는 작품을 하나의 투명 레이어 위에 올려 일러스트를 그렸습니다.
* 진짜 마커로 그리듯 색을 쌓았어. 마지막에 하이라이트 마커로 몇 가지 디테일을 추가했어요!
== 텍스처 설정 ==
600dpi 고해상도 디지털 아트용으로 설계되었습니다. (약 4000px 캔버스)
작거나 큰 캔버스를 사용한다면 텍스처 크기를 조절해야 할 수도 있습니다!
텍스처가 아래 중앙 사각형처럼 잘 균형 잡혀 보일 거예요!
필요하다면 브러시가 아름답게 느껴질 때까지 텍스처 크기를 조절해 주세요. ^^

번역을 위해:
맨 위 줄에 "텍스처 밀도"라고 적혀 있고 40으로 설정되어 있습니다. (이 숫자는 변경할 필요가 없습니다.)
두 번째 줄의 텍스트에는 "스케일 비율"이라고 적혀 있습니다. 텍스처 크기를 바꾸기 위해 조정해야 할 숫자가 바로 이 숫자입니다!
이 설정은 "도구 속성" 메뉴에서 찾을 수 있습니다.
.: 감사합니다 :.
- 엘리스 -
여기에 나오는 모든 자료, 일러스트, 캐릭터는 모두 제가 직접 창작한 것입니다.
[참고] 저는 자주 온라인에 있지 않아 댓글을 읽을 수 없습니다. 도움이 필요하다면 공식 튜토리얼과 포럼을 확인하거나 Clip Studio 지원팀에 연락하세요. 이해해 주셔서 감사합니다!
여기에 나오는 모든 자료, 일러스트, 캐릭터는 모두 제가 직접 창작한 것입니다.
[참고] 저는 자주 온라인에 있지 않아 댓글을 읽을 수 없습니다. 도움이 필요하다면 공식 튜토리얼과 포럼을 확인하거나 Clip Studio 지원팀에 연락하세요. 이해해 주셔서 감사합니다!
Artist marker pen set (previous version 1.0)
I wanted an easy-to-use brush that would mimic the feeling of drawing with an artist marker on paper!
Its appearance is somewhere between a dry marker and an alcohol ink pen.
== Brush Types ==
1. Artist Marker: The original marker pen!
2. Highlight Marker: An opaque version of the marker pen. This pen is good for illustrating white or pale colors.
3. Blender: A blender pen that mixes colors for a smooth but still textured look.
4. Eraser: A textured eraser that works well with the markers.
== Timelapse Example ==
This example image is colored entirely using this artist marker set!
* There is a base paper layer underneath.
* I illustrated the artwork in a single transparent layer overtop.
* I built up the colors as if drawing with a real marker. I used the highlight marker to add a few details at the end!
== Texture Settings ==
Designed for 600dpi high resolution digital art. (Approximately 4000px canvas.)
If you use a smaller or larger canvas, you may need to adjust the texture size!
Your texture should look nicely balanced like the center square below!
If needed, please adjust the texture size until the brush is beautiful. ^^
For translation:
The top line of text says "texture density" and is set to 40. (You do not need to change this number.)
The second line of text says "scale ratio." This is the number you want to adjust to change the texture size!
You can find this setting in the "tool property" menu.
.: Thank You :.
- Elise -
All materials, illustrations, and characters shown here are my own original creations.
【Note】 I am not online often and cannot read comments. If you need help: check official tutorials and forums, or contact Clip Studio support team. Thank you for understanding!
All materials, illustrations, and characters shown here are my own original creations.
【Note】 I am not online often and cannot read comments. If you need help: check official tutorials and forums, or contact Clip Studio support team. Thank you for understanding!
아티스트 마커 Artist Markers


'mh.elise'님의 다른 소재


'소재집'의 인기 소재


신규 소재


배지
-
 MVP ◆질문에 적절한 답변을 많이 게시하고 커뮤니티 운영에 크게 공헌한 사용자입니다. MVP는 3개월에 한 번, 그 사이에 획득한 포인트를 바탕으로 결정하고 표창을 실시하고 있습니다.
 -
 NVP(New Valuable Player) ◆MVP 다음으로 커뮤니티 운영에 공헌한 사용자입니다. 이제까지 MVP 수상 경험이 없는 분 중에서 획득한 포인트를 바탕으로 결정하여 표창을 실시하고 있습니다.
 -
 공식 엑스퍼트 ◆뛰어난 응답자의 증표인 MVP수상자 중에서 선택된 커뮤니티에서 가장 뛰어난 응답자의 증표입니다. 심사를 거쳐서 저희 회사에서 의뢰할 경우 취임되십니다.※ 옛 명칭 '에반젤리스트'
 -
 셀시스 공인 모더레이터 ◆모더레이터는 일본어와 기타 언어로 말할 수 있는 셀시스 공인 스태프입니다. 소프트웨어나 창작 전문가가 아니므로 직접 의문을 해결할 수는 없지만 여러분이 순조롭게 소통할 수 있도록 언어나 커뮤니케이션 측면에서 지원합니다.
 -
 셀시스 공식운영에 관련된 공식 계정입니다.