

사용자 정의 창 그리드를 만드는 자동 작업. Auto action to create a customized grid of windows.
도시 스카이라인의 창을 많이 그리는 것이 귀찮기 때문에 이 도구를 만들었습니다. 사용자 정의 그리드를 만듭니다. 선이 약간 기울어질 수 있으므로 멀리 있는 건물에 가장 적합합니다.


비디오:

자세한 지침:
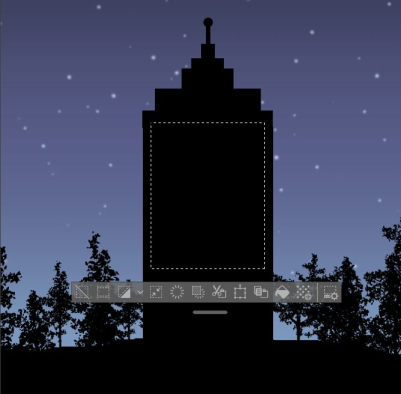
0.) 자동 액션을 시작하기 전에 창으로 채울 영역을 선택하십시오.

- 새 레이어가 생성되므로 현재 레이어가 엉망이 될까 봐 걱정할 필요가 없습니다.
- (!) 선택하지 않으면 효과가 전체 캔버스에 나타납니다. 컴퓨터가 좋아하지 않을 수도 있습니다.
1.) 자동 액션을 시작합니다.
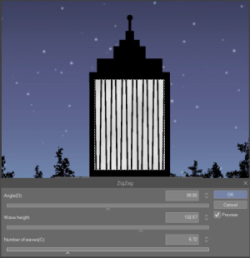
수직 분할 수를 선택합니다.


- 지그재그 프롬프트(왼쪽):
- 파도 높이 = 초기 선 두께.
- 파동 수 = 라인 수.
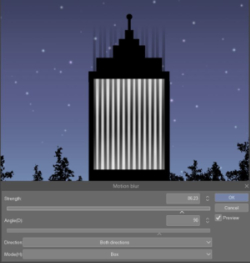
- 모션 블러 프롬프트(오른쪽): 선을 매끄럽게 하고 곧게 펴줍니다. 일반적으로 아무것도 변경할 필요가 없지만 만일을 대비하여 옵션이 나타납니다.
- 선이 너무 희미해지거나 컴퓨터 성능이 걱정되는 경우 강도를 낮추십시오.
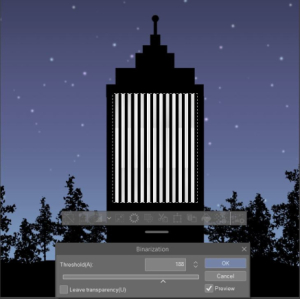
2.) 선을 불투명하게 만듭니다.

- 이중화 프롬프트: 모든 선이 검은색이 될 때까지 강도를 변경합니다.
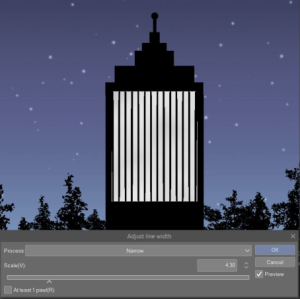
3.) 최종 선 너비를 선택합니다.

- 선 너비 조정 프롬프트: 기본 설정은 가늘지만 원하는 경우 대신 선을 굵게 할 수 있습니다..
4.) 수평 분할에 대해 프롬프트가 다시 나타나면 다시 응답합니다.

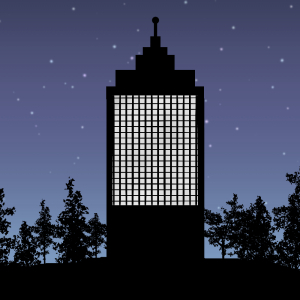
5.) 창문을 즐기세요!

참고:
- 윤곽선의 경우 레이어 속성 -> 테두리 효과 -> 효과 범위: 마스크 이미지를 활성화합니다.
- 마지막에 격자는 레이어 마스크가 됩니다. 대신 그리드를 두 개의 개별 레이어로 유지하려면 최종 모션 블러 이후의 모든 단계를 끕니다.
It's annoying to draw a lot of windows for city skylines, so I made this tool. It creates a customized grid. The lines can be a little slanted, so it's best suited for buildings that are farther away.
Video:
Detailed Instructions:
0.) Before starting the auto action, select an area to fill with windows.
- A new layer will be created, so you don't have to worry about messing up your current layer.
- (!) If you don't make a selection, the effects will appear over the entire canvas. Your computer might not like that.
1.) Start the auto action.
Choose the number of vertical divisions.
- Zigzag prompt (left):
- Wave height = initial line thickness.
- Number of waves = how many lines.
- Motion Blur prompt (right): smooths and straightens lines. You usually don't have to change anything, but the option appears just in case:
- Lower the intensity if the lines become too faint or if you are concerned about computer performance.
2.) Make lines opaque.
- Binarization prompt: change intensity until all lines are black.
3.) Choose the final line width.
- Adjust Line Width prompt: the default setting is thin, but if you want you can thicken the lines instead..
4.) Answer prompts again when they reappear for horizontal divisions.
5.) Enjoy your windows!
Notes:
- For outlines, enable Layer Property -> Border Effect -> Effect Range: Mask Image.
- At the end, the grid becomes a layer mask. If you want to keep the grid as two separate layers instead, turn off all steps after the final motion blur.


'wheatris'님의 다른 소재


'오토 액션'의 인기 소재


신규 소재


배지
-
 MVP ◆질문에 적절한 답변을 많이 게시하고 커뮤니티 운영에 크게 공헌한 사용자입니다. MVP는 3개월에 한 번, 그 사이에 획득한 포인트를 바탕으로 결정하고 표창을 실시하고 있습니다.
 -
 NVP(New Valuable Player) ◆MVP 다음으로 커뮤니티 운영에 공헌한 사용자입니다. 이제까지 MVP 수상 경험이 없는 분 중에서 획득한 포인트를 바탕으로 결정하여 표창을 실시하고 있습니다.
 -
 공식 엑스퍼트 ◆뛰어난 응답자의 증표인 MVP수상자 중에서 선택된 커뮤니티에서 가장 뛰어난 응답자의 증표입니다. 심사를 거쳐서 저희 회사에서 의뢰할 경우 취임되십니다.※ 옛 명칭 '에반젤리스트'
 -
 셀시스 공인 모더레이터 ◆모더레이터는 일본어와 기타 언어로 말할 수 있는 셀시스 공인 스태프입니다. 소프트웨어나 창작 전문가가 아니므로 직접 의문을 해결할 수는 없지만 여러분이 순조롭게 소통할 수 있도록 언어나 커뮤니케이션 측면에서 지원합니다.
 -
 셀시스 공식운영에 관련된 공식 계정입니다.