

Annomicon 프로젝트의 페이지 내에 그려진 많은 생물과 아이템에 사용된 거의 모든 렌더링에 사용하는 Essential 브러시의 총합입니다. A total of the Essential brushes I use for nearly every single one of the renderings used in the many creatures and items painted within the pages of the Annomicon project.

안녕하세요, Annomicon 프로젝트에서 사용된 필수 브러시 모음입니다.
이 브러시는 거의 모든 렌더링에 사용됩니다.
각 브러시에는 Shape -> Opacity -> Hue -> Tilt -> (목적/참고)의 공식에 따라 쉽게 선택할 수 있도록 키워드가 표시되어 있습니다.
이들 중 하나가 없다는 것은 단순히 해당 기능이 해당 브러시에 포함되어 있지 않다는 것을 의미합니다.
전설:
Shape 셰이프 - 라운드/플랫 브러시 또는 기타 모양입니다.
Opacity 오파시티 - 오파시티가 활성화됩니다.
색조 - 이 브러시는 보다 역동적인 색상 범위를 위해 약간의 색조 변화가 있습니다 .
기울기 - 기울기는 스타일러스 펜을 사용할 때 브러시에 영향을 줍니다.
워시 - 색상의 아트웍을 유약으로 칠하는 데 쉽게 사용할 수 있습니다.
브러쉬 :웻워시 - 수채화

사용법:
이것은 아트웍 위에 유약을 바르기 위해 설계된 젖은 브러시입니다. 기본 수채화 브러시와 달리 사용자 정의 브러시 팁을 사용하지 않습니다. 대신, 기본 수채화 도구에서 자주 발견되는 큰 지연 없이 '모양'느낌을 주기 위해 세심하게 미세 조정되었습니다. 그림자, 색조 변화 및 주변 조명을 추가하거나 조명 구조를 변경하는 데 적극 권장됩니다.
'하드 라이트' / '노멀' 레이어에 사용하는 것이 좋습니다.

위의 예는 60% 불투명도 하드 라이트 레이어를 사용하여 고룡의 머리 모양에 더 풍부한 깊이를 만들기 위해 주변 조명의 색조 변화를 보여줍니다.
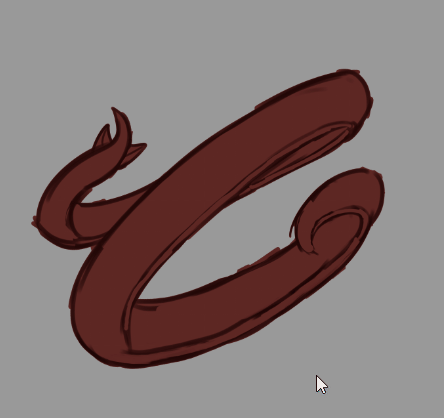
고대의 펜

사용법:
약간 묽고 묽은 느낌이 드는 기발한 펜. 스타일라이즈한 라인 아트와 책이나 일러스트레이션을 위해 종이에 스케치하는 데 적합합니다. '마녀 모자 아틀리에', '메이드 인 어비스', '던전 메시'와 같은 만화와 '영원한 폐허' 설정과 관련된 아트 스타일에서 많은 영감을 받았습니다.
'곱하기' / '노멀' 레이어에 사용하는 것이 좋습니다.

위의 예는 스케치 느낌이 가미된 매우 양식화된 라인 아트를 보여줍니다. 펜에서 묽은 느낌이 들고 더 두꺼운 얼룩을 만들려면 더 천천히 그리거나 제자리에서 일시 중지하여 잉크가 흐르도록 하면 됩니다.
라운드/플랫 불투명도
라운드/플랫 불투명도

사용법:
이 두 브러시는 비슷한 용도로 사용되지만 페인팅하는 개체에 따라 더 편안한 브러시 모양을 허용합니다. 예를 들어, 저는 비늘, 구체, 효과, 깃털, 발톱 및 이와 유사한 세부 사항을 페인팅하는 데 둥근 불투명도 브러시를 선호하고 얼굴, 뼈, 금속 및 팔다리와 같은 보다 구조화된 요소에는 플랫 브러시를 사용합니다.
'노멀' / '하드 라이트' 레이어에 사용하는 것이 좋습니다.

위의 예는 단색의 영역과 음영을 통한 모양의 발전과 소량의 블렌딩을 통한 색상을 보여줍니다. 이 브러시는 확고한 압력으로 견고한 불투명도를 미세하게 조정하고 일관된 스트로크로 빛을 발하여 컬러 티핑을 사용하여 중간 톤을 구축할 수 있습니다.
라운드/플랫 오파시티 색조

사용법:
이 두 브러시는 유사한 용도로 사용되며 색조가 없는 버전과 거의 동일한 결과를 생성합니다. 그러나 보다 역동적인 색상 범위를 만들고 아트웍에 생명을 불어넣는 데 유용하다고 생각합니다. 그레인과 동일한 작업을 수행하는 문자 제한으로 인해 표시할 수 없는 컬러 버전이 있습니다.
원형(충전)

사용법:
이것은 기본 브러시 중 가장 기본입니다. 그것의 주요 목적은 나중에 더 쉽게 칠할 수 있도록 단색을 놓는 것입니다. 기본 음영에도 사용할 수 있습니다. 그러나 저는 일반적으로 해당 작업에 대해 Flat(Filling) 브러시를 선호합니다.
'노멀' 레이어에 사용하는 것이 좋습니다.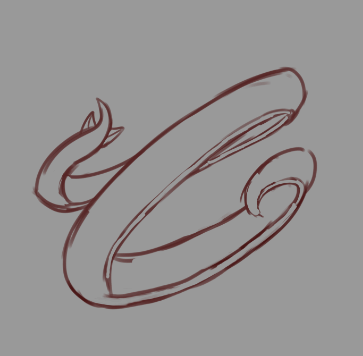

위의 예는 '곱하기'로 설정되고 '참조 레이어'로 표시된 컬러 스케치를 보여줍니다.
페인팅은 단색의 채우기 브러시를 사용하여 아래에서 수행되며, 모든 유출은 '참조 레이어의 선을 넘지 마십시오'로 설정된 지우개로 지워집니다. 위의 예는 속도가 빨라지지 않습니다 .플랫(충전)

사용법
이것은 가장 기본적인 기본 사항입니다. 평평하게 짜낸 둥근 충전 브러시로 펜의 기울기를 따릅니다. 기본 음영과 색상을 배치하는 데 얼마나 유용한지 아무리 강조해도 지나치지 않습니다. 이것은 아마도 라운드(필링) 브러시 다음으로 시간을 절약해 줄 것입니다.
'노멀' 레이어에 사용하는 것이 좋습니다.

위의 예는 채워진 스케치가 음영 및 하이라이트를 위해 단색으로 칠해진 다음 혼합되는 것을 보여줍니다. 모양이 이미 3D 윤곽을 만드는 방법을 확인할 수 있습니다. 위의 예는 속도가 빨라지지 않았습니다 .
글자 수 제한 빠른 요약:
스케치

Hi, this is a collection of the essential brushes used in the Annomicon project.
These brushes are used in nearly all of my rendering.
Each brush is labeled with keywords to make it easy to pick up, following the formula of Shape -> Opacity -> Hue -> Tilt -> (Purpose/Note)
Lacking one of these simply means that feature is not included in that brush.
Legend:
Shape - Round/Flat brushes or other shapes.
Opacity - Opacity is enabled.
Hue - This brush has a slight hue shift for more dynamic color range.
Tilt - A tilt effects the brush when using a stylus pen.
Wash - Easily use for glazing artworks in a color.
The Brushes:Wetwash - Watercolor
Usage:
This is a wet brush designed for glazing over artwork. Unlike the default watercolor brushes, it doesn't use custom brush tips. Instead, it has been carefully fine-tuned to create a 'shaped' feel without the significant lag often found in default watercolor tools. It is highly recommended for adding shadows, tonal shifts, and ambient lighting or changing light structures.
Recommended to use on a `Hard light` / `Normal` layer.
Example above showing a tonal shift in the ambient light to make a richer depth in the shape of the wyrm's head using a 60% opacity hard light layer.
Ancient Pen
Usage:
A gimmicky pen that feels slightly watery and runny. It's great for stylized line art and sketching in books or on paper for illustrations. It is heavily inspired by manga such as `Witch Hat Atelier`, `Made in Abyss`, and `Dungeon Meshi`, as well as the art style associated with the `Eternal Ruins` setting.
Recommended to use on a `Multiply` / `Normal` layer.
The example above shows highly stylized line art with a touch of sketching feel. The pen feels runny, and to create thicker blotches, you simply need to draw more slowly or pause in place to let the ink flow.
Round/Flat Opacity
Round/Flat Opacity
Usage:
These two brushes serve a similar purpose, yet they allow for a more comfortable brush shape depending on the object being painted. For example, I prefer rounded opacity brushes for painting scales, orbs, effects, feathers, claws, and similar details, while I use the flat brush for more structured elements such as faces, bones, metal, and limbs.
Recommended to use on a `Normal` / `Hard light` layer.
The example above shows flat-colored areas and the development of shape through shading and color with a small amount of blending. These brushes have finely tuned opacity that is solid with firm pressure and light with consistent strokes, allowing you to build up midtones using color tipping.
Round/Flat Opacity Hue
Usage:
These two brushes serve a similar purpose and produce results near-identical to the non-hue versions. However, I find them useful for creating more dynamic color ranges and adding life to an artwork. there is a colored version of these I cant show due to character limit that do the same thing with grain.
Round (Filling)
Usage:
This is the most basic of basic brushes. Its main purpose is simply to lay down solid colors for easier painting later on. It can also be used for base shading; however, I usually prefer the Flat (Filling) brush for that task.
Recommended to use on a `Normal` layer.
The example above shows a colored sketch set to `Multiply` and marked as a `Reference Layer`. Painting is done underneath using a filling brush for solid color, and any spill-over is erased with an eraser set to `Do not cross lines of reference layer`. Note the example above is NOT sped up.
Flat (Filling)
Flat (Filling)
Usage
This is the most basic of basics. It’s a round filling brush that has been squeezed flat and follows the tilt of the pen. I can't stress enough how useful it is for laying down basic shading and colors. This is probably the second biggest time-saver for me after the Round (Filling) brush.
Recommended to use on a `Normal` layer.
The example above shows a filled sketch being painted with solid colors for shading and highlights, which are then blended in. It's possible to see how the shape already creates a 3D contour. Note the example above is NOT sped up.
Character limit quick rundown:
Sketching
브러시 Brush
-
고대 펜 - Annomicon Ancient Pen - Annomicon
-
원형(충전) - Annomicon Round (Filling) - Annomicon
-
플랫 (충전) - Annomicon Flat (Filling) - Annomicon
-
플랫 오파시티 색조 - Annomicon Flat Opacity Hue - Annomicon
-
라운드 소프트 불투명도 - Annomicon Round Soft Opacity - Annomicon
-
라운드 불투명도 - Annomicon Round Opacity - Annomicon
-
플랫 불투명도 - Annomicon Flat Opacity - Annomicon
-
연필 틸트(스케치) - Annomicon Pencil Tilt(Sketching) - Annomicon
-
연필 틸트(렌더링) - Annomicon Pencil Tilt(Rendering) - Annomicon
-
색연필 틸트 색조(렌더링) - Annomicon Colored Pencil Tilt Hue(Rendering) - Annomicon
-
습식 워시(Lagfix) - Annomicon Wet Wash (Lagfix) - Annomicon
-
라운드 오파시티 색조 - Annomicon Round Opacity Hue - Annomicon


'소재집'의 인기 소재


신규 소재


배지
-
 MVP ◆질문에 적절한 답변을 많이 게시하고 커뮤니티 운영에 크게 공헌한 사용자입니다. MVP는 3개월에 한 번, 그 사이에 획득한 포인트를 바탕으로 결정하고 표창을 실시하고 있습니다.
 -
 NVP(New Valuable Player) ◆MVP 다음으로 커뮤니티 운영에 공헌한 사용자입니다. 이제까지 MVP 수상 경험이 없는 분 중에서 획득한 포인트를 바탕으로 결정하여 표창을 실시하고 있습니다.
 -
 공식 엑스퍼트 ◆뛰어난 응답자의 증표인 MVP수상자 중에서 선택된 커뮤니티에서 가장 뛰어난 응답자의 증표입니다. 심사를 거쳐서 저희 회사에서 의뢰할 경우 취임되십니다.※ 옛 명칭 '에반젤리스트'
 -
 셀시스 공인 모더레이터 ◆모더레이터는 일본어와 기타 언어로 말할 수 있는 셀시스 공인 스태프입니다. 소프트웨어나 창작 전문가가 아니므로 직접 의문을 해결할 수는 없지만 여러분이 순조롭게 소통할 수 있도록 언어나 커뮤니케이션 측면에서 지원합니다.
 -
 셀시스 공식운영에 관련된 공식 계정입니다.