

스티커처럼 보이는 윤곽선을 만드는 브러시입니다. 가장 좋아 보이거나 가장 효율적이지 않을 수 있지만 사용하기 쉽습니다. A brush to create an outline that looks like a sticker. It may not be the best looking or the most efficient, but it is easy to use.
1. 두 개의 레이어를 만듭니다: 하나는 그림용이고 다른 하나는 윤곽선용입니다. 도면 아래에 윤곽선 도면층을 배치합니다.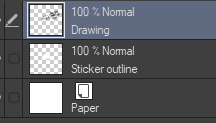


2. 색상을 흰색으로 설정하는 것이 좋지만 원하는 경우 다른 색상을 사용할 수 있습니다. 불행히도 실제 윤곽선의 색상을 변경할 수 있는 방법은 없습니다.
3. 스티커 외곽선 레이어에 그림 뒤에 그립니다. 임의의 검은 선이 없도록 하기 위해. (저품질 gif에 대해 사과드립니다. 많이 압축해야했습니다.)

4. 윤곽선의 두께/어두움을 늘리려면 도구 설정(렌치 아이콘)으로 이동하여 "수채화 가장자리" 설정을 찾으면 됩니다.
스티커의 예! (아니요, 당연히 판매용이 아닙니다.)
또한 스티커를 판매하려는 경우 이 도구를 사용하지 않는 것이 좋습니다. 주로 미적 목적을 위한 것입니다.

1. Create two layers: one for the drawing, another for the outline. Place the outline layer below the drawing.
2. I recommend setting the color as white, though you can use another color if you want. Unfortunately there isn't a way to change the color of the actual outline.
3. Draw behind the drawing on the sticker outline layer. In order to make it so that there aren't any random black lines. (Apologies for low quality gif; i had to compress it a lot.)
4. If you want to increase the thickness/darkness of the outline, you can do so by going to the tool settings (wrench icon) and locating the "watercolor edge" settings.
Example of a sticker! (No it is not for sale, obviously.)
Also, if you wish to sell a sticker, I DO NOT recommend using this tool. It is for aesthetic purposes, mainly.


'shadowandsonic'님의 다른 소재

'브러시'의 인기 소재


신규 소재


배지
-
 MVP ◆질문에 적절한 답변을 많이 게시하고 커뮤니티 운영에 크게 공헌한 사용자입니다. MVP는 3개월에 한 번, 그 사이에 획득한 포인트를 바탕으로 결정하고 표창을 실시하고 있습니다.
 -
 NVP(New Valuable Player) ◆MVP 다음으로 커뮤니티 운영에 공헌한 사용자입니다. 이제까지 MVP 수상 경험이 없는 분 중에서 획득한 포인트를 바탕으로 결정하여 표창을 실시하고 있습니다.
 -
 공식 엑스퍼트 ◆뛰어난 응답자의 증표인 MVP수상자 중에서 선택된 커뮤니티에서 가장 뛰어난 응답자의 증표입니다. 심사를 거쳐서 저희 회사에서 의뢰할 경우 취임되십니다.※ 옛 명칭 '에반젤리스트'
 -
 셀시스 공인 모더레이터 ◆모더레이터는 일본어와 기타 언어로 말할 수 있는 셀시스 공인 스태프입니다. 소프트웨어나 창작 전문가가 아니므로 직접 의문을 해결할 수는 없지만 여러분이 순조롭게 소통할 수 있도록 언어나 커뮤니케이션 측면에서 지원합니다.
 -
 셀시스 공식운영에 관련된 공식 계정입니다.