

수술 후 멍을 포함하여 모든 유형과 치유 수준의 상세하고 사실적인 멍을 만들기 위한 브러시 세트입니다. A set of brushes for making detailed, realistic bruises of all types and levels of healing, including post-surgical bruising.
타박상을 칠하고 싶지만 타박상의 겉보기 나이를 올바르게 잡거나, 모양을 정확하게 잡거나, 수술 후 멍을 묘사해야 하는 사람들을 위한 브러시 세트입니다.
밝은 피부와 어두운 피부를 위한 기본 올인원 타박상 브러시가 있는 무료 버전이 있습니다. 그들은 이것보다 훨씬 사용하기 쉽고 거의 모든 것에 적합할 것입니다. 해당 자료의 번호는 2077682 입니다.
어두운 피부 묘사에 대한 참고 사항: 저는 개인적으로 믿을 수 없을 정도로 밝은 색의 피부를 가지고 있으며 중간 톤의 아프리카계 미국인보다 더 어두운 사람에 대한 참조를 찾을 수 없었습니다. 따라서 매우 어두운 피부 톤에 사용하는 경우 혼합 모드를 약간 조정해야 할 수 있습니다.
또한 죽은 피는 아무리 많은 색소가 뒤에 있어도 사람의 색은 같지만 밝은 피부와 어두운 피부 모두에서 사실적으로 보이도록 하는 방법을 찾는 데 어려움을 겪었습니다. 어두운 피부에 대한 가장 좋은 해결책은 하드 라이트 블렌딩 모드로 설정된 레이어에 놓은 다음 제대로 보일 때까지 불투명도를 줄이는 것입니다. 모든 피부 톤에 사용할 수 있도록 최선을 다했지만 무료 팩에는 사용하기 쉬운 어두운 피부를 가진 사람들을 위한 브러시가 있습니다.
마지막으로, 이것은 인간의 타박상을 위한 것이며, 타박상을 입은 외계인을 그려야 하는 경우 혼자서입니다. 😂
사용 방법:
이 브러시는 자체 레이어에서 사용한 다음 필요한 경우 병합해야 합니다. 이는 멍에 적합한 텍스처를 얻기 위해 어둡게 블렌딩 모드를 사용하기 때문이지만 레이어에 이미 무언가가 있으면 정말 이상하게 보일 것입니다. 또한 어두운 피부의 경우 불투명도를 많이 엉망으로 만들어야 합니다.
내 브러시의 평소와 같이 기울기는 크기를 제어합니다. 즉, 예를 들어 매우 부드러운 평평한 스트로크로 노란색 멍 가장자리를 만들고 보라색으로 멍의 살을 넣은 다음 빨간색으로 더 깊은 외상 영역을 추가할 수 있습니다. 콤보 브러시는 완전히 똑바로 사용하면 조금 이상하게 보이기 때문에 익숙해질 때까지 기울여 사용하십시오. 빨간색 및 보라색 점 브러시의 경우 기울기는 개별 점의 크기에 영향을 미치지 않고 얼마나 퍼져 있는지에만 영향을 미치므로 다른 크기의 개를 원할 경우 전체 브러시 크기를 변경해야 합니다.
이 팩에는 총 9개의 브러시가 포함되어 있습니다: 기본 타박상 콜로프 브러시 6개와 추가 브러시 3개. 6가지 색상:
1. 노랗게 변한 멍. 이것은 피가 분해되기 시작한 멍의 가장자리가 일반적으로 보이는 모습입니다.
2. 밝은 노란색 멍. 피부색이 밝은 사람들의 수술 후 멍을 묘사하고 싶을 때 필요한 것입니다. 그 타박상은 거의 형광 노란색이며, 나는 그것을 포함하는 브러시 세트를 본 적이 없습니다. 그래서 여기 있습니다!
3. 보라색 멍. 이것은 사람들이 타박상을 생각할 때 생각하는 색이지만 그 자체로 정말 이상하게 보입니다. 다른 색상을 조금이라도 사용하고 싶을 것입니다.
4. 칙칙한 붉은 멍. 이것은 이제 막 보이기 시작한 멍의 색입니다. 또한 양탄자 화상 및 기타 마모 및 흡입 부상.
5. 신선한 붉은 멍. 이것은 마치 누군가 뺨을 맞은 것처럼 맞아서 붉어지는 밝은 톤의 피부색입니다. 어두운 톤에도 사용할 수 있지만 불투명도를 낮추고 싶을 것입니다.
6. 신선한 분홍색 멍. 이것은 가볍게 뺨을 맞은 극도로 밝은 피부의 사람들 또는 더 세게 뺨을 때린 가장자리 주변의 색입니다. 어두운 피부 톤에서는 꽤 이상해 보이지만 내가 찾지 못한 블렌딩 모드 비밀을 찾을 수 있을 것입니다.
세 가지 추가 브러시는 다음과 같습니다.
1. 콤보 브러시: CSP의 듀얼 브러시 기능을 사용하여 한 번에 전체 타박상을 칠합니다. 어떤 상황에서는 무료 브러시보다 더 잘 작동하지만 매우 가벼운 손이 필요하고 정말 빨리 이상하게 보일 수 있습니다.
2. 보라색 및 분홍색 점. 피부색이 매우 밝은 사람의 경우 모낭 바닥에 갇힌 혈액이 이러한 얼룩덜룩한 효과를 유발합니다. 또한 피부색이 어두운 사람들의 타박상에 질감을 더하는 데 사용할 수 있습니다.
3. 옐로우 라이트 블렌더. 이 브러시는 모서리가 너무 날카롭지만 전체를 다시 하고 싶지 않은 약간의 타박상을 입었을 때를 대비하여 여기에 있습니다. 너무 많이 사용하면 매우 이상하고 가짜처럼 보이지만 소량으로 문제를 해결하는 데 도움이 될 수 있습니다. 이것은 이름에도 불구하고 선택한 기본 색상으로 사물을 매우 가볍게 착색하므로 사용하기 전에 적절한 색상을 선택하는 것이 좋습니다.
각각의 색상은 고정되어 있으며 각 팁은 고유합니다.
이렇게 하면 반복이 적기 때문에 멍이 좀 더 사실적으로 느껴지고 어떤 색상을 사용할지 걱정할 필요가 없습니다. (당신이 외계인👽을 그리지 않는 한, 그러면 나는 당신을 도울 수 없습니다.)사실적인 타박상을 레이어링하는 데 사용할 수 있는 브러시는 다음과 같습니다: 6가지 색상 브러시와 도트 브러시.

다음은 다양한 피부 톤에서 두 가지 블렌드 모드로 시연된 콤보 브러시입니다.

여기서는 불투명도를 줄이는 방법을 보여 드리겠습니다. 측면은 서로의 거울 이미지이며 배경, 피부 톤, 레이어 혼합 설정만 다릅니다.

스트레스를 덜 받으면서 사실적인 타박상을 그리는 데 도움이 되길 바랍니다!
These are a set of brushes intended for people who want to paint bruises but care about getting the apparent age of the bruises right, getting the shape exactly right, or who need to depict post-surgical bruising.
There is a free version which has basic all-in-one bruise brushes for light skin and dark skin. They are much easier to use than these, and are probably fine for almost everything. The number for that material is: 2077682
A note about the dark skinned depictions: I personally have incredibly light-colored skin, and I wasn't able to find references for anyone darker than a mid-toned African-American person. So if you are using these for a very very dark skin tone, you might need to make some adjustments to the blending modes.
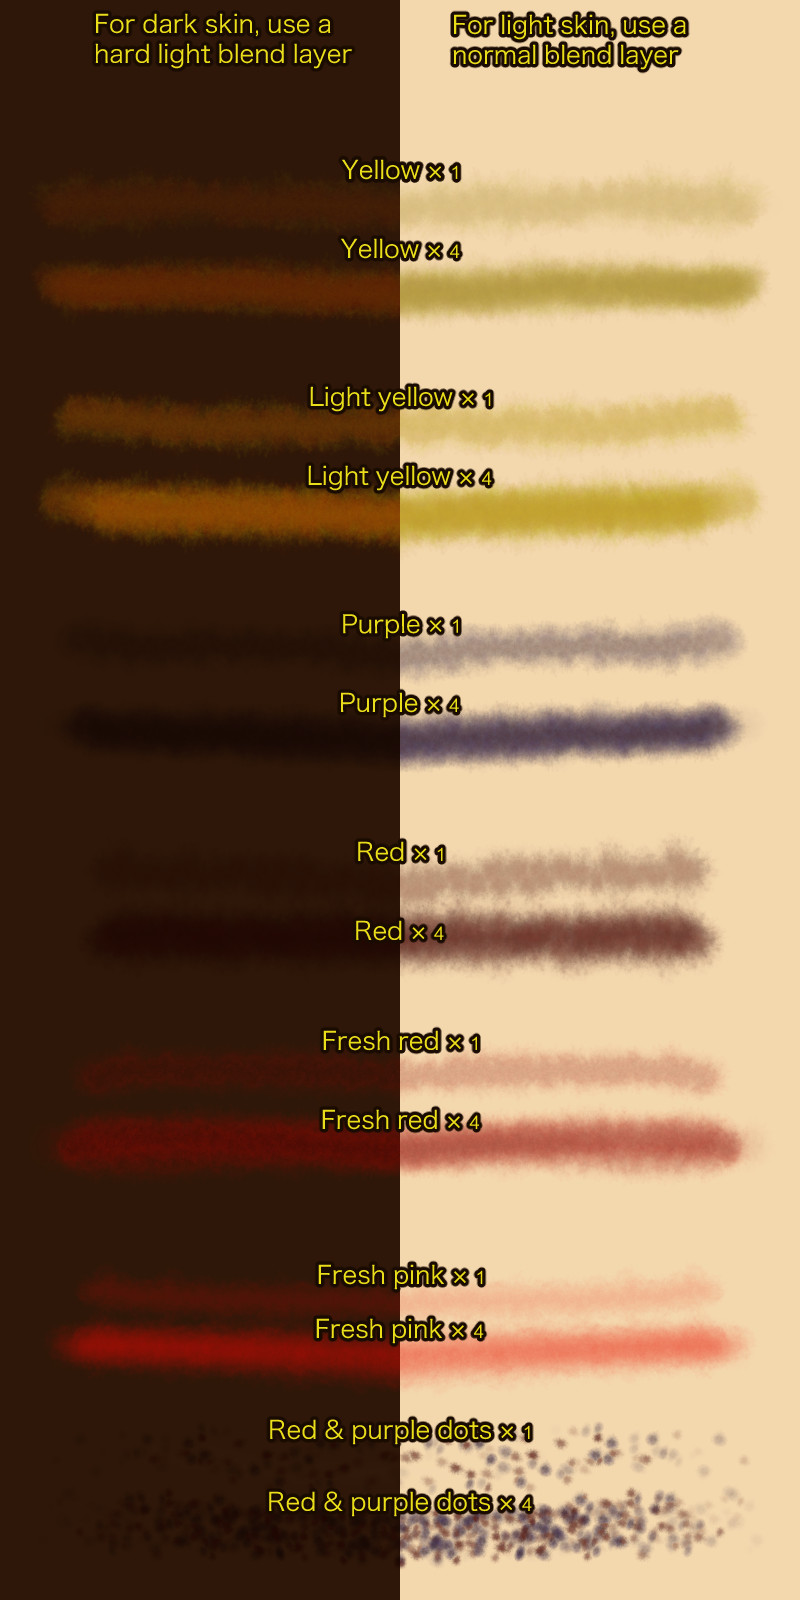
Also, although dead blood is the same color on humans no matter how much pigment is behind it, I had some trouble finding a way to make these look realistic on both light and dark skin. The best solution I found for dark skin is to put them on a layer that's set to Hard Light blending mode, and then decrease the opacity until it looks right. I did my best to make them work for all skin tones, but the free pack has a brush that is specifically for dark skinned people that you might find easier to use.
Lastly, these are for human bruises, if you need to paint aliens who are bruised, you're on your own. 😂
How to use them:
These brushes should be used on their own layer and then merged down if necessary. This is because they use the Darken blending mode to get the right texture for bruises, but if there's something already on the layer, it'll look really weird. Also, for dark skin, you'll need to mess around with opacity a lot.
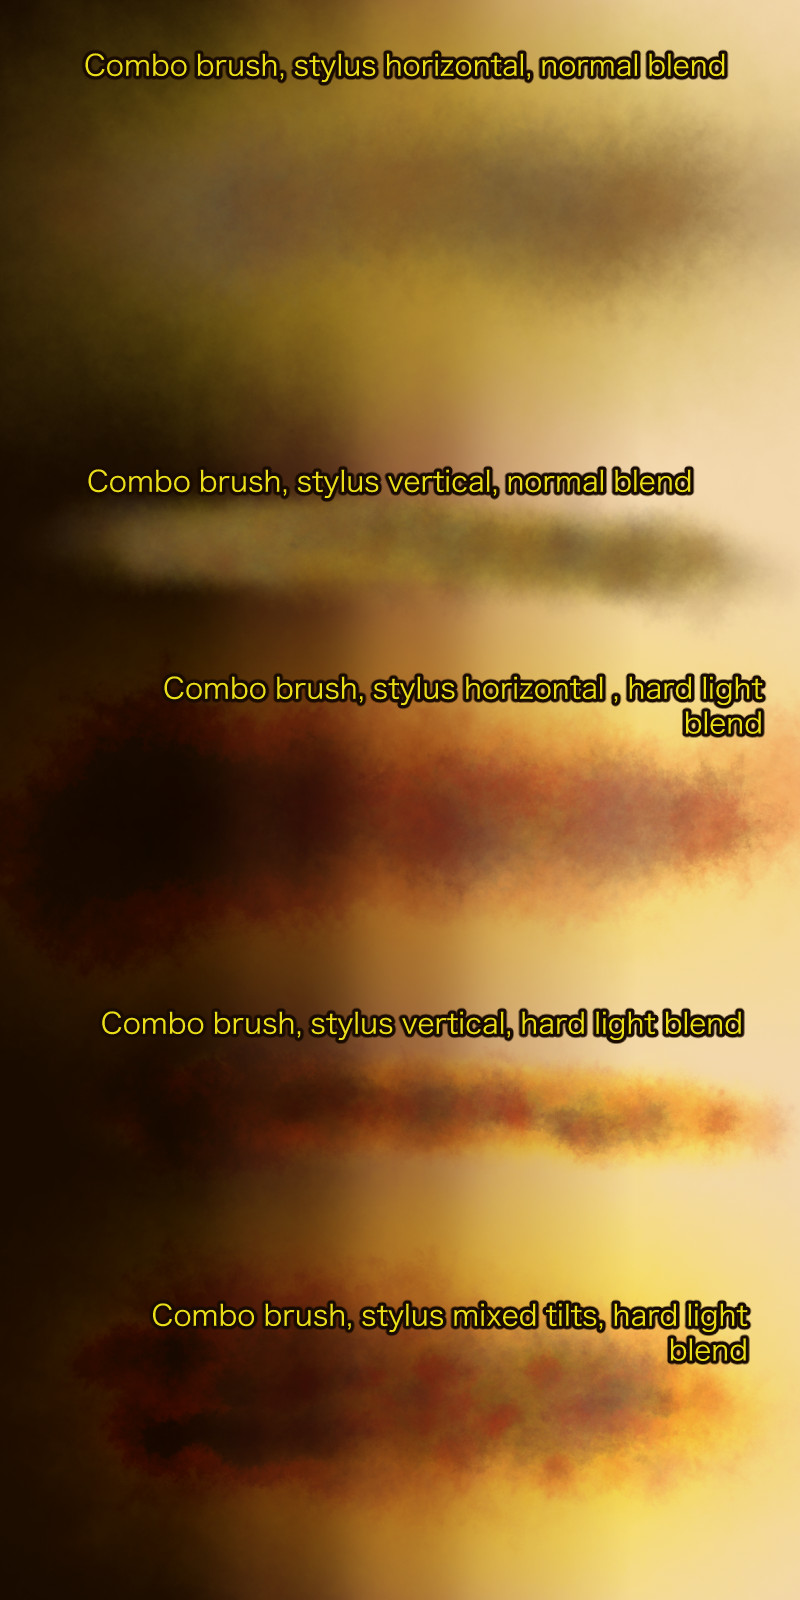
As is usual for my brushes, tilt controls size. This means you can, for example, build up the yellow bruise edges with very soft flat strokes, get the meat of the bruising in with the purple, and then add some areas of deeper trauma with the red. The combo brush looks a little weird if used fully upright, so try to use it at a tilt until you get used to it. For the red & purple dots brush, tilt does not affect the size of the individual dots, only how spread out they are, so you'll need to change the overall brush size if you want a different size of dog.
There are nine brushes included in this pack in total: six basic bruise colof brushes and three additional brushes. The six colors:
1. Yellowed bruising. This is what the edges of bruises usually look like, where the blood has started to break down.
2. Light yellow bruising. This is what you need if you want to depict post-surgical bruising on light-skinned people. Those bruises are almost fluorescent yellow, and I haven't seen a brush set that includes that. So here it is!
3. Purple bruising. This is the color people think of when they think of bruises, but it looks really weird by itself. You'll want to use at least a little of the other colors with it.
4. Dull red bruising. This is the color of bruises that have just started to show. Also rug burns and other such abrasion and suction injuries.
5. Fresh red bruising. This is the color of light-toned skin that's reddened from being struck, like if someone has been slapped. It can be used on darker tones too but you'll want to crank down the opacity.
6. Fresh pink bruising. This is the color of extremely light-skinned people who have been lightly slapped, or the area around the edges of a harder slap. Looks pretty weird on darker skin tones but maybe you'll find a blending mode secret I didn't.
The three additional brushes are:
1. Combo brush: this uses CSP's dual brush feature to paint an entire bruise at one go. For some situations it works better than the free brushes, but it needs a very light hand and can look bizarre really fast.
2. Purple & pink dots. On very light-skinned people, the blood that gets trapped in the bottom of hair follicles causes this mottled effect. It can also be used to get a bit more texture into bruises on dark-skinned people.
3. Yellow light blender. This brush is here in case you get a bit of bruise that's just a little too sharp-edged but you don't want to redo the whole thing. It looks super weird and fake if you use it too much, but in small doses it can help fix things. This one tints things very lightly with your selected main color despite the name, so you'll want to select an appropriate color before you use it.
The colors of each of them are fixed, and each tip is unique. This helps the bruise feel a little more real, because there's less repetition, and means you don't need to worry as much about what color to use. (Unless you're painting an alien 👽, and then I can't help you.)
Here are the brushes that you might want to use to layer up a realistic bruise: the six color brushes and the dots brush.
Here is the combo brush demonstrated with both blend modes on a range of skin tones.
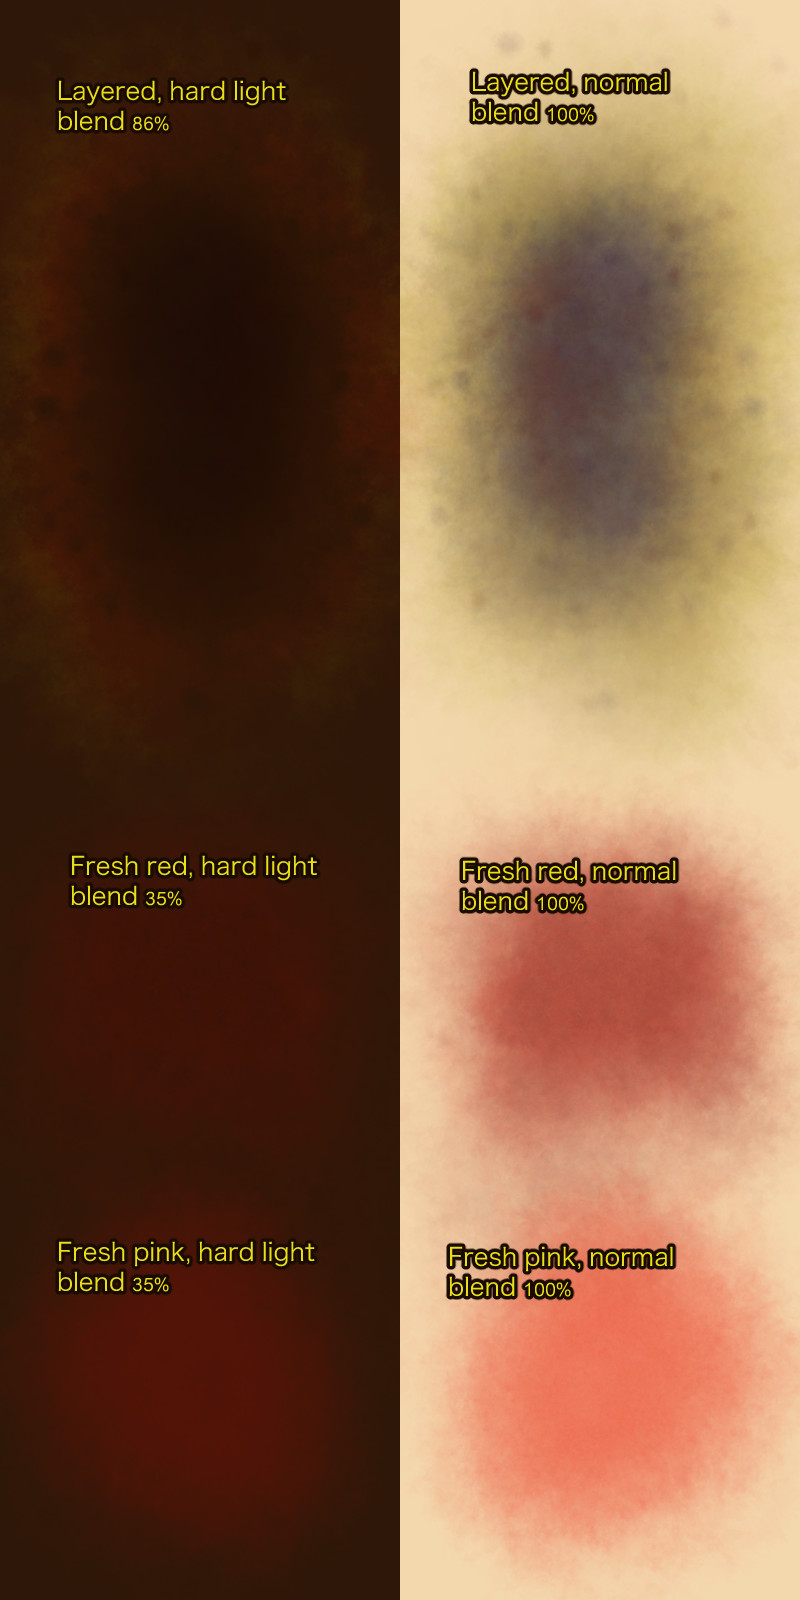
Here I'm demonstrating how you might want to decrease the opacity. The sides are mirror images of each other, just with a different background skin tone and layer blend settings.
I hope this helps you paint realistic bruises with less stress!
기본 타박상 색상 Basic bruise colors


추가 효과 Additional effects


'kalany'님의 다른 소재


'소재집'의 인기 소재


신규 소재


배지
-
 MVP ◆질문에 적절한 답변을 많이 게시하고 커뮤니티 운영에 크게 공헌한 사용자입니다. MVP는 3개월에 한 번, 그 사이에 획득한 포인트를 바탕으로 결정하고 표창을 실시하고 있습니다.
 -
 NVP(New Valuable Player) ◆MVP 다음으로 커뮤니티 운영에 공헌한 사용자입니다. 이제까지 MVP 수상 경험이 없는 분 중에서 획득한 포인트를 바탕으로 결정하여 표창을 실시하고 있습니다.
 -
 공식 엑스퍼트 ◆뛰어난 응답자의 증표인 MVP수상자 중에서 선택된 커뮤니티에서 가장 뛰어난 응답자의 증표입니다. 심사를 거쳐서 저희 회사에서 의뢰할 경우 취임되십니다.※ 옛 명칭 '에반젤리스트'
 -
 셀시스 공인 모더레이터 ◆모더레이터는 일본어와 기타 언어로 말할 수 있는 셀시스 공인 스태프입니다. 소프트웨어나 창작 전문가가 아니므로 직접 의문을 해결할 수는 없지만 여러분이 순조롭게 소통할 수 있도록 언어나 커뮤니케이션 측면에서 지원합니다.
 -
 셀시스 공식운영에 관련된 공식 계정입니다.