

안녕하세요, 저는 투명한 이미지(또는 일반적인 이미지)를 패치 스타일의 이미지로 만드는 자동 작업을 가지고 있습니다! Hi hi, I'm here with an auto-action that will make your transparent image (or image in general tbh) into a patch-styled one!
기본 해상도는 300dpi입니다:)
>방법:
1.

이미지 레이어를 선택합니다(패치가 모양을 따르도록 하려면 이미지가 투명한 배경에 있는지 확인).
2. 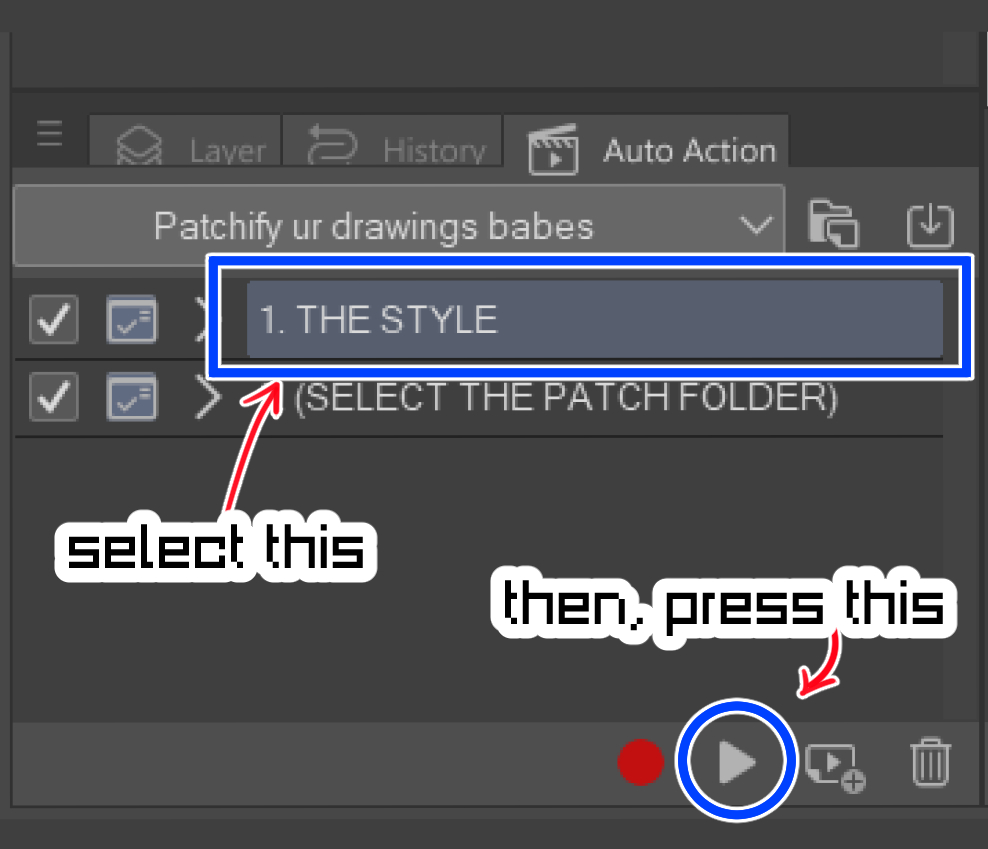

[1. THE STYLE] 오토 액션
3.

원하는대로 선과 색상 설정을 조정하십시오! (이것은 패치가 얼마나 지저분하고 깨끗하게 보이는지 결정합니다)
4.

레이어 속성 효과에서 패치 바깥쪽의 테두리를 조정하고 색상이나 두께 등을 변경할 수 있습니다.
5. 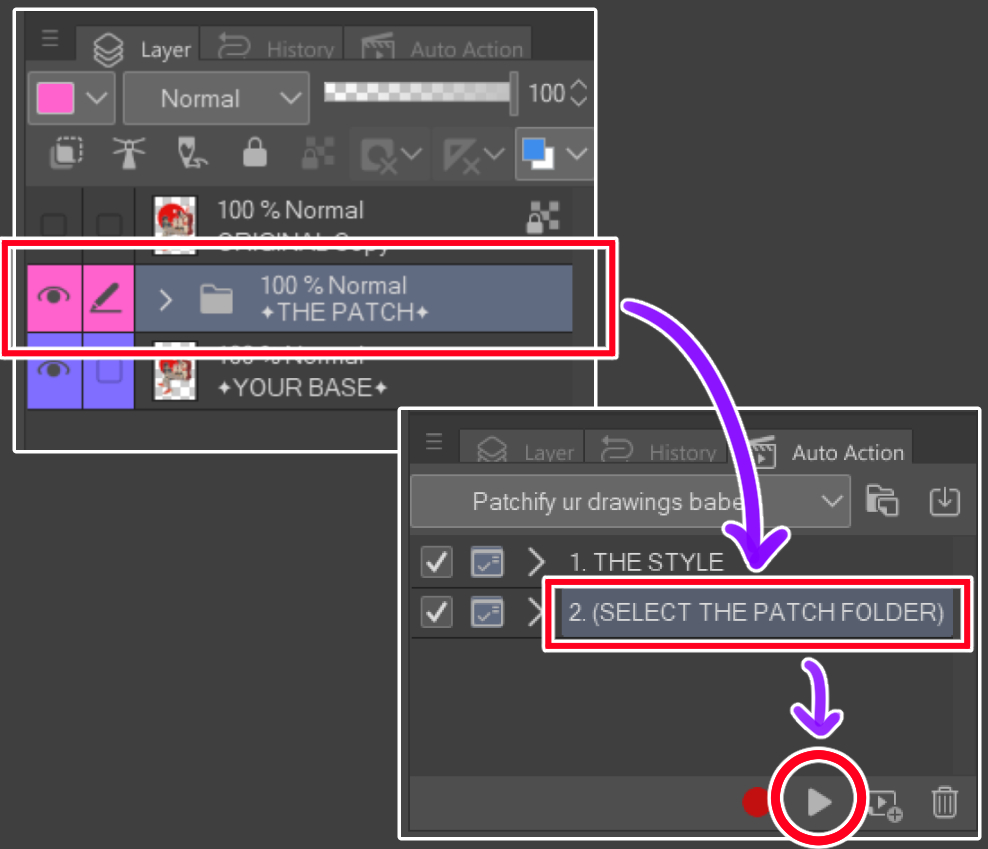

추가 효과를 얻으려면 [THE PATCH] 폴더를 선택하고 [2. (패치 폴더 선택)] 자동 동작
6.

패치입니다!! :D
Please note the default resolution is 300dpi :)
>How to:
1.
Select your image layer (if you'd like the patch to follow the shape, make sure the image is on a transparent background)
2.
Apply the [1. THE STYLE] auto-action
3.
Adjust the line and color setting as you'd like! (this will determine how messy/clean your patch looked like)
4.
You may adjust the border of the outer side of the patch on the layer property effect, changing the color or thickness etc.
5.
For extra effect, select the [THE PATCH] folder, and apply the [2. (SELECT THE PATCH FOLDER)] auto-action
6.
It's a patch!! :D


'sdfjmeng'님의 다른 소재


'오토 액션'의 인기 소재


신규 소재


배지
-
 MVP ◆질문에 적절한 답변을 많이 게시하고 커뮤니티 운영에 크게 공헌한 사용자입니다. MVP는 3개월에 한 번, 그 사이에 획득한 포인트를 바탕으로 결정하고 표창을 실시하고 있습니다.
 -
 NVP(New Valuable Player) ◆MVP 다음으로 커뮤니티 운영에 공헌한 사용자입니다. 이제까지 MVP 수상 경험이 없는 분 중에서 획득한 포인트를 바탕으로 결정하여 표창을 실시하고 있습니다.
 -
 공식 엑스퍼트 ◆뛰어난 응답자의 증표인 MVP수상자 중에서 선택된 커뮤니티에서 가장 뛰어난 응답자의 증표입니다. 심사를 거쳐서 저희 회사에서 의뢰할 경우 취임되십니다.※ 옛 명칭 '에반젤리스트'
 -
 셀시스 공인 모더레이터 ◆모더레이터는 일본어와 기타 언어로 말할 수 있는 셀시스 공인 스태프입니다. 소프트웨어나 창작 전문가가 아니므로 직접 의문을 해결할 수는 없지만 여러분이 순조롭게 소통할 수 있도록 언어나 커뮤니케이션 측면에서 지원합니다.
 -
 셀시스 공식운영에 관련된 공식 계정입니다.