

こんにちはこんにちは、私はあなたの透明な画像(または一般的なtbhの画像)をパッチスタイルのものにする自動アクションでここにいます! Hi hi, I'm here with an auto-action that will make your transparent image (or image in general tbh) into a patch-styled one!
デフォルトの解像度は300dpi:)であることに注意してください
>方法:
1.

画像レイヤーを選択します(パッチを形状に沿わせたい場合は、画像が透明な背景にあることを確認してください)
2. 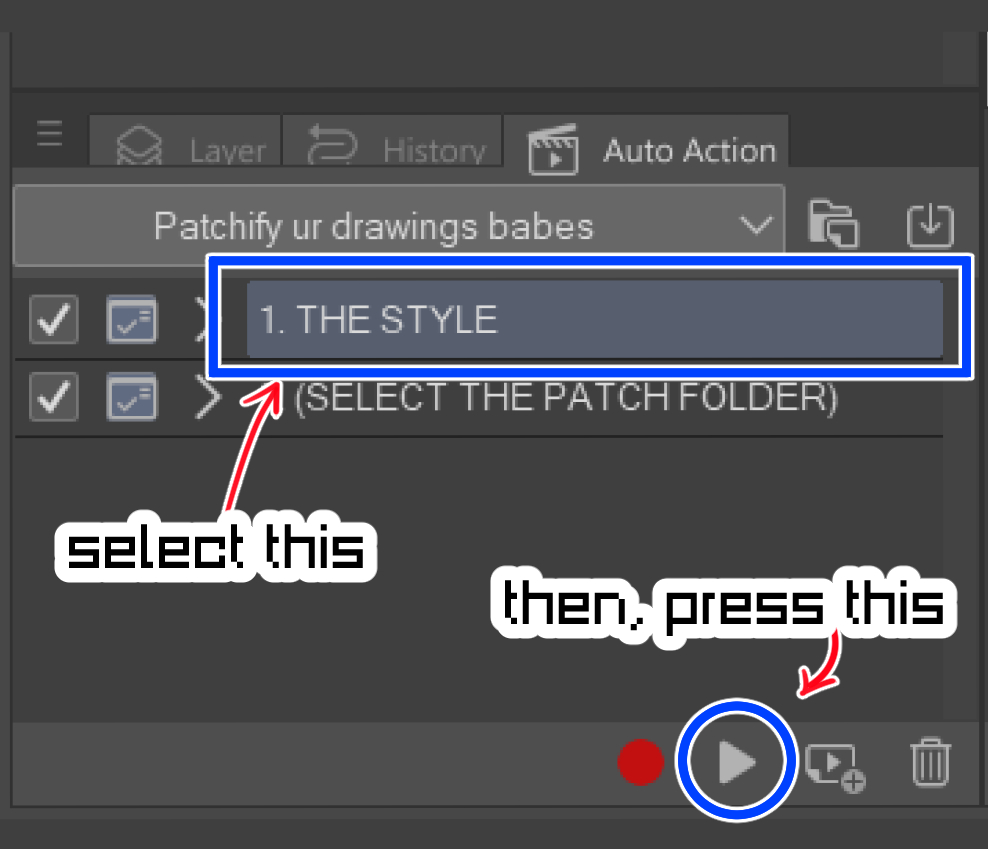

[ 1.THE STYLE』オートアクション
3.

線と色の設定 を必要に応じて調整します。(これにより、パッチがどれだけ乱雑/きれいに見えたかが決まります)
4.

パッチの外側の境界線は、レイヤープロパティ効果で調整したり、色や太さを変更したりできます。
5. 

効果を高めるには、[THE PATCH]フォルダーを選択し、[2.(パッチフォルダを選択)]オートアクション
6.

パッチです!!:D
Please note the default resolution is 300dpi :)
>How to:
1.
Select your image layer (if you'd like the patch to follow the shape, make sure the image is on a transparent background)
2.
Apply the [1. THE STYLE] auto-action
3.
Adjust the line and color setting as you'd like! (this will determine how messy/clean your patch looked like)
4.
You may adjust the border of the outer side of the patch on the layer property effect, changing the color or thickness etc.
5.
For extra effect, select the [THE PATCH] folder, and apply the [2. (SELECT THE PATCH FOLDER)] auto-action
6.
It's a patch!! :D


"sdfjmeng"さんの別の素材


"オートアクション"の人気素材


新着素材


バッジ
-
 MVP ◆質問に対して適切な回答を数多く投稿し、コミュニティの運営に大きく貢献したユーザーです。MVPは3ヶ月に一度、その間に獲得したポイントを元に決定し、表彰を行っています。
 -
 NVP (New Valuable Player) ◆MVPに次いでコミュニティの運営に貢献したユーザーです。これまでMVPの受賞経験のない方から、獲得したポイントを元に決定し、表彰を行なっています。
 -
 公式エキスパート ◆優れた回答者の証であるMVP受賞者の中からさらに選ばれた、コミュニティで最も優良な回答者の証です。審査を経て当社から依頼し就任いただいています。※旧名称「エバンジェリスト」
 -
 セルシス公認モデレーター ◆モデレーターは、日本語とその他の言語が話せるセルシス公認のスタッフです。ソフトウェアや創作のエキスパートではないので、直接疑問を解決することはできませんが、みなさんがスムーズにコミュニケーションできるように、言葉やコミュニケーションの側面からサポートします。
 -
 セルシス公式運営に関連した公式アカウントです。