

Hola, hola, estoy aquí con una acción automática que convertirá tu imagen transparente (o imagen en general) en una de estilo parche. Hi hi, I'm here with an auto-action that will make your transparent image (or image in general tbh) into a patch-styled one!
Tenga en cuenta que la resolución predeterminada es de 300 ppp :)
>Cómo:
1.

Selecciona tu capa de imagen (si quieres que el parche siga la forma, asegúrate de que la imagen esté sobre un fondo transparente)
2. 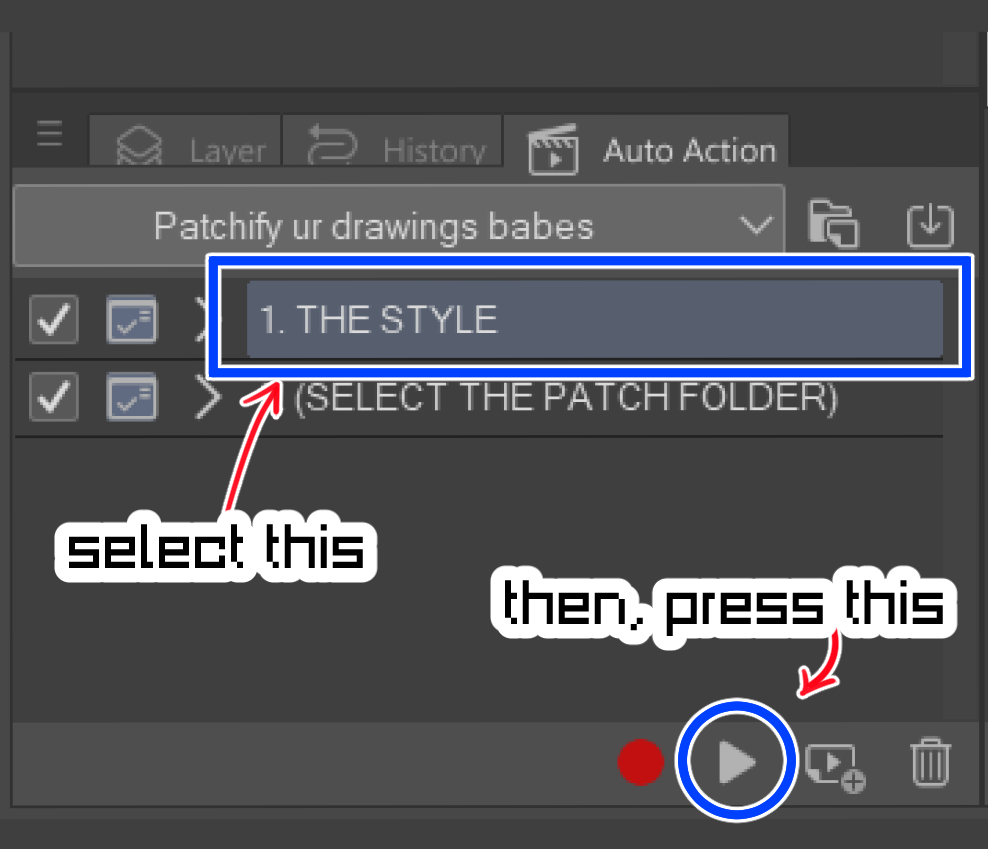

Aplique el [1. EL ESTILO] acción automática
3.

¡Ajusta la configuración de línea y color como quieras! (esto determinará qué tan desordenado/limpio se veía su parche)
4.

Puede ajustar el borde del lado exterior del parche en el efecto de propiedad de la capa, cambiando el color o el grosor, etc.
5. 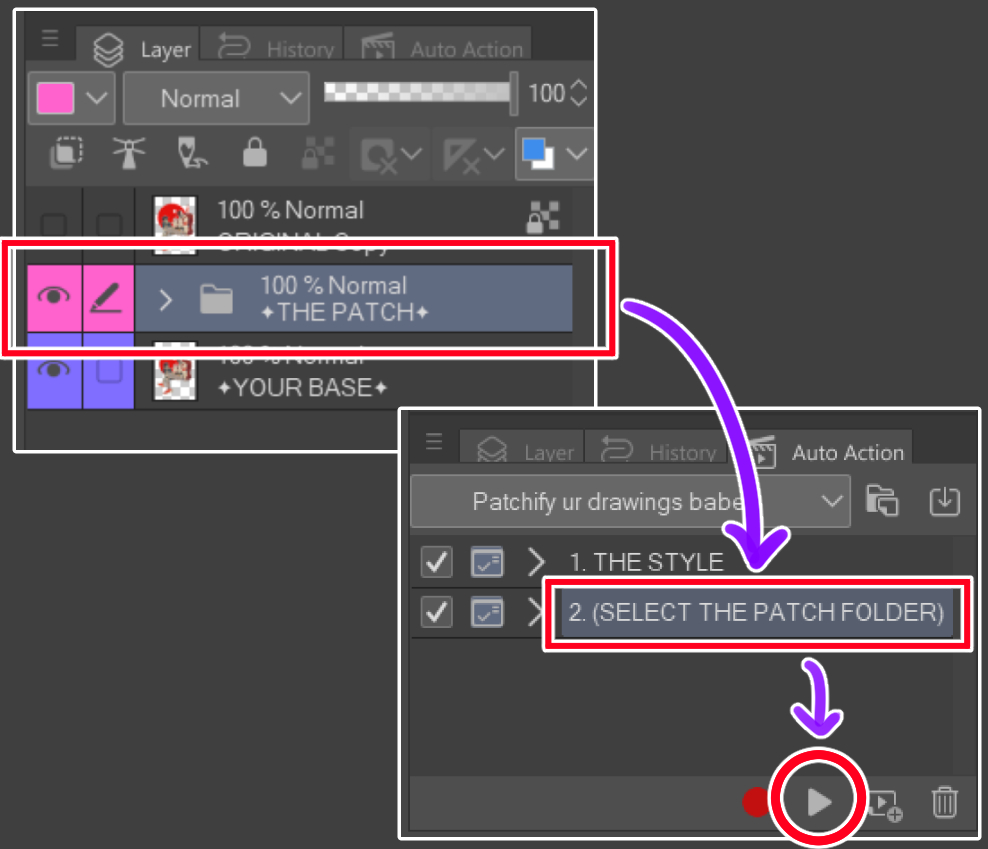

Para obtener un efecto adicional, seleccione la carpeta [THE PATCH] y aplique el botón [2. (SELECCIONE LA CARPETA DE PARCHES)] Acción automática
6.

¡¡Es un parche!! :D
Please note the default resolution is 300dpi :)
>How to:
1.
Select your image layer (if you'd like the patch to follow the shape, make sure the image is on a transparent background)
2.
Apply the [1. THE STYLE] auto-action
3.
Adjust the line and color setting as you'd like! (this will determine how messy/clean your patch looked like)
4.
You may adjust the border of the outer side of the patch on the layer property effect, changing the color or thickness etc.
5.
For extra effect, select the [THE PATCH] folder, and apply the [2. (SELECT THE PATCH FOLDER)] auto-action
6.
It's a patch!! :D


Más materiales de sdfjmeng


Materiales populares de Acciones automáticas


Nuevos materiales


Insignias
-
 MVP ◆Estos usuarios han contribuido en gran medida a la gestión de la comunidad, al publicar multitud de útiles respuestas a las preguntas planteadas. Una vez cada tres meses, los MVP son seleccionados en base a los puntos obtenidos durante ese período y, en consecuencia, son reconocidos por su esfuerzo.
 -
 New Valuable Player (NVP) ◆Son las personas que más han contribuido a la comunidad después de los MVP. Este galardón se otorga según los puntos conseguidos a los usuarios que aún no han obtenido ningún premio MVP.
 -
 Especialista oficial ◆Elegidos de entre todos los MVP, quienes ya han demostrado ser de inestimable ayuda, esto es un testimonio de su excepcional apoyo para con la comunidad. Tras un minucioso escrutinio, son nombrados por Celsys para ocupar dicho cargo.Nota: Anteriormente denominados "evangelistas".
 -
 Moderador oficial de Celsys ◆Los moderadores son miembros del personal de Celsys que pueden comunicarse en japonés y otros idiomas. No son expertos en software o ilustración, por lo que no pueden responder directamente a las preguntas. Sin embargo, tratarán de asegurarse de que la comunicación entre usuarios de distintas lenguas sea tan fluida y comprensible como sea posible.
 -
 Cuenta oficial de CelsysCuenta oficial del administrador