


Convert photos to background illustration style (写真を背景イラスト風に変換) 写真を背景イラスト風に変換
Content ID:2302491
-
1,332


Photo → illustration photo → illustration
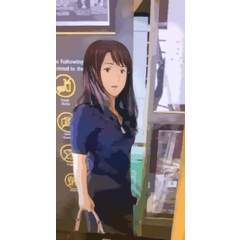
It is a auto action to make the photo look like a background illustration.
Since the details are crushed, it will have a rough texture that looks like it was applied with a brush.
It will be easier to get used to the character illustration, so please try it if you like.


(All sample photos are taken by the author)
■ ■ ■ ■ ■
【How to use】
(1) Click [Create new canvas for processing] at the top ★ of the auto action set.
(2) Add a photo image to the created canvas and adjust the size
(3) Click [Photo → Illustration (weak ~ strong)]
This completes the machining.
Repeat (3) until it is in good condition, and repeat the processing.
★ The higher the intensity of processing, the more the contour will be crushed and the illustration will increase.
★ "Strong" processing takes about 10 seconds (in the author's environment...)
It may be heavy depending on the environment, so please try it while watching the situation from a weak position.

■ ■ ■ ■ ■
Below are the more detailed steps.
■【Show auto action set】
Click "Window" → "auto action" from the top menu
A default set of auto action will appear.

Click the menu button in the auto action window, and then click
Click "Add auto action Set" → "Convert Photo to Background Illustration Style" → "Add to Palette".
(Or add to palette from "Load Button")

■【Details of usage】
(1) Click [★ Create new canvas for processing].
Put the photo in the created canvas and process it.
※Be careful here!
Do not use auto action on the same canvas as the character illustration.
Since there is a process of degrading the image in the auto action,
Even the character illustration will deteriorate!
★ Be sure to process with a new canvas!

(2) Add a photo image to the canvas and adjust the size

(3) Click [Photo → Illustration (weak → strong)]
★ If the processing is weak, try making the photo image smaller.
■ ■ ■ ■ ■
It will blend in better if you combine the processed background with a character illustration and finish it together.

In the sample above, the character & background is displayed on the entire surface
■ Chromatic aberration
■ Noise
■ overlay (pink)
I'm putting it on.
You can also uncheck the left of the command to finish without noise.

Distant sample (overlay finish: top pink, bottom blue)

★ Please note that thin straight lines such as electric wires and tree branches, and crushed gravel are prone to squirming and discomfort.
■ ■ ■ ■ ■
That is all.
If you have an older version of clip studio Paint, you may not be able to use it.
Also, please be careful not to process the photos you use in a way that clearly shows the copyrights and trademarks.
I haven't been able to confirm that it works well outside of my environment, so I'm very sorry if there is a problem ...;
写真を背景イラスト風にするオートアクションです。
ディテールが潰れるので、ブラシでベタッと塗ったようなラフな質感になります。
キャラクターイラストに馴染ませやすくなるので、よければお試しください。
(作例写真はすべて作者の撮影です)
■ ■ ■ ■ ■
【使い方】
①オートアクションセットの1番上にある【★加工用新規キャンバス作成】をクリック
②作成されたキャンバスに写真画像を追加して、大きさを調整する
③【写真→イラスト化(弱~強)】をクリック
これで加工が完了します。
よい具合になるまで③を繰り返し、加工を重ねてみてください。
★加工の強度を上げるほど、輪郭が潰れてイラスト感が増していきます。
★「強め」加工で約10秒ほどかかります (作者の環境では…)
環境によっては重くなるかもしれませんので、弱めから様子を見つつお試しください。
■ ■ ■ ■ ■
以下、より詳しい手順です。
■【オートアクションセットを表示する】
上部のメニューから「ウィンドウ」→「オートアクション」をクリックすると
デフォルトのオートアクションセットが出てきます。
オートアクションウィンドウのメニューボタンをクリックし、
「オートアクションセットの追加」→「写真を背景イラスト風に変換」→「パレットに追加」をクリックしてください。
(もしくは「読み込みボタン」からパレットに追加)
■【使い方詳細】
①【★加工用新規キャンバス作成】をクリック
作成されたキャンバス内に写真を入れて、加工作業をしていきます。
※ここで注意!
キャライラストと同じキャンバスでオートアクションを使用しないでください。
オートアクション内に画像を劣化させる工程があるので、
キャライラストまで劣化してしまいます!
★加工は必ず新規キャンバスで!
②キャンバスに写真画像を追加して 大きさを調整
③【写真→イラスト化(弱→強)】をクリック
★加工のかかりが弱い場合は、写真画像を小さくしてみてください。
■ ■ ■ ■ ■
加工後の背景をキャライラストに組み合わせて、まとめて仕上げをするとより馴染みます。
上のサンプルでは、キャラ&背景の全面に
■ 色収差
■ ノイズ
■ オーバーレイ(ピンク)
をかけています。
コマンドの左のチェックを外すと、ノイズなしで仕上げることもできます。
遠景サンプル (オーバーレイ仕上げ:上ピンク 下青)
★電線や木の枝などの細い直線、砂利などのつぶつぶは、ぐにゃぐにゃして違和感が出やすいので注意してください。
■ ■ ■ ■ ■
以上です。
クリップスタジオペイントのバージョンが古い場合、使用できない可能性があります。
また、使用する写真の著作権や、商標などがはっきりとわかる形での加工はご注意くださいませ。
自分の環境以外で上手く作動するか確認できていないため、もし不具合がございましたら大変申し訳ございません…;




Popular “Auto Action” materials


New materials




Badges
-
 MVP ◆This user has contributed greatly to the management of the community, by posting many great responses to the questions asked. Once every three months, MVPs are determined based on the points earned during that period and will be recognized accordingly.
 -
 New Valuable Player (NVP) ◆These are the next-best contributors to the community after MVPs. This is awarded to users who have not yet won an MVP award, based on the number of points they have earned.
 -
 Official Expert ◆Chosen out of all MVP awardees, who are already proof of excellence, this is a testimony of outstanding correspondence in the community. After careful screening, they are appointed by CELSYS and assume their position.Note: Formally called “Evangelists”
 -
 Official Moderator of CELSYS ◆Moderators are official CELSYS staff members who are fluent in Japanese as well as various other languages. Moderators are not experts on the software or illustration, so they are not able to directly answer your questions. However, moderators provide communication and language support to ensure that everyone can smoothly communicate with each other.
 -
 CELSYS official accountThe Official Administrator Account