



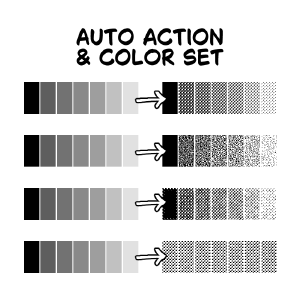
カラーセットと、原稿の描画に使うオートアクションセット用のマテリアルカタログです。 Material catalog for the color set and auto action set I use for drawing manuscripts.

グランジトーンを除けば、これらはデフォルトです。これは使いやすさのためです。
純粋な黒をトーンと同じレイヤーに塗ることはおすすめしません。私は個人的に純粋な黒のシェーディング用にモノクロレイヤーを作っています。
また、色ごとにトーンを分けることも推奨されます。

「トーンレイヤー」と「トーンレイヤー(サーモン)」
この二人も同じことをしています。どちらもグレーレイヤーで新しいレイヤーを作るので、モノクロレイヤーがあると便利です。これはショートカットキーに割り当てるためのものです。唯一の違いは「トーンレイヤー(サーモン)」がサーモン色のレイヤーカラーを適用していることです。他のオートアクションを適用すると、レイヤーの色は自動的にオフになります。
パレットカラーは「赤」なので、まだトーンに変換されていないか確認できます。
「カスタムトーンを使用」/「カスタムトーン(フォルダなし)」の説明:
トーンレイヤーを使って選択を行います。アクションが終わったら、画像マテリアルをドラッグ&ドロップするだけです。最初のものはレイヤーマスク付きのフォルダを作成しますが、2つ目はできません。
With the exception of the grunge tone, these are default. This is just for ease of use.
I don’t recommend putting pure black on the same layer as tones. I personally make a monochrome layer for pure black shading.
It is also recommended to separate your tones by color.
"Tone Layer" and "Tone Layer (Salmon)"
These two do the same thing. They both make new layers for your tones in a Gray layer, so it’s helpful if you have monochrome layers. This is meant to be binded to a shortcut key. The only difference is that "Tone Layer (Salmon)” applies a salmon-colored layer color. When you apply the other auto actions, the layer color will be turned off automatically.
The palette color is “red” so you can see if it hasn’t been converted to tones yet.
Explanation for “Use Custom Tones”/“Custom Tones (no folder)":
It takes the tone layer and makes a selection. After the action is done, just drag and drop an image material. The first one makes a folder with a layer mask, but the second doesn’t.
セット SET










"kaaaal"さんの別の素材


"素材集"の人気素材


新着素材





バッジ
-
 MVP ◆質問に対して適切な回答を数多く投稿し、コミュニティの運営に大きく貢献したユーザーです。MVPは3ヶ月に一度、その間に獲得したポイントを元に決定し、表彰を行っています。
 -
 NVP (New Valuable Player) ◆MVPに次いでコミュニティの運営に貢献したユーザーです。これまでMVPの受賞経験のない方から、獲得したポイントを元に決定し、表彰を行なっています。
 -
 公式エキスパート ◆優れた回答者の証であるMVP受賞者の中からさらに選ばれた、コミュニティで最も優良な回答者の証です。審査を経て当社から依頼し就任いただいています。※旧名称「エバンジェリスト」
 -
 セルシス公認モデレーター ◆モデレーターは、日本語とその他の言語が話せるセルシス公認のスタッフです。ソフトウェアや創作のエキスパートではないので、直接疑問を解決することはできませんが、みなさんがスムーズにコミュニケーションできるように、言葉やコミュニケーションの側面からサポートします。
 -
 セルシス公式運営に関連した公式アカウントです。