

多くのパーツはオプションです
Idkはtbh.を言うために何を言うべきか。
Many of the parts are optional
Idk what to say tbh..
以前は

後

いくつかのメモ:
- 図面のサイズはキャンバスサイズとして忘れずに維持してください
- 「明るさ」が機能しないことがあります- 新しいレイヤーを作成し、好きな色を使用します
(暗い効果と明るい効果のどちらが必要かによって異なります。
暗い色 - 暗い色、明るい - 明るい色 (ここでは濃い青を使用しました)

後

いくつかのメモ:
- 図面のサイズはキャンバスサイズとして忘れずに維持してください
- 「明るさ」が機能しないことがあります- 新しいレイヤーを作成し、好きな色を使用します
(暗い効果と明るい効果のどちらが必要かによって異なります。
暗い色 - 暗い色、明るい - 明るい色 (ここでは濃い青を使用しました)
レイヤーを明るさに設定し、不透明度を好きなように変更します。
- 「線の色」と「線のぼかし」は線画用です。忘れずに1つ置いてください。お持ちでない場合は、この操作をスキップするか、次の操作を行います。
- 元の図面でレイヤーをコピーする
- 彩度のある補正レイヤーを作成し、0に設定します。このコピーでマージしてください
- 補正レイヤーを「レバー補正」にし、線画だけ が残るまで動き回ってみてください
- オートアクションでは「線効果」を使用しますが、「画面」に設定してマージします
- 「ラインブラー」を使用すると、すべてが完了します:D
さらに効果を高めるために「レトロTVフレーム」もお勧めします!
しかし、それはオプションにすぎません(たとえば、ここでは使用しませんでした)
https://assets.clip-studio.com/en-us/detail?id=2103749
楽しむ!
Before
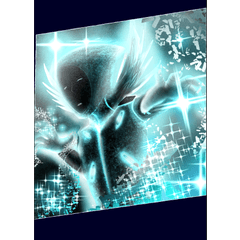
After
Few notes:
- remember to keep size of the drawing as canvas size
- "brightness" sometimes doesnt work - Make new layer, use any color you want
(depends on if you want darker or brighter effect.
For dark - darker color, for bright - brighter color (here I used dark blue)
After
Few notes:
- remember to keep size of the drawing as canvas size
- "brightness" sometimes doesnt work - Make new layer, use any color you want
(depends on if you want darker or brighter effect.
For dark - darker color, for bright - brighter color (here I used dark blue)
set layer to brightness and change opacity as you like.
- "line color" and "line blur" is for lineart. Remember to keep one around. If you don't have one, you can skip this action or:
- copy layer with the original drawing
- make correction layer with saturation and set it to 0. Marge it on this copy
- make correction layer "lever correction" and try to move around till all it's left is lineart
- use "line effect" in auto action, but set it to "screen" and merge
- now use "line blur" and all is done : D
I also reccomand "Retro TV Frame" for even better effect!
But that's only optional (for example I didn't use it here)
https://assets.clip-studio.com/en-us/detail?id=2103749
Enjoy!


"KarolH"さんの別の素材


"オートアクション"の人気素材


新着素材


バッジ
-
 MVP ◆質問に対して適切な回答を数多く投稿し、コミュニティの運営に大きく貢献したユーザーです。MVPは3ヶ月に一度、その間に獲得したポイントを元に決定し、表彰を行っています。
 -
 NVP (New Valuable Player) ◆MVPに次いでコミュニティの運営に貢献したユーザーです。これまでMVPの受賞経験のない方から、獲得したポイントを元に決定し、表彰を行なっています。
 -
 公式エキスパート ◆優れた回答者の証であるMVP受賞者の中からさらに選ばれた、コミュニティで最も優良な回答者の証です。審査を経て当社から依頼し就任いただいています。※旧名称「エバンジェリスト」
 -
 セルシス公認モデレーター ◆モデレーターは、日本語とその他の言語が話せるセルシス公認のスタッフです。ソフトウェアや創作のエキスパートではないので、直接疑問を解決することはできませんが、みなさんがスムーズにコミュニケーションできるように、言葉やコミュニケーションの側面からサポートします。
 -
 セルシス公式運営に関連した公式アカウントです。