

マグネットなげなわツールは、参照レイヤーを使用している場合でも、現在のレイヤーで作業している場合でも、ラインに直接スナップするため、選択がより迅速かつクリーンになります。
これがあなたのアートをより迅速かつ簡単に色付けするのに役立つことを願っています!
The Magnetic Lasso Tool snaps directly to your lines, whether you're using a reference layer or just working on the current one, which makes your selections quicker and cleaner.
Hope this helps you color your art quicker and easier!
こんにちは
Clip Studio Paintバージョン4.0専用の便利な磁気なげなわツールを作成しました。
ここでは、その使用方法について簡単に説明します。
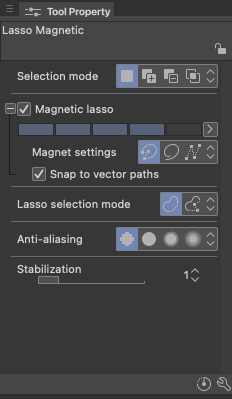
- ラインアートを準備する:ラインアートが ベクターレイヤーに配置されていることを確認してください。 磁気なげなわはベクトル線で最適に機能するため、これは重要です。

- 簡単に選択:マグネットなげなわツールをつかんで、アートワークの周りをトレースし始めます。自動的にラインにスナップし、正確な選択が非常に簡単になることに気付くでしょう。

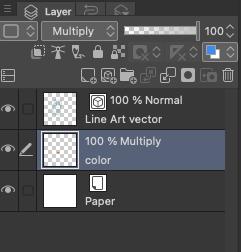
- 色の追加:私の例では、線画の下に新しいラスターレイヤーを作成しました。エリアを選択したら、このレイヤーを使用して色をきれいに塗りつぶします。私はコンテキストメニューのバケツツールを使用します。


サブツールメニューの場合:

Hello ,
I’ve created a handy magnetic lasso tool specifically for Clip Studio Paint version 4.0.
Here’s a quick guide on how to use it:
- Get your Line Art ready: make sure your line art is placed on a Vector Layer. This is important because the magnetic Lasso works best with vector lines.
- Select with Ease: grab the Magnetic Lasso Tool and start tracing around your artwork. You’ll notice how it automatically snaps onto your lines, making precise selections super easy.
- Adding color: In my example, I created a new Raster Layer underneath the line art. Once you’ve got your area selected, simply use this layer to fill the colors neatly. I use the bucket tools on the contextual menu.
For the sub tool menu:


"JayNandu"さんの別の素材

"ツール設定(その他)"の人気素材


新着素材


バッジ
-
 MVP ◆質問に対して適切な回答を数多く投稿し、コミュニティの運営に大きく貢献したユーザーです。MVPは3ヶ月に一度、その間に獲得したポイントを元に決定し、表彰を行っています。
 -
 NVP (New Valuable Player) ◆MVPに次いでコミュニティの運営に貢献したユーザーです。これまでMVPの受賞経験のない方から、獲得したポイントを元に決定し、表彰を行なっています。
 -
 公式エキスパート ◆優れた回答者の証であるMVP受賞者の中からさらに選ばれた、コミュニティで最も優良な回答者の証です。審査を経て当社から依頼し就任いただいています。※旧名称「エバンジェリスト」
 -
 セルシス公認モデレーター ◆モデレーターは、日本語とその他の言語が話せるセルシス公認のスタッフです。ソフトウェアや創作のエキスパートではないので、直接疑問を解決することはできませんが、みなさんがスムーズにコミュニケーションできるように、言葉やコミュニケーションの側面からサポートします。
 -
 セルシス公式運営に関連した公式アカウントです。