
「クリップ、マージ、コンティニュ」オートアクション ("Clip, Merge and Continue" Auto Action) "Clip, Merge and Continue" Auto Action
コンテンツID:2059681
-
176
1つまたは複数のレイヤーをドキュメント内のすべてのレイヤーにマージするのに役立つ自動アクション。 An auto action that helps merging one or multiple Layers to all Layers in your document.
1つまたは 複数の 補正レイヤーをすべてのレイヤーにすばやく マージしたい場合は、これが自動アクションです。他の用途もありますが 、それが私が作成した主な 用途です。
使い:
1つのレイヤーをその下のレイヤーにマージするには、レイヤーを選択して自動 アクションを実行し、必要に応じて繰り返します。複数のレイヤーの場合は、それらを選択してレイヤーフォルダーを作成し、 フォルダーを閉じてから、それらをマージするレイヤーごとに通常どおり自動アクションを実行します。
詳細な手順:
まず、その下のレイヤーに適用する レイヤー を選択します。
使い:
1つのレイヤーをその下のレイヤーにマージするには、レイヤーを選択して自動 アクションを実行し、必要に応じて繰り返します。複数のレイヤーの場合は、それらを選択してレイヤーフォルダーを作成し、 フォルダーを閉じてから、それらをマージするレイヤーごとに通常どおり自動アクションを実行します。
詳細な手順:
まず、その下のレイヤーに適用する レイヤー を選択します。

「クリップ、マージ、コンティニュ」自動アクションを実行し、ファイル>ショートカット設定>Category:自動アクションでショートカットを割り当てることをお勧めします。

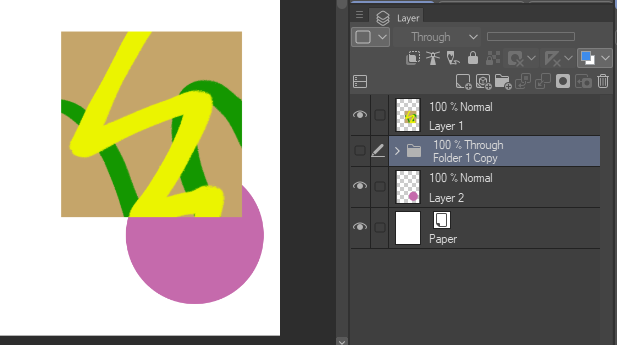
キャンバス上では何も起こらなかったように見えますが、レイヤーをよく見ると、レイヤーが クリップされ、そのすぐ下のレイヤーにマージされていることがわかります。 その可視性を無効にすると、自分の目で確かめることができます。

次のレイヤーに対してプロセスを簡単に繰り返すことができるように 、現在も複製されています。 何が起こったかを示すために可視性を無効にしましたが、自動アクションはレイヤーが表示されている場合にのみ機能します。 必要なすべてのレイヤーのプロセスが終了したら、 最後の複製を削除するだけです。

各レイヤーに一度に複数のレイヤーを適用する場合は、レイヤー フォルダーにグループ化し、 フォルダーアイコンの右側にある小さな矢印をクリックして閉じてから、同じ自動アクションを実行します。 フォルダが開いていると正しく動作 しません。 残念ながら、このフォルダを閉じるステップ は自動アクションに 記録できませんでした。

繰り返しになりますが、結果を示すためだけにレイヤーの可視性が無効になっています。

筆記:

筆記:
- 最初のレイヤー/フォルダー は毎回変更されずに複製されますが 、結果としてマージされたレイヤーは常にラスターレイヤー になります。 したがって、適用される最初のレイヤーがベクターレイヤーとその下のレイヤーであり 、マージされた レイヤーをベクターレイヤーのまま にしたい場合は 、そのステップで手動でマージしてから、他のレイヤーに対して通常どおり続行します。これをベクターレイヤーで頻繁に使用する場合は、この自動アクションを複製して、必要な調整を行うことを検討してください。
- 同じ理由で、現在のレイヤーの下のレイヤーがフォルダーの場合も注意してください。フォルダ全体をマージされた ラスターレイヤーにしたくない場合は、オートアクションを実行する前に、現在のレイヤー/フォルダをその 下のフォルダ内に移動します。
- ポスタリゼーションなどの一部の補正レイヤーは、キャンバス 全体に適用した場合と1つのレイヤーにクリップした場合で計算が異なる場合 があり、 この 自動アクション によってレイヤーの 外観が予期せず変更されます。そのような場合、問題のある補正レイヤーを回避し、おそらく何もマージしないままにしておく以外に、やることはあまりありません。
If you ever wanted to quickly merge one or multiple Correction Layers to all of your layers, this is the auto action for you. It has other uses, but that's the main one I created it for.
Usage:
To merge a single Layer to the ones below it, just select it and run the auto action, repeating as needed. For multiple Layers, select them and create a Layer Folder, close the Folder, then run the auto action normally for each Layer you want to merge them with.
Detailed instructions:
Begin by selecting the Layer that you want to apply to the Layers below it.

Run the "Clip, Merge and Continue" auto action, I recommend assigning a shortcut to it in File > Shorcut Settings > Category:Auto Actions.

It might look like nothing happened on the Canvas, but a close look at the layers reveals the result: the layer was clipped and merged to the one directly below it. If you disable its visibility you can see for yourself.

There is also a duplicate of it now so that you can easily repeat the process for the following layers. I disabled its visibility to show what happened but the auto action only works if the Layer is visibile. When you've finished the process for all of the layers that you wanted, simply delete the last duplicate.

If you want to apply multiple Layers at once to each Layer, simply group them in a Layer Folder, close it by clicking on the little arrow to the right of the folder icon, and only then run the same auto action. It won't work properly if the folder is open. This closing folder step couldn't be recorded into the auto action, unfortunately.

Again, Layer visiblity disabled just to demonstrate the results:

Notes:

Notes:
- The initial Layer/Folder is duplicated without changes every time, but the resulting merged layer always becomes a Raster Layer. So if the initial Layer being applied is a Vector Layer and the Layer below it too and you want the merged Layer to still be a Vector one, merge them manually for that step, then proceed normally for other Layers. If you intend to use this with Vector Layers a lot, consider duplicating this auto action and making the necessary adjustments.
- For the same reason, be careful when the layer below the current one is a Folder. If you don't want the entire Folder to become a merged Raster Layer, move the current Layer/Folder inside the Folder below it before running the auto action.
- Some Correction Layers, like Posterization, might make different calculations when applied to the entire canvas vs. when clipped to a single layer, leading this auto action to change a Layer's appearance unexpectedly. There's not much to do in those cases except working around the problematic Correction Layer and perhaps leaving it unmerged with anything.


