


Exportierte ausgewählte Schicht (Auto-Action) (Export Selected Layer (Auto-Action)) Export Selected Layer (Auto-Action)
Content ID:2302636
-
141
by
 ◆
◆
◆

Exportiere die aktuelle Schicht als PNG Export the current layer as a PNG
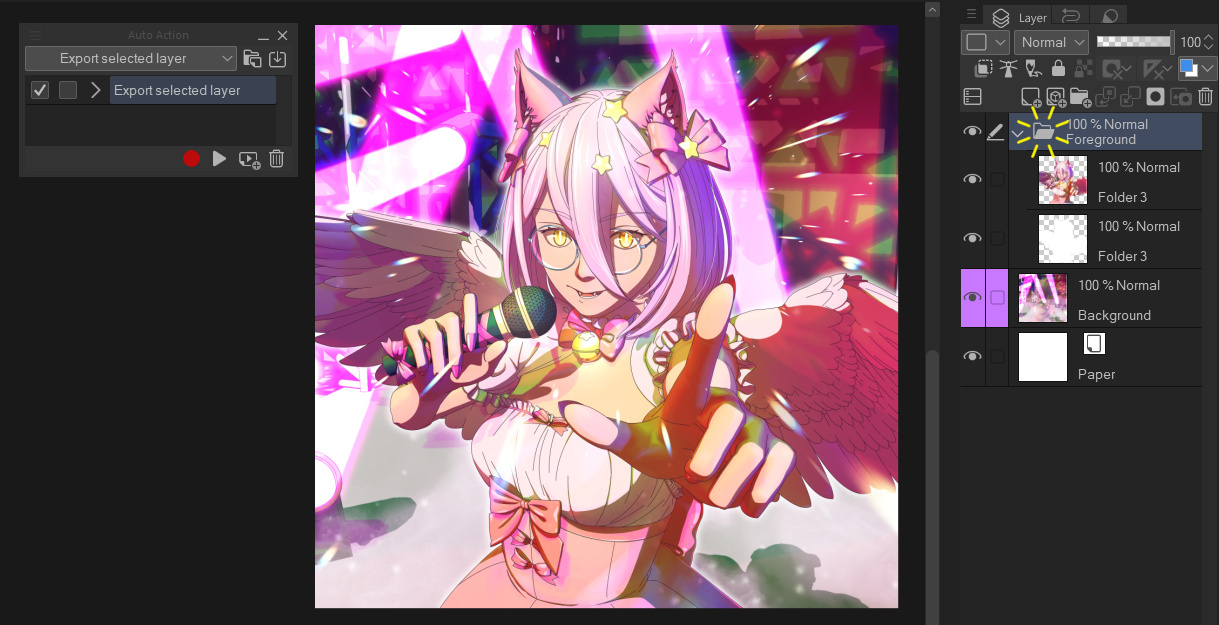
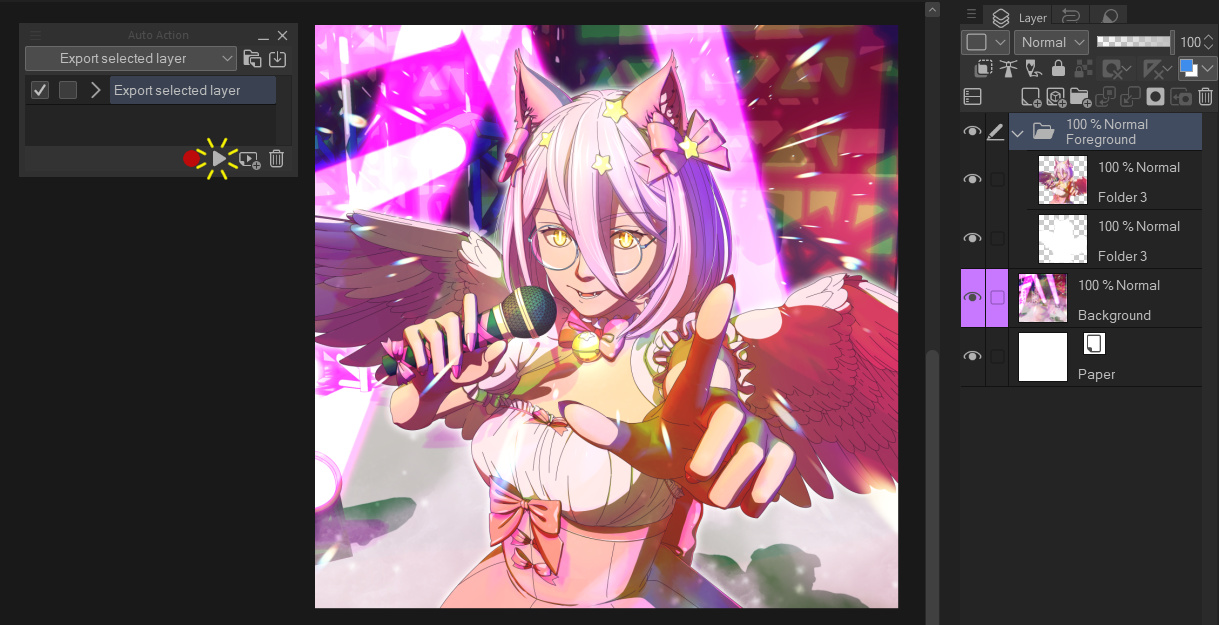
Exportiere die aktuell ausgewählte Ebene automatisch als PNG, ohne die Sichtbarkeit anderer Ebenen zu beeinträchtigen. Funktioniert auf einzelnen Ebenen oder Ebenenordnern. Wähle einfach eine Ebene aus, führe die automatische Aktion aus und wähle dann den Dateinamen. Verwendet Layer-Kompositionen, um den Dokumentstatus vorübergehend zu speichern, funktioniert daher nicht auf Versionen von Clip Studio vor Version 3.0 oder in Clip Studio Debut.
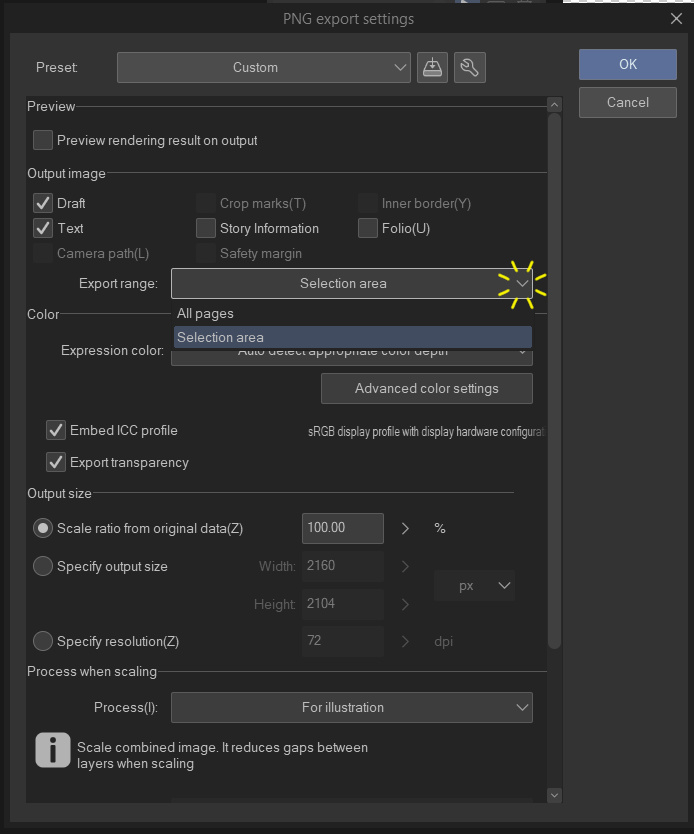

Wenn Sie auswählen, wo Sie die Datei exportieren, können Sie entweder nur die Teile der Ebene exportieren, auf denen gezeichnet ist (und transparente Pixel an den Rändern zuschneiden), indem Sie das Dropdown-Menü "Exportbereich" auf "Auswahlbereich" ändern. Wenn man es auf "Alle Seiten" belässt, wird die Ebene mit der gleichen Auflösung wie die Leinwand exportiert.
Du kannst auch automatische Aktionen in Tastenkombinationen registrieren, um noch schneller zu exportieren. Verwenden Sie "Datei-> Shortcut-Einstellungen" und ändern Sie die Kategorie auf "Automatische Aktionen", um dies einzurichten.
Beispielverwendung
Wähle die Ebene aus, die du exportieren möchtest
Führe die Auto-Action aus (drücke die Play-Taste)
Wählen Sie einen Namen für Ihre Datei und wählen Sie dann entweder "Auswahlbereich" oder "Alle Seiten" für den Exportbereich
Fertig!
Über Auto-Aktionen
Falls du noch nie eine Auto-Action benutzt hast, hier einige Anleitungen, wie du sie benutzt:
https://support.clip-studio.com/en-us/faq/articles/20210077
https://support.clip-studio.com/en-us/faq/articles/20220025
Automatically export the currently selected layer on its own as a PNG, without affecting the visibility of any other layers. Works on individual layers or layer folders. Just select a layer, run the auto-action, then choose the file name. Uses layer comps to temporarily save the document state, so will not work on versions of Clip Studio before version 3.0, or in Clip Studio Debut.
When choosing where to export the file, you can choose to either export only the parts of the layer that are drawn on (cropping any transparent pixels on the edges) by changing the "Export range" dropdown to "Selection area". Leaving it on "All pages" will export the layer at the same resolution as the canvas.
You can also register auto-actions to keyboard shortcuts for even faster exporting. Use "File -> Shortcut settings" and change the category to "Auto actions" to set this up.
Example usage
Select the layer you want to export
Run the auto-action (press the play button)
Choose a name for your file, then choose either "Selection area" or "All pages" for the export range
Done!
About Auto Actions
If you've never used an Auto Action before, here's some guides on how to use them:
https://support.clip-studio.com/en-us/faq/articles/20210077
https://support.clip-studio.com/en-us/faq/articles/20220025







Weitere Materialien von DragonWithaFez


Beliebte Materialien zu „Auto-Action“



Neue Materialien


Abzeichen
-
 MVP ◆Dieser Nutzer hat einen großen Beitrag zur Verwaltung der Community geleistet, indem er viele großartige Antworten auf die gestellten Fragen veröffentlicht hat. Alle drei Monate werden die MVPs auf der Grundlage der in diesem Zeitraum erworbenen Punkte ermittelt und entsprechend anerkannt.
 -
 New Valuable Player (NVP) ◆Die NVP-Auszeichnung geht an die Nutzer, die nach den MVP den größten Beitrag zur Community geleistet haben. Sie werden basierend auf den gesammelten Punkten unter denjenigen ausgewählt, die bisher noch nicht als MVP ausgezeichnet wurden.
 -
 Offizielle Experten ◆Ausgewählt aus allen MVP-Preisträgern, die bereits ein Zeichen für Exzellenz sind, zeugt diese Auszeichnung von herausragender Korrespondenz in der Community. Nach sorgfältiger Prüfung werden sie von CELSYS ernannt und übernehmen ihre Position.* Vorherige Bezichnung: Evangelist
 -
 Offizieller Moderator von CELSYS ◆Moderatoren sind offizielle CELSYS-Mitarbeiter, die fließend Japanisch und verschiedene andere Sprachen sprechen. Moderatoren sind keine Experten der Software oder Illustrationen und können daher nicht direkt auf Ihre Fragen antworten. Aber Moderatoren bieten Unterstützung in Kommunikation und Sprache, um sicherzustellen, dass alle reibungslos miteinander kommunizieren können.
 -
 Offizieller Account von CELSYSDer offizielle Administrator-Account