


匯出選取圖層(自動操作) (Export Selected Layer (Auto-Action)) Export Selected Layer (Auto-Action)
素材ID:2302636
-
365
by
 ◆
◆
◆

將當前圖層匯出為 PNG Export the current layer as a PNG
自動將目前選取的圖層單獨匯出為 PNG,不影響其他圖層的可見性。適用於單一圖層或圖層資料夾。只要選擇一個圖層,執行自動動作,然後選擇檔案名稱。使用圖層合成暫時儲存文件狀態,因此 無法在 3.0 版本之前的 Clip Studio 版本或 Clip Studio Debut 上運作。
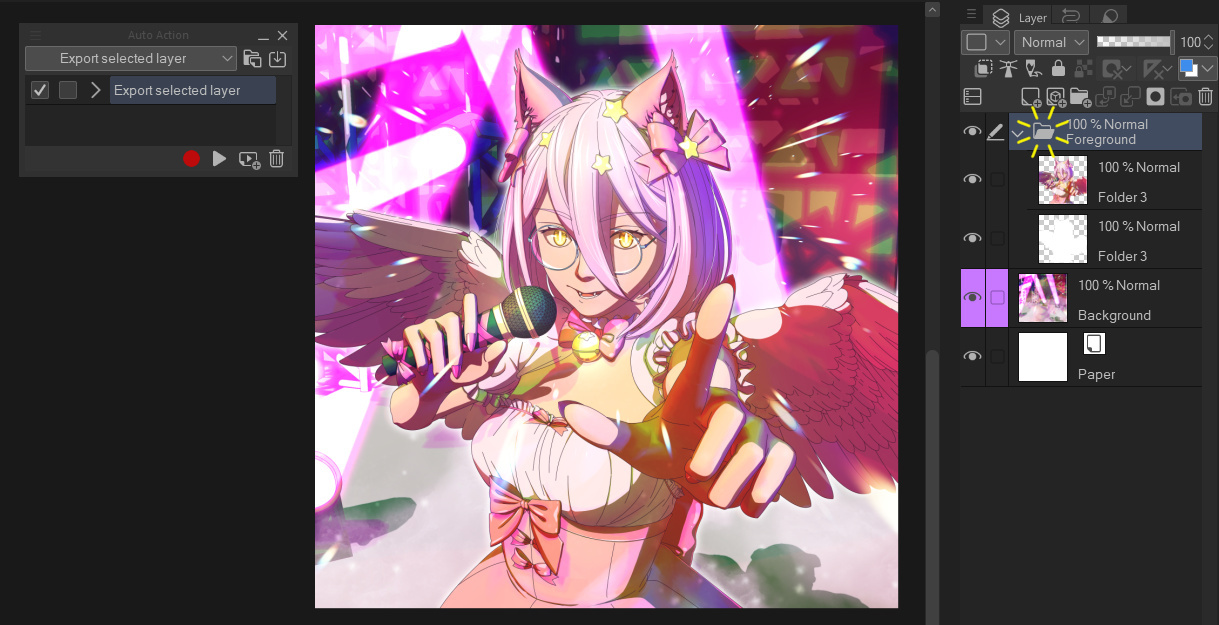
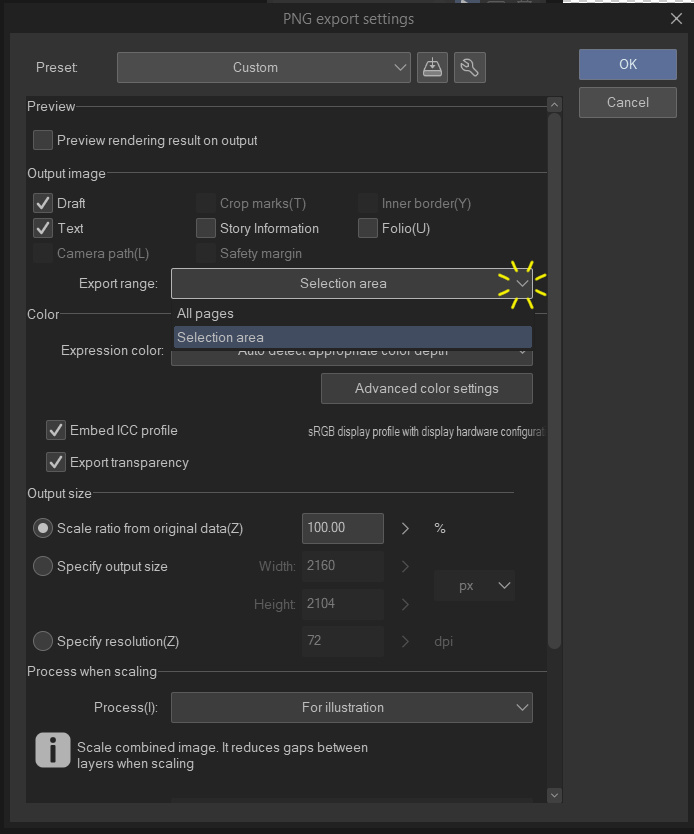

選擇匯出檔案的位置時,你可以選擇只匯出已繪製的圖層部分(裁切邊緣的透明像素),方法是將「匯出範圍」下拉選單改成「選取區域」。將圖層設為「所有頁面」會匯出到與畫布相同的解析度。
你也可以將自動動作登錄到鍵盤快捷鍵,讓匯出速度更快。使用「檔案 ->捷徑設定」,並將分類改成「自動動作」來設定。
範例用法
選擇你想匯出的圖層
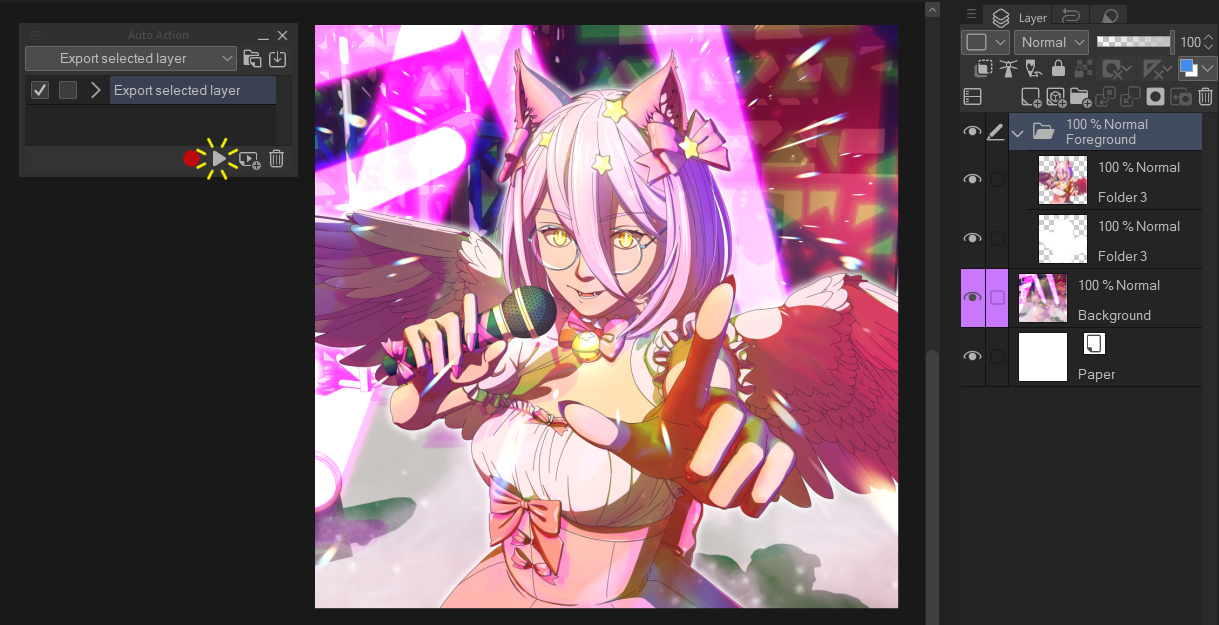
執行自動動作(按下播放鍵)
選擇檔案名稱,然後選擇「選取區」或「所有頁面」來選擇匯出範圍
完成!
關於自動行動
如果你從未使用過自動動作,這裡有一些使用指南:
https://support.clip-studio.com/en-us/faq/articles/20210077
https://support.clip-studio.com/en-us/faq/articles/20220025
Automatically export the currently selected layer on its own as a PNG, without affecting the visibility of any other layers. Works on individual layers or layer folders. Just select a layer, run the auto-action, then choose the file name. Uses layer comps to temporarily save the document state, so will not work on versions of Clip Studio before version 3.0, or in Clip Studio Debut.
When choosing where to export the file, you can choose to either export only the parts of the layer that are drawn on (cropping any transparent pixels on the edges) by changing the "Export range" dropdown to "Selection area". Leaving it on "All pages" will export the layer at the same resolution as the canvas.
You can also register auto-actions to keyboard shortcuts for even faster exporting. Use "File -> Shortcut settings" and change the category to "Auto actions" to set this up.
Example usage
Select the layer you want to export
Run the auto-action (press the play button)
Choose a name for your file, then choose either "Selection area" or "All pages" for the export range
Done!
About Auto Actions
If you've never used an Auto Action before, here's some guides on how to use them:
https://support.clip-studio.com/en-us/faq/articles/20210077
https://support.clip-studio.com/en-us/faq/articles/20220025










「DragonWithaFez」的其他素材


「自動動作」的人氣素材





最新素材



徽章
-
 MVP ◆針對問題投稿了眾多適切的回答,對社群有顯著貢獻的用戶。每3個月一次,會依據期間內獲得的點數選出MVP用戶,並進行表揚。
 -
 NVP(New Valuable Player) ◆繼MVP後,對社群營運做出良好貢獻的用戶。將從不曾獲選為MVP的用戶中,依據獲得的點數進行評選、表揚。
 -
 官方推廣大使 ◆從被證明為優良回答用戶的MVP獲獎者中選出社群中最優異的回答者。並經審查後由本社委託就任。※舊名稱為「Evangelist」
 -
 CELSYS公認Moderator ◆Moderator為會使用日文及其他語言的CELSYS公認工作人員。由於並非軟體或創作的專業人士,Moderator無法直接為用戶解決疑問,但能在語言、交流方面提供支援,幫助用戶們順利地進行溝通。
 -
 CELSYS官方為與營運相關的官方帳號。