

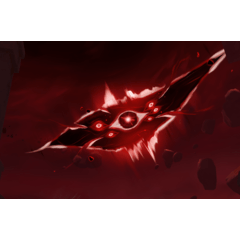
AK74SU (1) 帶有消音器的 標準自動步槍,可融入您的項目中。
- 建立 新畫布 或開啟要新增 3D 模型的現有專案。
- 在「材質面板」(通常位於右側)中 ,前往 「 3D >物件」。
- 從檔案總管拖曳 3D 模型檔案或 手動匯入:
- 匯入後,模型將出現在畫布上。
- 使用螢幕 上的移動、旋轉或縮放工具調整模型的位置 :
- 使用 藍色、綠色和紅色箭頭 在 3D 空間中移動模型。
- 使用 旋轉控點 繞不同軸旋轉它。
- 透過拖曳角或使用縮放工具來調整 大小 。
- 使用相機工具 (位於 3D 控制項附近的工具列中)來 調整 3D 物件的視圖。
- 您可以放大/縮小或旋轉相機以捕捉模型的所需角度。
- 在 [工具屬性面板 ] (頂端或側邊) 中 ,您可以調整 光線方向 和 陰影設定。
- 調整 環境光 或 物體陰影 強度以獲得更逼真的效果。
- 如果您已完成定位並想要進行進一步編輯, 請右鍵單擊 3D 圖層並選擇 點陣化。
- 這會將模型轉換為標準 2D 圖層以進行繪畫或修飾。
AK74SU (1) Standard automatic rifle with Silencer to incorporate into your project.
- Create a new canvas or open an existing project where you want to add the 3D model.
- In the Materials Panel (usually on the right side), go to 3D > Object.
- Drag the 3D model file from your file explorer or import it manually:
- Once imported, the model will appear on the canvas.
- Adjust the model's position using the on-screen move, rotate, or scale tools:
- Use the blue, green, and red arrows to move the model in 3D space.
- Use the rotation handles to rotate it around different axes.
- Adjust the size by dragging the corners or using the scaling tool.
- Use the Camera Tool (located in the toolbar near the 3D controls) to adjust your view of the 3D object.
- You can zoom in/out or rotate the camera to capture the desired angle of the model.
- In the Tool Property Panel (at the top or side), you can adjust light direction and shadow settings.
- Tweak the ambient light or object shadow intensity for a more realistic effect.
- If you’re done with positioning and want to make further edits, right-click on the 3D layer and choose Rasterize.
- This converts the model to a standard 2D layer for painting or touch up.
材料 Material
-
預設材質 Default material

分配 Allocate
-
預設版面配置 Default layout


「ChicoThaDon91」的其他素材


「3D物件」的人氣素材


最新素材


徽章
-
 MVP ◆針對問題投稿了眾多適切的回答,對社群有顯著貢獻的用戶。每3個月一次,會依據期間內獲得的點數選出MVP用戶,並進行表揚。
 -
 NVP(New Valuable Player) ◆繼MVP後,對社群營運做出良好貢獻的用戶。將從不曾獲選為MVP的用戶中,依據獲得的點數進行評選、表揚。
 -
 官方推廣大使 ◆從被證明為優良回答用戶的MVP獲獎者中選出社群中最優異的回答者。並經審查後由本社委託就任。※舊名稱為「Evangelist」
 -
 CELSYS公認Moderator ◆Moderator為會使用日文及其他語言的CELSYS公認工作人員。由於並非軟體或創作的專業人士,Moderator無法直接為用戶解決疑問,但能在語言、交流方面提供支援,幫助用戶們順利地進行溝通。
 -
 CELSYS官方為與營運相關的官方帳號。