
水玻璃刷(JR的垃圾抽屜) (Water glass brushes (JR's Junk Drawer)) Water glass brushes (JR's Junk Drawer)
素材ID:2076167
-
48,970

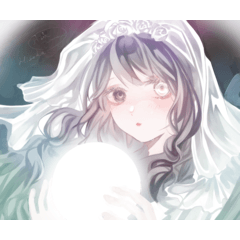
我製作了這套畫筆,以説明我在最近的一幅藝術作品中畫出從玻璃窗上流下來的水。
這套有9把刷子,盡情享受吧!
我在 YouTube 藝術教程中展示了更多這些畫筆,這裡是連結 - https://youtu.be/eky8y0ivTXI?t=1457
I made this brushset to help me paint water running down a glass window in a recent artwork of mine.
There are 9 brushes in this set, enjoy!
I show a little more of these brushes in that YouTube art tutorial, here is the link - https://youtu.be/eky8y0ivTXI?t=1457
我製作了這套畫筆,以説明我 在最近的一幅藝術作品中畫 出從玻璃窗上流下來的水。
這套有9把刷子,盡情享受吧!

當我製作這些畫筆時,我正在畫 一些靠在雨窗上的女孩 的同人畫, 我在 YouTube 藝術教程中展示了更多 這些畫筆, 這裡是連結 - https://youtu.be/eky8y0ivTXI?t=1457

注意: 如果將透過玻璃看到的所有元素合併到一層中,則這些畫筆效果最佳。
步驟 1。 複製視窗層,稍後 將 使用。
第2步。 使用“JR Blur 2 Water Glass Texture”和“JR Blur glow Water Glass Texture”畫筆在整個窗口周圍進行模糊和發光。
第 3 步。 使用「JR紋理水玻璃」、「JR不均勻紋理水玻璃1」、“JR流紋水玻璃3”和 “JR效果紋理水玻璃2”將灰度塗抹在玻璃上。
第 4 步。 使用“JR Water Stream Dark 02”和“JR Water Stream Light 03”在光源周圍繪製更清晰的光澤和高光
第 5 步。 用液化工具繪製一些小條紋,以添加一些輕微的垂直變形。
第 6 步。 這是關鍵的一步 - 使用「JR Water Stream 01」刷子,
使用擦除的混合模式,剪切掉流式圖案
從當前層露出原來的底漆。
(在第一步中留出的重複圖層。
使用擦除的混合模式,剪切掉流式圖案
從當前層露出原來的底漆。
(在第一步中留出的重複圖層。
第 7 步。 使用鋼筆劃筆,任何適合清晰細節的鋼筆都可以,在光源周圍繪製清晰的高光。將尖銳的標記 從光源 中散射 出來,以顯示 通過水滴折射 的光 。
第8步。 使用畫筆和混合模式進行自由泳,以增強光源的發光,直到您滿意為止。
第 9 步。 在玻璃邊緣添加額外的灰度。
-----------------------
這些畫筆很靈活, 不必 完全按照我的指示使用。這些步驟只是一些建議,用於解釋 我知道的一種有效方法 。
請嘗試使用該技術並找到以意想不到的方式使用畫筆的酷方法,當您這樣做時, 請隨時在 Instagram 上 與我分享您的結果或在 YouTube 上對我發表評論。我很想聽聽你使用 這些畫筆的創造性方式!


I made this brushset to help me paint water running down a glass window in a recent artwork of mine.
There are 9 brushes in this set, enjoy!
I was painting some fanart of a girl leaning against a rainy window when I made these brushes, and I show a little more of these brushes in that YouTube art tutorial, here is the link - https://youtu.be/eky8y0ivTXI?t=1457
Note: These brushes work best if you merge all elements seen through the glass into one layer.
Step 1. Make a duplicate of the window layer, this WILL be used later.
Step 2. Use the "JR Blur 2 Water Glass Texture" and "JR Blur glow Water Glass Texture" brushes to blur and glow around the whole window.
Step 3. Apply ashyness to the glass with "JR Textured Water Glass", "JR Uneven Textured Water Glass 1", "JR Streaming Textured Water Glass 3", and "JR Effect Streaming Textured Water Glass 2".
Step 4. Paint sharper glow and highlights around light sources with "JR Water Stream Dark 02" and "JR Water Stream Light 03"
Step 5. Paint some small streaks with a liquify tool to add some slight vertical distortion.
Step 6. Here is the crucial step - Use the "JR Water Stream 01" brush,
with a blending mode of erase, to cut away a streaming pattern
from the current layer to reveal the original base coat.
(that duplicated layer set aside on step one.)
with a blending mode of erase, to cut away a streaming pattern
from the current layer to reveal the original base coat.
(that duplicated layer set aside on step one.)
Step 7. Use a pen brush, any pen brush that would be good for sharp detail will do, to paint sharp highlights around the light sources. Scatter the sharp marks out from the light source to show light refracting through droplets of water.
Step 8. Freestyle with the brushes and blending modes to enhance the glow of the light sources till you are satisfied.
Step 9. Add extra ashyness around the edge of the glass.
-----------------------
These brushes are flexible and don't have to be used exactly as I've instructed. These steps are just some advice to explain one way that I know works.
Please, play with the technique and find cool ways to use the brushes in unexpected ways, and when you do, feel free to share your results with me on instagram or comment to me on YouTube. I would love to hear your creative ways of using these brushes!
JR 玻璃刷上的水 JR Water on Glass Brushes
-
JR Blur glow 水玻璃紋理 JR Blur glow Water Glass Texture
-
JR Blur 2 水玻璃紋理 JR Blur 2 Water Glass Texture
-
JR水流燈03 JR Water Stream Light 03
-
JR水流黑暗02 JR Water Stream Dark 02
-
JR水流01 JR Water Stream 01
-
JR Effect 流淌紋理水杯 2 JR Effect Streaming Textured Water Glass 2
-
JR 流淌紋理水杯 3 JR Streaming Textured Water Glass 3
-
JR 不均勻紋理水杯 1 JR Uneven Textured Water Glass 1
-
JR 紋理水玻璃 JR Textured Water Glass


「素材集」的人氣素材


最新素材


徽章
-
 MVP ◆針對問題投稿了眾多適切的回答,對社群有顯著貢獻的用戶。每3個月一次,會依據期間內獲得的點數選出MVP用戶,並進行表揚。
 -
 NVP(New Valuable Player) ◆繼MVP後,對社群營運做出良好貢獻的用戶。將從不曾獲選為MVP的用戶中,依據獲得的點數進行評選、表揚。
 -
 官方推廣大使 ◆從被證明為優良回答用戶的MVP獲獎者中選出社群中最優異的回答者。並經審查後由本社委託就任。※舊名稱為「Evangelist」
 -
 CELSYS公認Moderator ◆Moderator為會使用日文及其他語言的CELSYS公認工作人員。由於並非軟體或創作的專業人士,Moderator無法直接為用戶解決疑問,但能在語言、交流方面提供支援,幫助用戶們順利地進行溝通。
 -
 CELSYS官方為與營運相關的官方帳號。