

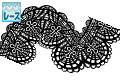
褶皺,蕾絲,絲帶,前立,針塔克等,
這是一套25種刷子,方便繪製衣服和織物的東西。
褶皺,這需要相當多的時間和精力,我可以很容易地畫它。
我包括蕾絲和絲帶,前立針塔克為小加。
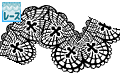
各種洛麗塔時尚和女僕服裝,公主系列一件,
華麗的禮服,或畫的衣服,如內衣或圍裙,
床、窗簾、靠墊、包、圍裙、遮陽傘等。
布的小東西怎麼樣?
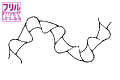
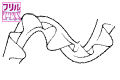
フリル・レース・リボン・前立て・ピンタック等、
洋服やファブリックものを描くのに便利なブラシの25種類のセットです。
けっこう手間がかかるフリルがザーッと簡単に描けちゃいます。
ちょい足し用のレースやリボン・前立て・ピンタックも同梱してます。
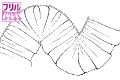
各種ロリータ系ファッションやメイド服・姫系のワンピース、
ゴージャスなドレス、ランジェリーやエプロンなどの服を描く時や、
ベッドやカーテン、クッション、バッグやエプロン、日傘などなど
布の小物にもいかがでしょうか。
各種洛麗塔時尚,女僕服裝,公主禮服,
當你畫華麗的衣服, 內衣時, 一個褶皺刷怎麼樣?
我們還建議使用它來繪製小物品,如床罩、窗簾、靠墊、包、圍裙和遮陽傘。
當你畫華麗的衣服, 內衣時, 一個褶皺刷怎麼樣?
我們還建議使用它來繪製小物品,如床罩、窗簾、靠墊、包、圍裙和遮陽傘。
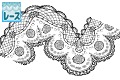
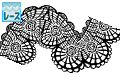
★ ☆ ★ ...[使用示例]사용 예제...★ ☆ ★
グリザイユ畫法・自動彩色・色ベタ塗り・テクスチャ・レイヤー効果などいろいろ織り交ぜて加工しています。
它通過交聯各種東西,如格裡賽耶繪畫方法,自動著色,
純色繪畫、紋理、圖層效果等。
純色繪畫、紋理、圖層效果等。


●使用ブラシ一覧&使用箇所
使用的畫筆和使用的畫筆清單
使用的畫筆和使用的畫筆清單
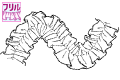
A...褶皺兩端
B。。。褶皺兩端,用於小零件
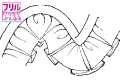
C。。。弗里爾隨機
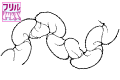
D。。。褶皺簡單
E...弗里爾查找
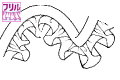
F。。。褶皺水準
G。。。用於小零件的褶皺水準
H。。。褶皺垂直簡單
Ⅰ。。。褶皺垂直隨機
J。。。褶皺長輕直
K。。。褶皺長微弧形
我。。。蕾絲白色交叉小零件
M...蕾絲白玫瑰小零件
N...蕾絲黑十字
O...蕾絲黑玫瑰
P。。。蕾絲黑色交叉小零件
問。。。蕾絲黑玫瑰小零件
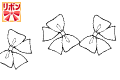
R。。。絲帶白長
S...絲帶白短
T...絲帶黑長
美國。。。絲帶黑短
五。。。絲帶迷你黑色 A
W...絲帶迷你黑色 B
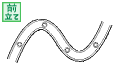
Ⅹ。。。帶按鈕的普拉克特
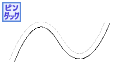
Y。。。針塞
別1...繡球(單獨出售-1 ID:1715567)
別2...圓形顆粒圖案(單獨出售-2 ID:1770486)新藝術風格
別3...圓形/帶狀(單獨出售-3 ID:1756911)羅可哥音
別4...百合角(單獨出售-4 ID:1756911)羅可哥音
別5...玫瑰花貝加萊德(單獨出售-5 ID:1716712)
別6...玫瑰葉貝加萊歐(單獨出售-6 ID:1728105)
別7...向日葵(單獨出售-7 ID:1716712)
別8...海葵花(單獨出售-7 ID:1770486)新藝術風格


繪圖時實際使用的大小
減少時的外觀,線條的運算式,
外觀自然的先進材料數量
我考慮各種因素。
減少時的外觀,線條的運算式,
外觀自然的先進材料數量
我考慮各種因素。
我盡我最大的努力微調每個點,使它看起來美麗和自然。
如果每個畫筆的線權重在分層時不匹配,則通過引用"如何使線條變厚或更薄"來更正它們
在頁面底部的圖像中。
我認為你可以根據你的想法設計各種想法,所以請試一試。
★ ☆ ★ ...細部確認用の畫像...★ ☆ ★
有關詳細資訊確認:將放大使用示例的示例圖像的一部分。
有關詳細資訊確認:將放大使用示例的示例圖像的一部分。

★ ☆ ★ ...[デタ[上市資料]데이터 나열...★ ☆ ★

★ ☆ ★ ...[種説][各種解釋]다양한 설명...★ ☆ ★

A-這是要增加或減少畫筆的長度和寬度時的方法。
從子工具詳細資訊進行調整。
從子工具詳細資訊進行調整。
我做了一條長裙。 (使用"J"畫筆)
左側垂直厚度為 100,中間垂直厚度為 50,是原始畫筆尺寸的 3 倍。
您可以通過刪除有關線條厚度的零件來更正它。
左側垂直厚度為 100,中間垂直厚度為 50,是原始畫筆尺寸的 3 倍。
您可以通過刪除有關線條厚度的零件來更正它。
C-更改振幅值。(使用"I"畫筆)
水準厚度 130 / 垂直厚度 100 / 垂直厚度 250
水準厚度 130 / 垂直厚度 100 / 垂直厚度 250
D-對於微妙的調整,讓你看到一瞥的皮大衣(從裙子下擺。(使用"L"畫筆)
垂直厚度 100 / 垂直厚度 70 / 水準厚度 70
垂直厚度 100 / 垂直厚度 70 / 水準厚度 70
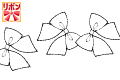
E-也可以反轉黑白並繪製。
根據您的喜好更正白線。
根據您的喜好更正白線。
F-主/子黑白可以更改為顏色。
G-這是使同一圖像看起來自然,以便它不使用多個畫筆時不會重疊的一種方式。
(使用向量圖層時)
捏合控制點,然後將其擴展以顯示下一個圖像。
擦除不必要的零件。
(使用向量圖層時)
捏合控制點,然後將其擴展以顯示下一個圖像。
擦除不必要的零件。
H-請應用它,當你堆積各種刷子。

各種方法使線"thck 或薄"作為一個整體
a-使用"向量線校正"
在柵格圖層上繪製並轉換為向量以校正線寬。
光線密度高的區域通過校正線寬使其變薄,看起來自然。
在柵格圖層上繪製並轉換為向量以校正線寬。
光線密度高的區域通過校正線寬使其變薄,看起來自然。
b-使用"選擇範圍(色域規格)"
通過創建線條的選擇區域和"展開/收縮"以繪製或擦除來調整線寬。
通過創建線條的選擇區域和"展開/收縮"以繪製或擦除來調整線寬。
c-使用"邊界效應"
在柵格圖層上繪製,從上面的功能表列"將亮度轉換為透明度"以擦除白色部分。
之後,在外部創建一條黑線,具有圖層屬性的"效果"的"邊界效果"。
向背景顏色添加白色。
在柵格圖層上繪製,從上面的功能表列"將亮度轉換為透明度"以擦除白色部分。
之後,在外部創建一條黑線,具有圖層屬性的"效果"的"邊界效果"。
向背景顏色添加白色。
d-使用"減色顯示"
使用灰色圖層上的主黑色和子白色進行繪製,然後從上面的功能表列中應用"篩檢程式"的"模糊"的"高斯模糊"。
之後,更改為單色圖層,然後從圖層屬性調整"顏色/阿爾法閾值"的值。
使用灰色圖層上的主黑色和子白色進行繪製,然後從上面的功能表列中應用"篩檢程式"的"模糊"的"高斯模糊"。
之後,更改為單色圖層,然後從圖層屬性調整"顏色/阿爾法閾值"的值。
e-加厚線後,如果您擔心密度,或者使線變薄或變淡,建議通過手工繪製來校正。這將是一個美麗的完成。
★ ☆ ★ ☆ ★ ☆ ★ ☆ ★ ☆ ★ ☆ ★ ☆ ★ ☆ ★ ☆ ★ ☆
白下地入りのブラシです。
説明畫像は図案が見やすいよう一部フチを太くしてるものがあります。
説明用の畫像はサンプルなので線を入れています。実際の素材には入っていません。
説明畫像は図案が見やすいよう一部フチを太くしてるものがあります。
説明用の畫像はサンプルなので線を入れています。実際の素材には入っていません。
它是一個帶白色底座的刷子。
一些解釋性圖像具有較厚的邊框,使設計更易於查看。
由於要說明的圖像是示例,因此將插入一行。它不包括在實際材料中。
一些解釋性圖像具有較厚的邊框,使設計更易於查看。
由於要說明的圖像是示例,因此將插入一行。它不包括在實際材料中。
Various lolita fashion, maid clothes, princess dresses,
How about a frill brush when you draw gorgeous dresses, lingerie?
We also recommend using it for drawing small items such as bedspreads, curtains, cushions, bags, aprons and parasols.
How about a frill brush when you draw gorgeous dresses, lingerie?
We also recommend using it for drawing small items such as bedspreads, curtains, cushions, bags, aprons and parasols.
★ ☆ ★ …↓使用例・Usage example・사용 예제… ★ ☆ ★
グリザイユ画法・自動彩色・色ベタ塗り・テクスチャ・レイヤー効果などいろいろ織り交ぜて加工しています。
It is processed by interweaving various things such as grisaille painting method, automatic coloring,
solid color painting, texture, layer effect etc.
solid color painting, texture, layer effect etc.
●使用ブラシ一覧&使用箇所
List of brushes used & locations used
List of brushes used & locations used
A…Frill both ends
B…Frill Both ends-for small parts
C…Frill random
D… Frill Simple
E…Frill Look up
F…Frill horizontal
G…Frill horizontal-for small parts
H…Frill verticall-simple
I…Frill verticall-random
J…Frill long-lightly straight
K…Frill long-slightly curved
L…Lace white cross-for small parts
M…Lace white rose-for small parts
N…Lace black cross
O…Lace black rose
P…Lace black cross-for small parts
Q…Lace black rose-for small parts
R…Ribbon white-long
S…Ribbon white-short
T…Ribbon black-long
U…Ribbon black-short
V…Ribbon mini black A
W…Ribbon mini black B
X…Placket with button
Y…Pin tuck
別1…hydrangea(Sold separately-1 ID:1715567)
別2…Round grain pattern(Sold separately-2 ID:1770486)Art Nouveau style
別3…Round/ribbon(Sold separately-3 ID:1756911)Rococo tone
別4…Lily-corner(Sold separately-4 ID:1756911)Rococo tone
別5…Rose flower B&W(Sold separately-5 ID:1716712)
別6…Rose leaf B&W(Sold separately-6 ID:1728105)
別7…Sunflower(Sold separately-7 ID:1716712)
別8…Anemone flower(Sold separately-7 ID:1770486)Art Nouveau style
The size actually used when drawing
The appearance when it is reduced, the expression of the line,
Number of advanced materials that look natural
I made it considering various elements.
The appearance when it is reduced, the expression of the line,
Number of advanced materials that look natural
I made it considering various elements.
I did my best to fine-tune each dot so that it looks beautiful and natural.
If the line weights of each brush do not match when they are layered, correct them by referring to "How to make the line thicker or thinner"
in the image at the bottom of the page.
I think that you can devise various ideas depending on your ideas, so please give it a try.
★ ☆ ★ …細部確認用の画像… ★ ☆ ★
For details confirmation: A part of the sample image of the usage example is enlarged.
For details confirmation: A part of the sample image of the usage example is enlarged.
★ ☆ ★ …出品データ・Listing data・데이터 나열… ★ ☆ ★
★ ☆ ★ …↓各種説明・Various explanations・다양한 설명… ★ ☆ ★
A-This is the method when you want to increase or decrease the length and width of the brush.
Adjust from the sub tool details.
Adjust from the sub tool details.
B-I made a long skirt. (Use "J" brush)
The vertical thickness is 100 on the left, the vertical thickness is 50 in the middle, and it is 3 times the original brush size.
You can correct it by deleting the part where you are concerned about the thickness of the line.
The vertical thickness is 100 on the left, the vertical thickness is 50 in the middle, and it is 3 times the original brush size.
You can correct it by deleting the part where you are concerned about the thickness of the line.
C-Changed the amplitude value. (Use "I" brush)
Horizontal Thickness 130 / Vertical Thickness 100 / Vertical Thickness 250
Horizontal Thickness 130 / Vertical Thickness 100 / Vertical Thickness 250
D-For subtle adjustments that allow you to see a glimpse of the petticoat(from the skirt hem. (Use "L" brush)
Vertical thickness 100 / vertical thickness 70 / horizontal thickness 70
Vertical thickness 100 / vertical thickness 70 / horizontal thickness 70
E-It is also possible to reverse the black and white and draw.
Correct the white line to your liking.
Correct the white line to your liking.
F-Main/sub black and white can be changed to color.
G-This is a way to make the same image look natural so that it doesn't overlap in the vicinity when using multiple brushes.
(When using vector layer)
Pinch the control point at the end and extend it to display the next image.
Erase unnecessary parts.
(When using vector layer)
Pinch the control point at the end and extend it to display the next image.
Erase unnecessary parts.
H-Please apply it when you pile up various brushes.
Various ways to make the line "thck or thin" as a whole
a-Use "Vector line correction"
Draw on a raster layer and convert to vector to correct the line width.
Areas with a high density of lines look natural by correcting the line width to make them thinner.
Draw on a raster layer and convert to vector to correct the line width.
Areas with a high density of lines look natural by correcting the line width to make them thinner.
b-Use "selection range (color gamut specification)"
Adjust the line width by creating a selection area of the line and "expanding/contracting" to paint or erase.
Adjust the line width by creating a selection area of the line and "expanding/contracting" to paint or erase.
c-Use "boundary effect"
Draw on a raster layer, and from the menu bar above, "Convert brightness to transparency" to erase the white part.
After that, make a black line on the outside with "Boundary effect" of "Effect" of the layer property.
Add a white color to the background color.
Draw on a raster layer, and from the menu bar above, "Convert brightness to transparency" to erase the white part.
After that, make a black line on the outside with "Boundary effect" of "Effect" of the layer property.
Add a white color to the background color.
d-Use "color reduction display"
Draw using the main black and sub white on the gray layer, and apply the "Gaussian blur" of "Blur" of "Filter" from the menu bar above.
After that, change to a monochrome layer and adjust the value of "Color/alpha threshold" from the layer properties.
Draw using the main black and sub white on the gray layer, and apply the "Gaussian blur" of "Blur" of "Filter" from the menu bar above.
After that, change to a monochrome layer and adjust the value of "Color/alpha threshold" from the layer properties.
e-After thickening the line, if you are concerned about the density, or if you make it thin and the line is cut or faint, it is recommended to correct it by hand drawing. It will be a beautiful finish.
★ ☆ ★ ☆ ★ ☆ ★ ☆ ★ ☆ ★ ☆ ★ ☆ ★ ☆ ★ ☆ ★ ☆
白下地入りのブラシです。
説明画像は図案が見やすいよう一部フチを太くしてるものがあります。
説明用の画像はサンプルなので線を入れています。実際の素材には入っていません。
説明画像は図案が見やすいよう一部フチを太くしてるものがあります。
説明用の画像はサンプルなので線を入れています。実際の素材には入っていません。
It is a brush with white base.
Some explanatory images have thicker borders to make the design easier to see.
Since the image for explanation is a sample, a line is inserted. It is not included in the actual material.
Some explanatory images have thicker borders to make the design easier to see.
Since the image for explanation is a sample, a line is inserted. It is not included in the actual material.
褶皺蕾絲絲帶刷+等 フリルレースリボンブラシ+etc
-
A 坎褶皺 - 兩端 Frill both ends A館フリル-両端 Frill both ends
-
B 坎褶皺 - 用於兩端/小零件的 Frill Both ends-for B館フリル-両端/小部分用 Frill Both ends-for small parts
-
C 坎弗里爾 - 隨機 Frill random C館フリル-ランダム Frill random
-
D 坎褶皺 - 簡單 Frill Simple D館フリル-シンプル Frill Simple
-
E 坎褶皺 - 奧裡·弗瑞爾·洛克 E館フリル-あおり Frill Look up
-
F 坎弗里爾 - 橫向 Frill Horizontal F館フリル-横向 Frill horizontal
-
G 坎褶皺 - 用於橫向/小零件的 Frill horizontal-for G館フリル-横向/小部分用 Frill horizontal-for small parts
-
H 坎褶皺 - 垂直簡單 Frill verticall-簡單 H館フリル-縦シンプル Frill verticall-simple
-
I 坎褶皺 - 垂直隨機 Frill verticall-random I館フリル-縦ランダム Frill verticall-random
-
J- 長度 / 略直 Frill 長光 J館フリル-長/やや直線 Frill long-lightly straight
-
K 坎褶皺 - 長度 / 有點曲線 Frill 長光曲線 K館フリル-長/やや曲線 Frill long-slightly curved
-
L 坎蕾絲 - 白色十字架 / 用於小零件的 Lace 白色交叉 L館レース-白十字架/小部分用 Lace white cross-for small parts
-
M 坎賽車 - 白玫瑰 / 長白色玫瑰為小部分的小部分 M館レース-白薔薇/小部分用 Lace white rose-for small parts
-
N 坎蕾絲 - 黑色十字架 Lace 黑色十字 N館レース-黒十字架 Lace black cross
-
O 坎蕾絲 - 烏木玫瑰黑玫瑰 O館レース-黒薔薇 Lace black rose
-
P 坎蕾絲 - 黑色十字架 / 用於小零件的洛杉磯黑色交叉 P館レース-黒十字架/小部分用 Lace black cross-for small parts
-
Q 坎賽車 - 黑玫瑰 / 為小零件為黑玫瑰 / 小部分 Q館レース-黒薔薇/小部分用 Lace black rose-for small parts
-
R 坎絲帶 - 白色 /長裡博邦白色長 R館リボン-白/長 Ribbon white-long
-
S 坎絲帶 - 白色/短功能區白色-短 S館リボン-白/短 Ribbon white-short
-
T 坎絲帶 - 黑色 / 長裡博邦黑龍 T館リボン-黒/長 Ribbon black-long
-
U 坎絲帶 - 黑色/短功能區黑色短 U館リボン-黒/短 Ribbon black-short
-
V 館迷你黑絲帶 A 裡邦迷你黑色 A V館ミニ黒リボンA Ribbon mini black A
-
W 坎迷你黑絲帶 B 裡博邦迷你黑色 B W館ミニ黒リボンB Ribbon mini black B
-
X 館 - 帶前立按鈕的 Placket 按鈕 X館-前立てボタン付 Placket with button
-
Y 坎 - 平塔克針圖克 Y館-ピンタック Pin tuck


「背景職人の館」的其他素材


「素材集」的人氣素材


最新素材


徽章
-
 MVP ◆針對問題投稿了眾多適切的回答,對社群有顯著貢獻的用戶。每3個月一次,會依據期間內獲得的點數選出MVP用戶,並進行表揚。
 -
 NVP(New Valuable Player) ◆繼MVP後,對社群營運做出良好貢獻的用戶。將從不曾獲選為MVP的用戶中,依據獲得的點數進行評選、表揚。
 -
 官方推廣大使 ◆從被證明為優良回答用戶的MVP獲獎者中選出社群中最優異的回答者。並經審查後由本社委託就任。※舊名稱為「Evangelist」
 -
 CELSYS公認Moderator ◆Moderator為會使用日文及其他語言的CELSYS公認工作人員。由於並非軟體或創作的專業人士,Moderator無法直接為用戶解決疑問,但能在語言、交流方面提供支援,幫助用戶們順利地進行溝通。
 -
 CELSYS官方為與營運相關的官方帳號。