
エリーズ・アーティスト・マーカー(バージョン1.0) (Elise Artist Marker (Version 1.0)) Elise Artist Marker (Version 1.0)
コンテンツID:2247296
-
9,377

アナログの伝統的なメディア品質を持つアーティストマーカーセット。エリーズが作った。 Artist marker set that has an analogue traditional media quality. Made by Elise.
アーティストマーカーペンセット (以前のバージョン1.0)

紙にアーティストマーカーで描く感覚を再現できる、使いやすい筆が欲しかったのです!
その外観は乾いたマーカーとアルコールインクペンの中間のようなものです。

== ブラシの種類 ==

1. アーティストマーカー: オリジナルのマーカーペン!
2. ハイライトマーカー: マーカーペンの不透明なバージョンです。このペンは白や淡い色を描くのに適しています。
3. ブレンダー: 色を混ぜて滑らかでありながらテクスチャーのある見た目にするブレンダーペン。
4. 消しゴム: マーカーと相性の良いテクスチャー付き消しゴムです。
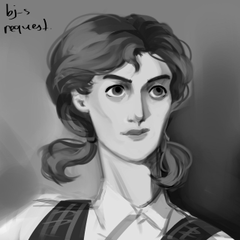
== タイムラプス例 ==

この例の画像は、このアーティストマーカーセットで全て彩色されています!
* その下にはベース紙の層があります。
* 私はアートワークを一層の透明なレイヤーの上に描きました。
* 本物のマーカーで描くように色を積み重ねた。最後にいくつかのディテールを加えるためにハイライトマーカーを使いました!
== テクスチャ設定 ==
600dpiの高解像度デジタルアート用に設計されています。(約4000ピクセルのキャンバス。)
キャンバスが小さいか大きいかは、テクスチャのサイズを調整する必要があるかもしれません!
下の中央の四角いように、質感がバランスよく見えるはずです!
必要に応じて、ブラシが美しくなるまでテクスチャサイズを調整してください。^^

翻訳のために:
テキストの一番上の行には「テクスチャ密度」と書かれており、40に設定されています。(この番号を変更する必要はありません。)
2行目の文章には「スケール比率」と書かれています。テクスチャサイズを変えるために調整したい数値です!
この設定は「ツールプロパティ」メニューで見つけることができます。
.: ありがとうございます :.
- エリーズ -
ここに示されているすべての素材、イラスト、キャラクターは私自身のオリジナル作品です。
【注】私はあまりオンラインにならず、コメントを読むこともできません。助けが必要な場合は、公式のチュートリアルやフォーラムを確認するか、Clip Studioのサポートチームに連絡してください。ご理解いただきありがとうございます!
ここに示されているすべての素材、イラスト、キャラクターは私自身のオリジナル作品です。
【注】私はあまりオンラインにならず、コメントを読むこともできません。助けが必要な場合は、公式のチュートリアルやフォーラムを確認するか、Clip Studioのサポートチームに連絡してください。ご理解いただきありがとうございます!
Artist marker pen set (previous version 1.0)
I wanted an easy-to-use brush that would mimic the feeling of drawing with an artist marker on paper!
Its appearance is somewhere between a dry marker and an alcohol ink pen.
== Brush Types ==
1. Artist Marker: The original marker pen!
2. Highlight Marker: An opaque version of the marker pen. This pen is good for illustrating white or pale colors.
3. Blender: A blender pen that mixes colors for a smooth but still textured look.
4. Eraser: A textured eraser that works well with the markers.
== Timelapse Example ==
This example image is colored entirely using this artist marker set!
* There is a base paper layer underneath.
* I illustrated the artwork in a single transparent layer overtop.
* I built up the colors as if drawing with a real marker. I used the highlight marker to add a few details at the end!
== Texture Settings ==
Designed for 600dpi high resolution digital art. (Approximately 4000px canvas.)
If you use a smaller or larger canvas, you may need to adjust the texture size!
Your texture should look nicely balanced like the center square below!
If needed, please adjust the texture size until the brush is beautiful. ^^
For translation:
The top line of text says "texture density" and is set to 40. (You do not need to change this number.)
The second line of text says "scale ratio." This is the number you want to adjust to change the texture size!
You can find this setting in the "tool property" menu.
.: Thank You :.
- Elise -
All materials, illustrations, and characters shown here are my own original creations.
【Note】 I am not online often and cannot read comments. If you need help: check official tutorials and forums, or contact Clip Studio support team. Thank you for understanding!
All materials, illustrations, and characters shown here are my own original creations.
【Note】 I am not online often and cannot read comments. If you need help: check official tutorials and forums, or contact Clip Studio support team. Thank you for understanding!
アーティストマーカー Artist Markers


"mh.elise"さんの別の素材


"素材集"の人気素材


新着素材


バッジ
-
 MVP ◆質問に対して適切な回答を数多く投稿し、コミュニティの運営に大きく貢献したユーザーです。MVPは3ヶ月に一度、その間に獲得したポイントを元に決定し、表彰を行っています。
 -
 NVP (New Valuable Player) ◆MVPに次いでコミュニティの運営に貢献したユーザーです。これまでMVPの受賞経験のない方から、獲得したポイントを元に決定し、表彰を行なっています。
 -
 公式エキスパート ◆優れた回答者の証であるMVP受賞者の中からさらに選ばれた、コミュニティで最も優良な回答者の証です。審査を経て当社から依頼し就任いただいています。※旧名称「エバンジェリスト」
 -
 セルシス公認モデレーター ◆モデレーターは、日本語とその他の言語が話せるセルシス公認のスタッフです。ソフトウェアや創作のエキスパートではないので、直接疑問を解決することはできませんが、みなさんがスムーズにコミュニケーションできるように、言葉やコミュニケーションの側面からサポートします。
 -
 セルシス公式運営に関連した公式アカウントです。