
私が使用しているエッセンシャルブラシの合計は、Annomiconプロジェクトのページ内に描かれた多くの生き物やアイテムで使用されるレンダリングのほぼすべてです。 A total of the Essential brushes I use for nearly every single one of the renderings used in the many creatures and items painted within the pages of the Annomicon project.

こんにちは、これはAnnomiconプロジェクトで使用される必須ブラシのコレクションです。
これらのブラシは、私のレンダリングのほぼすべてで使用されています。
各ブラシには、Shape -> Opacity -> Hue -> Tilt -> (Purpose/Note) の式 に従って、簡単に手に取れるようにキーワードのラベルが付けられています
これらのうちの 1 つが欠けているということは、単にそのブラシに機能が含まれていないことを意味します。
伝説:
形状 - 丸型/フラットブラシまたはその他の形状。
不透明度 - 不透明度が有効になります。
色相 - このブラシは、 よりダイナミックな色の範囲のためにわずかな 色相シフトがあります。
チルト - スタイラスペンの使用時にチルトがブラシに影響を与えます。
ウォッシュ - アートワークを色でグレージングするために簡単に使用できます。
ブラシ:ウェットウォッシュ - 水彩

使い:
これは、アートワークの上にグレージング用に設計されたウェットブラシです。デフォルトの水彩ブラシとは異なり、カスタムブラシチップは使用されません。代わりに、 デフォルトの水彩ツールでよく見られる大幅な遅延なしに「形作られた」感触を作り出すために慎重に微調整されています。シャドウ、色調シフト、アンビエント照明の追加や、照明構造の変更に強くお勧めします。
「ハードライト」/「ノーマル」レイヤーで使用することをお勧めします。

上記の例は、不透明度 60% のハード ライト レイヤーを使用して、ワームの頭の形をより豊かにするために、周囲光の色調シフトを示しています。
古代のペン

使い:
少し涙っぽく、水っぽい感じがするギミックペン。定型化された線画や、本や紙にスケッチしてイラストを描くのに最適です。「魔女の帽子のアトリエ」、「メイドインアビス」、「ダンジョンメシ」などの漫画や、「永遠の廃墟」の設定に関連するアートスタイルに大きく影響を受けています。
「乗算」/「ノーマル」レイヤーで使用することをお勧めします。

上の例は、スケッチのようなタッチで高度に様式化された線画を示しています。ペンが水っぽく感じられ、より厚いしみを作成するには、インクを流すためにゆっくりと描くか、その場で一時停止する必要があります。
ラウンド/フラット不透明度
ラウンド/フラット不透明度

使い:
これらの 2 つのブラシは同様の目的を果たしますが、ペイントするオブジェクトによっては、より快適なブラシ形状が可能になります。たとえば、スケール、オーブ、エフェクト、羽、爪、および同様の詳細のペイントには丸みを帯びた不透明度ブラシを好みますが、顔、骨、金属、手足などのより構造化された要素にはフラットブラシを使用します。
「ノーマル」/「ハードライト」レイヤーで使用する ことをお勧めします。

上の例は、フラットカラーの領域と、シェーディングと少量のブレンドによる色による形状の発達を示しています。これらのブラシは、しっかりとした圧力でしっかりとした不透明度と一貫したストロークで明るくなる、細かく調整された不透明度を備えているため、カラーティッピングを使用してミッドトーンを構築できます。
ラウンド/フラットオパシティ色相

使い:
これらの 2 つのブラシは同様の目的を果たし、非色相バージョンとほぼ同じ結果を生成します。ただし、よりダイナミックな色の範囲を作成し、アートワークに命を吹き込むのに便利だと思います。これらの色付きのバージョンは、グレインで同じことを行う文字数制限のために表示できません。
ラウンド(フィリング)

使い:
これは、基本的なブラシの中で最も基本的なものです。その主な目的は、後で簡単にペイントできるように単色を敷くことです。また、ベースのシェーディングにも使用できます。ただし、私は通常、そのタスクにはフラット(塗りつぶし)ブラシを好みます。
「標準」レイヤーで使用することをお勧めします。

上の例は、「Multiply」に設定され、「Reference Layer」としてマークされた色付きのスケッチを示しています。
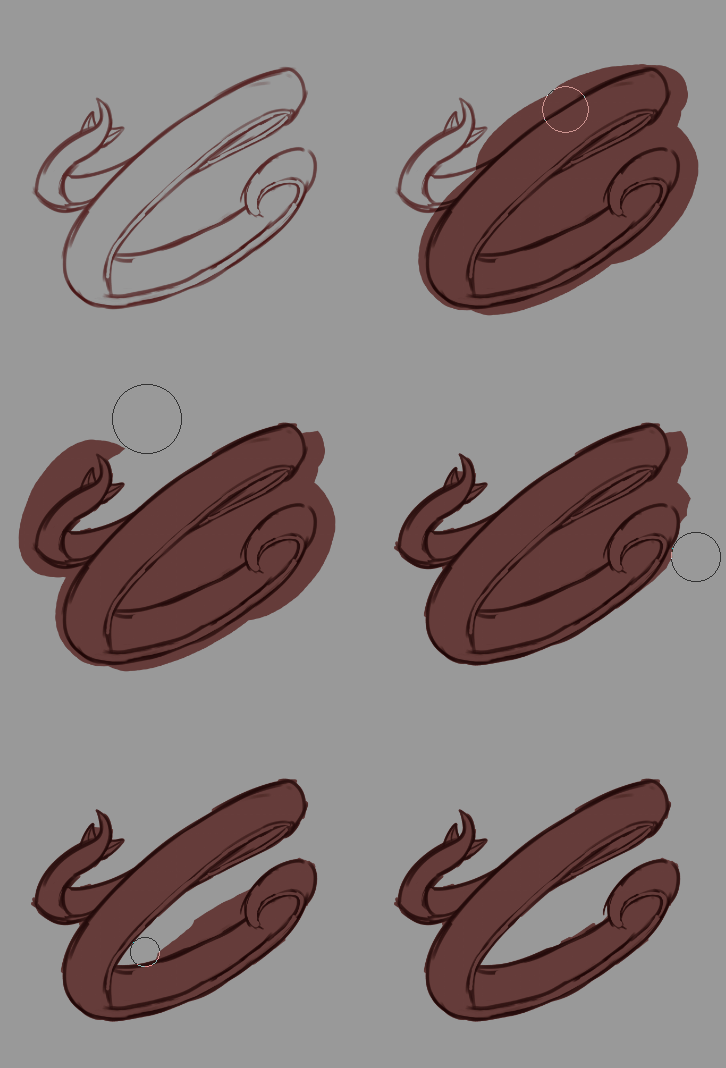
ペイントは、単色の塗りつぶしブラシを使用して下で行われ、こぼれた部分は「参照レイヤーの線を越えない」に設定された消しゴムで消去されます。 上記の例は高速化 されていない ことに注意してください。フラット(充填)

使い
これが最も基本的な基本です。これは、平らに絞られ、ペンの傾きに追従する丸い充填ブラシです。基本的なシェーディングと色を配置するのにどれほど役立つかは、いくら強調してもしきれません。これはおそらく、私にとってラウンド(フィル)ブラシに次いで2番目に大きな時間の節約です。
「標準」レイヤーで使用することをお勧めします。


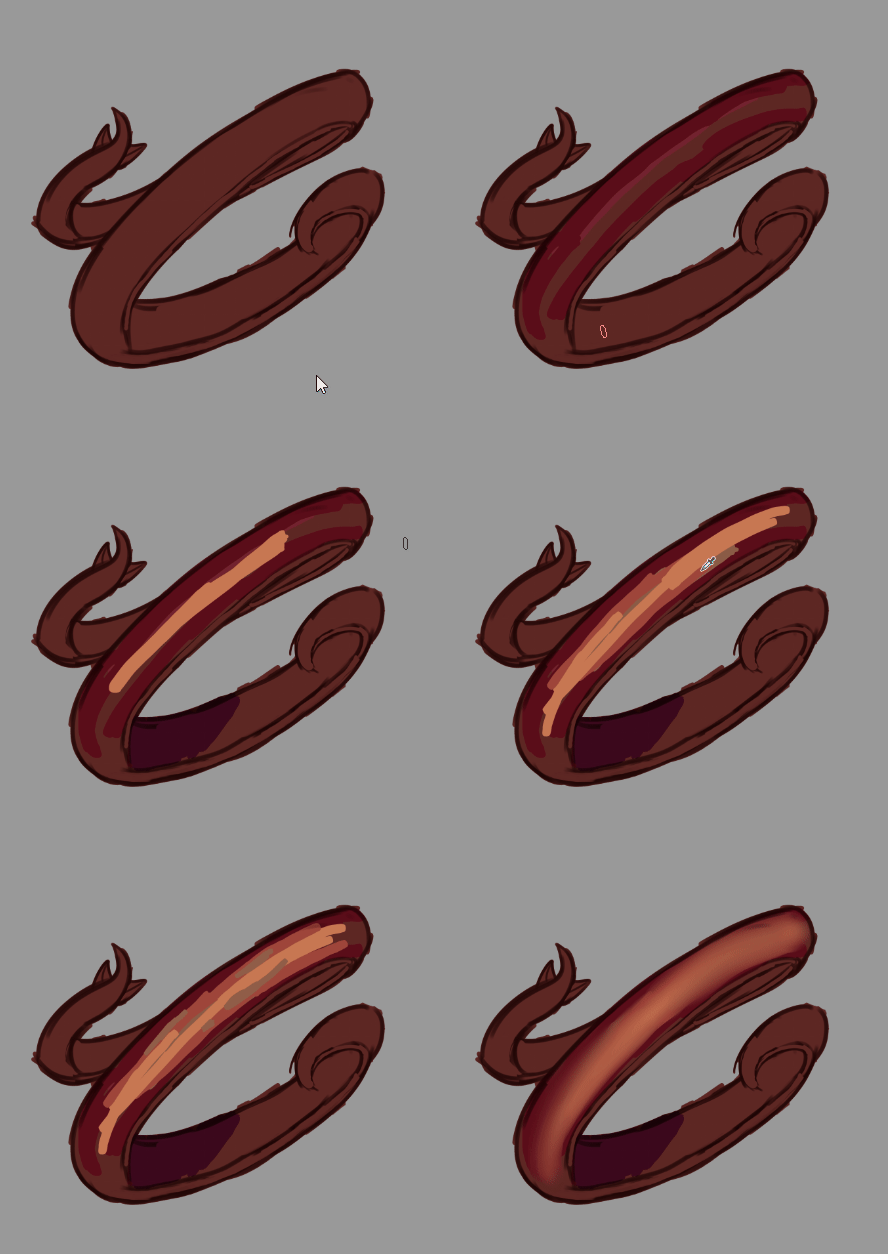
上の例は、塗りつぶされたスケッチをシェーディングとハイライトの単色でペイントし、それらをブレンドしていることを示しています。形状がすでに 3D 輪郭を作成していることがわかります。 上記の 例は高速化されていない ことに注意してください。
文字数制限のクイックランダウン:
製図


Hi, this is a collection of the essential brushes used in the Annomicon project.
These brushes are used in nearly all of my rendering.
Each brush is labeled with keywords to make it easy to pick up, following the formula of Shape -> Opacity -> Hue -> Tilt -> (Purpose/Note)
Lacking one of these simply means that feature is not included in that brush.
Legend:
Shape - Round/Flat brushes or other shapes.
Opacity - Opacity is enabled.
Hue - This brush has a slight hue shift for more dynamic color range.
Tilt - A tilt effects the brush when using a stylus pen.
Wash - Easily use for glazing artworks in a color.
The Brushes:Wetwash - Watercolor

Usage:
This is a wet brush designed for glazing over artwork. Unlike the default watercolor brushes, it doesn't use custom brush tips. Instead, it has been carefully fine-tuned to create a 'shaped' feel without the significant lag often found in default watercolor tools. It is highly recommended for adding shadows, tonal shifts, and ambient lighting or changing light structures.
Recommended to use on a `Hard light` / `Normal` layer.

Example above showing a tonal shift in the ambient light to make a richer depth in the shape of the wyrm's head using a 60% opacity hard light layer.
Ancient Pen

Usage:
A gimmicky pen that feels slightly watery and runny. It's great for stylized line art and sketching in books or on paper for illustrations. It is heavily inspired by manga such as `Witch Hat Atelier`, `Made in Abyss`, and `Dungeon Meshi`, as well as the art style associated with the `Eternal Ruins` setting.
Recommended to use on a `Multiply` / `Normal` layer.

The example above shows highly stylized line art with a touch of sketching feel. The pen feels runny, and to create thicker blotches, you simply need to draw more slowly or pause in place to let the ink flow.
Round/Flat Opacity
Round/Flat Opacity

Usage:
These two brushes serve a similar purpose, yet they allow for a more comfortable brush shape depending on the object being painted. For example, I prefer rounded opacity brushes for painting scales, orbs, effects, feathers, claws, and similar details, while I use the flat brush for more structured elements such as faces, bones, metal, and limbs.
Recommended to use on a `Normal` / `Hard light` layer.

The example above shows flat-colored areas and the development of shape through shading and color with a small amount of blending. These brushes have finely tuned opacity that is solid with firm pressure and light with consistent strokes, allowing you to build up midtones using color tipping.
Round/Flat Opacity Hue

Usage:
These two brushes serve a similar purpose and produce results near-identical to the non-hue versions. However, I find them useful for creating more dynamic color ranges and adding life to an artwork. there is a colored version of these I cant show due to character limit that do the same thing with grain.
Round (Filling)

Usage:
This is the most basic of basic brushes. Its main purpose is simply to lay down solid colors for easier painting later on. It can also be used for base shading; however, I usually prefer the Flat (Filling) brush for that task.
Recommended to use on a `Normal` layer.

The example above shows a colored sketch set to `Multiply` and marked as a `Reference Layer`. Painting is done underneath using a filling brush for solid color, and any spill-over is erased with an eraser set to `Do not cross lines of reference layer`. Note the example above is NOT sped up.
Flat (Filling)
Flat (Filling)

Usage
This is the most basic of basics. It’s a round filling brush that has been squeezed flat and follows the tilt of the pen. I can't stress enough how useful it is for laying down basic shading and colors. This is probably the second biggest time-saver for me after the Round (Filling) brush.
Recommended to use on a `Normal` layer.


The example above shows a filled sketch being painted with solid colors for shading and highlights, which are then blended in. It's possible to see how the shape already creates a 3D contour. Note the example above is NOT sped up.
Character limit quick rundown:
Sketching

ブラシ Brush
-
エンシェントペン - Annomicon Ancient Pen - Annomicon
-
ラウンド(フィリング) - Annomicon Round (Filling) - Annomicon
-
フラット(詰め物) - Annomicon Flat (Filling) - Annomicon
-
フラットオパシティ色相 - Annomicon Flat Opacity Hue - Annomicon
-
ラウンドソフトオパシティ - Annomicon Round Soft Opacity - Annomicon
-
丸い不透明度 - Annomicon Round Opacity - Annomicon
-
フラットオパシティ - Annomicon Flat Opacity - Annomicon
-
ペンシルチルト(スケッチ) - Annomicon Pencil Tilt(Sketching) - Annomicon
-
ペンシルチルト(レンダリング) - Annomicon Pencil Tilt(Rendering) - Annomicon
-
色鉛筆チルトヒュー(レンダリング) - Annomicon Colored Pencil Tilt Hue(Rendering) - Annomicon
-
ウェットウォッシュ(ラグフィックス) - Annomicon Wet Wash (Lagfix) - Annomicon
-
丸い不透明度の色相 - Annomicon Round Opacity Hue - Annomicon


