

ピンチラインツールと正しい線幅ツールの私のカスタマイズバージョン。 My customized versions of the Pinch line and Correct line width tools.
私のチュートリアルの読者から要求されたように、ピンチラインツールと正しい線幅ツールのカスタマイズされたバージョンと、それらを効果的に使用するための設定方法を次に示します:)

正しい線幅:
- 厚く
- 薄い

ピンチベクトル線:
- 1固定端ラージ
- 1固定端小
- 2つの固定端

効率的に使用するには、ショートカットと 修飾キー を設定することをお勧めします-ツールを切り替える時間を節約できます。
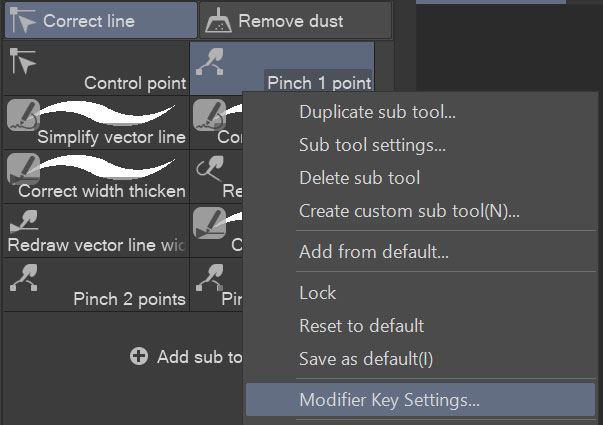
1.ショートカットキーを各グループの1つのツールのみに設定します(ピンチ1ポイントのOと正しい幅の太さのKがあります)
2. ショートカットが割り当てられたツールを右クリックし、[ 修飾キー設定] をクリックします。

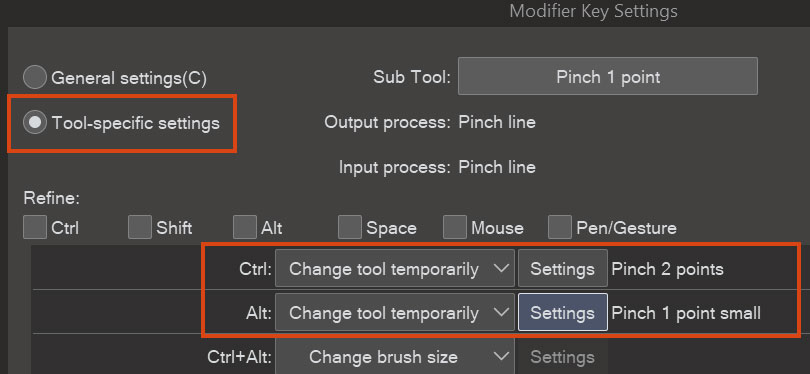
3.必要に応じて、ツール固有の修飾子を設定します。たとえば、Ctrl を押すと Pinch 1 point サブツールが Pinch 2 points に変わり、Alt キーを押すと Pinch 1 point small に変わります。

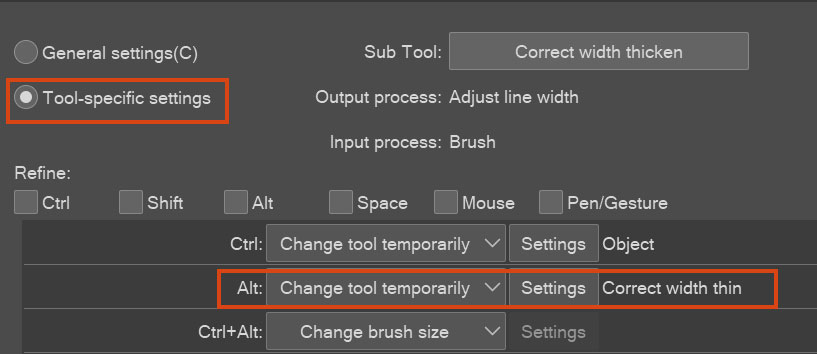
同様に、Alt を押す と、 Correct width thicken サブツールが Correct width thin に変わります 。

おかげで、ツールを切り替えたり調整したりするためにキャンバスを離れる必要はまったくないので、試してみてください!
As requested from my tutorial readers, here are my customized versions of the Pinch line and Correct line width tools and how to set them up for effective use :)
Correct line width:
- Thicken
- Thin
Pinch vector line:
- 1 fixed end large
- 1 fixed end small
- 2 fixed ends
For efficient use I recommend setting shortcuts and modifier keys - saves you time for switching between tools:
1. Set shortcut keys to only one tool of each group (I have O for Pinch 1 point and K for Correct width thicken)
2. Right-click the tool with the shortcut assigned and click Modifier Key Setting:
3. Set the tool-specific modifiers as you like. For example, my Pinch 1 point subtool changes to Pinch 2 points when I press Ctrl, and to Pinch 1 point small with Alt:
Similarly, my Correct width thicken subtool changes to Correct width thin when I press Alt:
Thanks to this, I don't need to leave the canvas to switch or adjust a tool at all, so give it a try!
ピンチベクトルライン Pinch vector line


正しい線幅 Correct line width


".avi."さんの別の素材


"素材集"の人気素材


新着素材


バッジ
-
 MVP ◆質問に対して適切な回答を数多く投稿し、コミュニティの運営に大きく貢献したユーザーです。MVPは3ヶ月に一度、その間に獲得したポイントを元に決定し、表彰を行っています。
 -
 NVP (New Valuable Player) ◆MVPに次いでコミュニティの運営に貢献したユーザーです。これまでMVPの受賞経験のない方から、獲得したポイントを元に決定し、表彰を行なっています。
 -
 公式エキスパート ◆優れた回答者の証であるMVP受賞者の中からさらに選ばれた、コミュニティで最も優良な回答者の証です。審査を経て当社から依頼し就任いただいています。※旧名称「エバンジェリスト」
 -
 セルシス公認モデレーター ◆モデレーターは、日本語とその他の言語が話せるセルシス公認のスタッフです。ソフトウェアや創作のエキスパートではないので、直接疑問を解決することはできませんが、みなさんがスムーズにコミュニケーションできるように、言葉やコミュニケーションの側面からサポートします。
 -
 セルシス公式運営に関連した公式アカウントです。