

An auto-action toolset that was made for an animation project. Try it out and adjust it to your workflow!
私がアニメーションに好んで使っているオートアクションツールセット。 使ってみて、あなたのワークフローに合わせて調整してください!
An auto-action toolset that was made for an animation project. Try it out and adjust it to your workflow!
私がアニメーションに好んで使っているオートアクションツールセット。使ってみて、あなたのワークフローに合わせて調整してください!

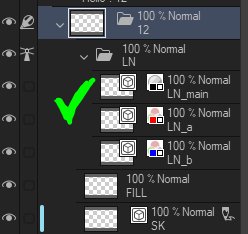
1. LN - 線画用フォルダ
このフォルダは、FILLレイヤーのペイントバケットツールを操作するための参照レイヤーとして設定されています。
- メインラインワークのLN_mainグレースケールレイヤー
- 赤いレイヤー LN_a特別な塗りつぶしの境界線を示しています
- LN_b青いレイヤーは、特別な塗りつぶしの境界を示しています
たとえば、すべての赤い線の色を変更したり、ドラフトレイヤーを作業レイヤーに変更したりするために、複数のセルでレイヤータイプごとにフィルターするなどの巧妙なことを行うことができます。2. FILL - 線画をフラットカラーで塗りつぶすのに役立つラスターカラーレイヤー。
境界を埋めるためにLNフォルダの内容を参照します。最良の結果を得るには、バケットツールを次のデフォルトに設定して、ベクトルラインアートを完全に塗りつぶします。

3. SK - スケッチのドラフトレイヤードラフト レイヤーはエクスポートから除外でき、複数のレイヤーを参照するツールでは無視できます。
- ⚠️ LN線画フォルダ が ネストされたセルの下の最上位のフォルダでない場合、これは壊れます。
- ⚠️ LN線画フォルダ が ネストされたセルの下の最上位のフォルダでない場合、これは壊れます。
- ⚠️ アニメーションセル の開始フレーム が タイムラインで選択されていない場合、これは壊れます。
- ⚠️ 削除したいセル ( セル番号を持つネストされたアニメーションフォルダ) が選択されていない場合、 これは壊れます
- ⚠️ セル内のレイヤーのいずれかが 編集ターゲット である場合 (表示トグルの横にある👁️鉛筆✏️アイコンで示されます)、これは 中断されます


- スケッチフェーズ(SK)、インク(LN)、ペイント(FILL)など、1つのレイヤータイプをすばやく めくること に集中したい場合に最適です 。
- これにより、編集ターゲットとして各レイヤーを一度に1つずつ手動で選択する時間を節約できます。
- これは、以下と連携して機能します。 このオートアクションセットを キーボードショートカット と組み合わせて、次へと前のセルをすばやく選択します

- ⚠️ レイヤー名を維持することは重要であり、そうしないと、この時間節約アクションは機能しません。
1. LN - Folder for Lineart
This folder is set as a Reference Layer to work with the paint bucket tool on FILL layer.
- LN_main grayscale layer for main linework
- LN_a red layer marks the border of special fills
- LN_b blue layer marks the border of special fills
You can do neat stuff like filter by layer type on multiple cels to, say, change the color of all red lines, change draft layer to a working layer, and so on.2. FILL - Raster Color Layer to assist with filling linework with flat color.
It references the contents of LN folder for fill boundaries. For best results: set bucket tool with the following defaults so it fills the vector line art completely.
3. SK - a Draft Layer for a sketchDraft layers can be excluded from export and ignored by tools that refer to multiple layers.
- ⚠️ If LN Lineart Folder is not the topmost folder under the nested cel, this will break.
- ⚠️ If LN Lineart Folder is not the topmost folder under the nested cel, this will break.
- ⚠️ If the start frame of the animation cel is NOT selected in the timeline, this will break.
- ⚠️ If the Cel (nested animation folder that has the Cel Number) you want to delete is not selected, this will break
- ⚠️ If any of the layers in the Cel are the Editing Target (indicated by pencil ✏️ icon next to 👁️ visibility toggle), this will break
- Perfect for when you want to focus on quickly flipping through 1 layer type, such as in the sketch phase (SK), ink (LN), and paint (FILL).
- It saves time of manually selecting each layer as the editing target one at a time.
- It works hand in hand with: Combining this Auto Action Set with a Keyboard Shortcut for quickly selecting Next and Previous Cels
- ⚠️ Maintaining the layer names is critical, or this time-saving action will not work.


"Ghalban"さんの別の素材

"オートアクション"の人気素材


新着素材


-
 MVP ◆質問に対して適切な回答を数多く投稿し、コミュニティの運営に大きく貢献したユーザーです。MVPは3ヶ月に一度、その間に獲得したポイントを元に決定し、表彰を行っています。
 -
 NVP (New Valuable Player) ◆MVPに次いでコミュニティの運営に貢献したユーザーです。これまでMVPの受賞経験のない方から、獲得したポイントを元に決定し、表彰を行なっています。
 -
 公式エキスパート ◆優れた回答者の証であるMVP受賞者の中からさらに選ばれた、コミュニティで最も優良な回答者の証です。審査を経て当社から依頼し就任いただいています。※旧名称「エバンジェリスト」
 -
 セルシス公認モデレーター ◆モデレーターは、日本語とその他の言語が話せるセルシス公認のスタッフです。ソフトウェアや創作のエキスパートではないので、直接疑問を解決することはできませんが、みなさんがスムーズにコミュニケーションできるように、言葉やコミュニケーションの側面からサポートします。
 -
 セルシス公式運営に関連した公式アカウントです。