

術後の打撲傷を含む、あらゆる種類と治癒レベルの詳細でリアルな打撲傷を作るためのブラシのセットです。 A set of brushes for making detailed, realistic bruises of all types and levels of healing, including post-surgical bruising.
これらは、あざを描きたいが、あざの見かけの年齢を正しくしたり、形を正確にしたり、術後のあざを描写する必要がある人を対象としたブラシのセットです。
明るい肌と暗い肌のための基本的なオールインワンのあざブラシを備えた無料版があります。これらはこれらよりもはるかに使いやすく、おそらくほとんどすべてに問題ありません。その品目の番号は 2077682 です。
肌の色が濃い描写についてのメモ:私は個人的に信じられないほど明るい色の肌を持っていますが、ミッドトーンのアフリカ系アメリカ人よりも暗い人の参考文献を見つけることができませんでした。したがって、これらを非常に暗い肌の色に使用している場合は、ブレンドモードを調整する必要がある場合があります。
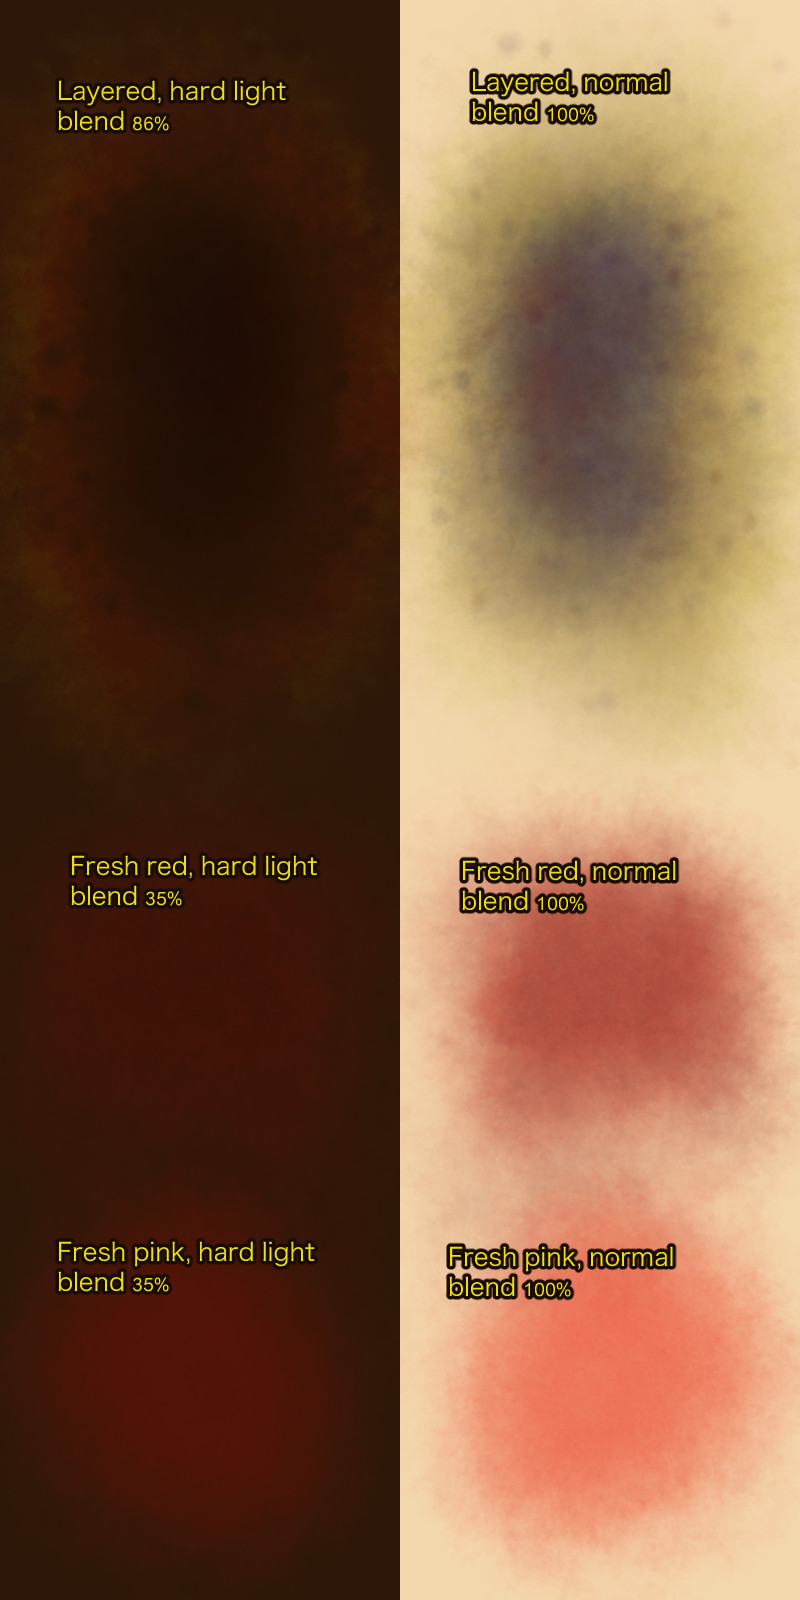
また、死んだ血は、その後ろにどれだけの色素があっても人間と同じ色ですが、明るい肌と暗い肌の両方でリアルに見えるようにする方法を見つけるのに苦労しました。 私が見つけた暗い肌の最善の解決策は、ハードライトブレンディングモードに設定されたレイヤーにそれらを置き、正しく見えるまで不透明度を下げる ことです。すべての肌の色調で機能するように最善を尽くしましたが、無料パックには、肌の色が濃い人専用のブラシが付いているので、使いやすいかもしれません。
最後に、これらは人間のあざ用で、あざのあるエイリアンを描く必要がある場合は、自分で行います。😂
それらを使用する方法:
これらのブラシは、独自のレイヤーで使用 し、必要に応じてマージする必要があります。これは、あざに適切なテクスチャを取得するために暗くするブレンディングモードを使用しているためですが、レイヤーにすでに何かがある場合、それは本当に奇妙に見えます。また、肌の色が濃い場合は、不透明度をたくさんいじる必要があります。
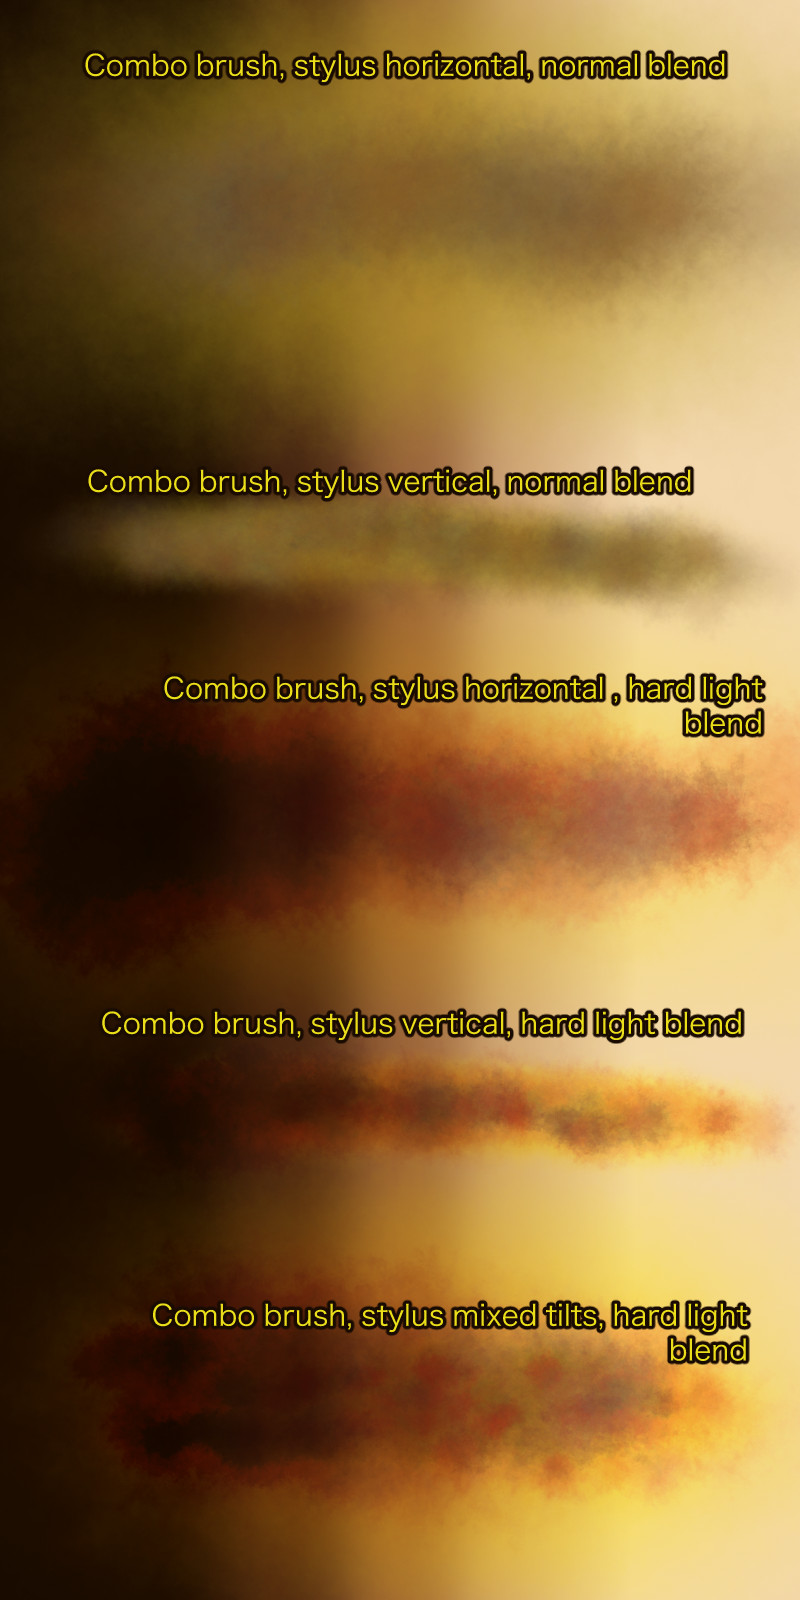
私のブラシではいつものように、傾きはサイズを制御します。つまり、例えば、黄色のあざの縁を非常に柔らかいフラットストロークで構築し、紫であざの肉を取り込み、赤でより深いトラウマの領域を追加することができます。コンボブラシは、完全に立てて使用すると少し変な感じがするので、慣れるまでは傾けて使ってみてください。赤と紫のドットブラシの場合、傾きは個々のドットのサイズには影響せず、ドットの広がり具合にのみ影響するため、異なるサイズの犬が必要な場合は、ブラシ全体のサイズを変更する必要があります。
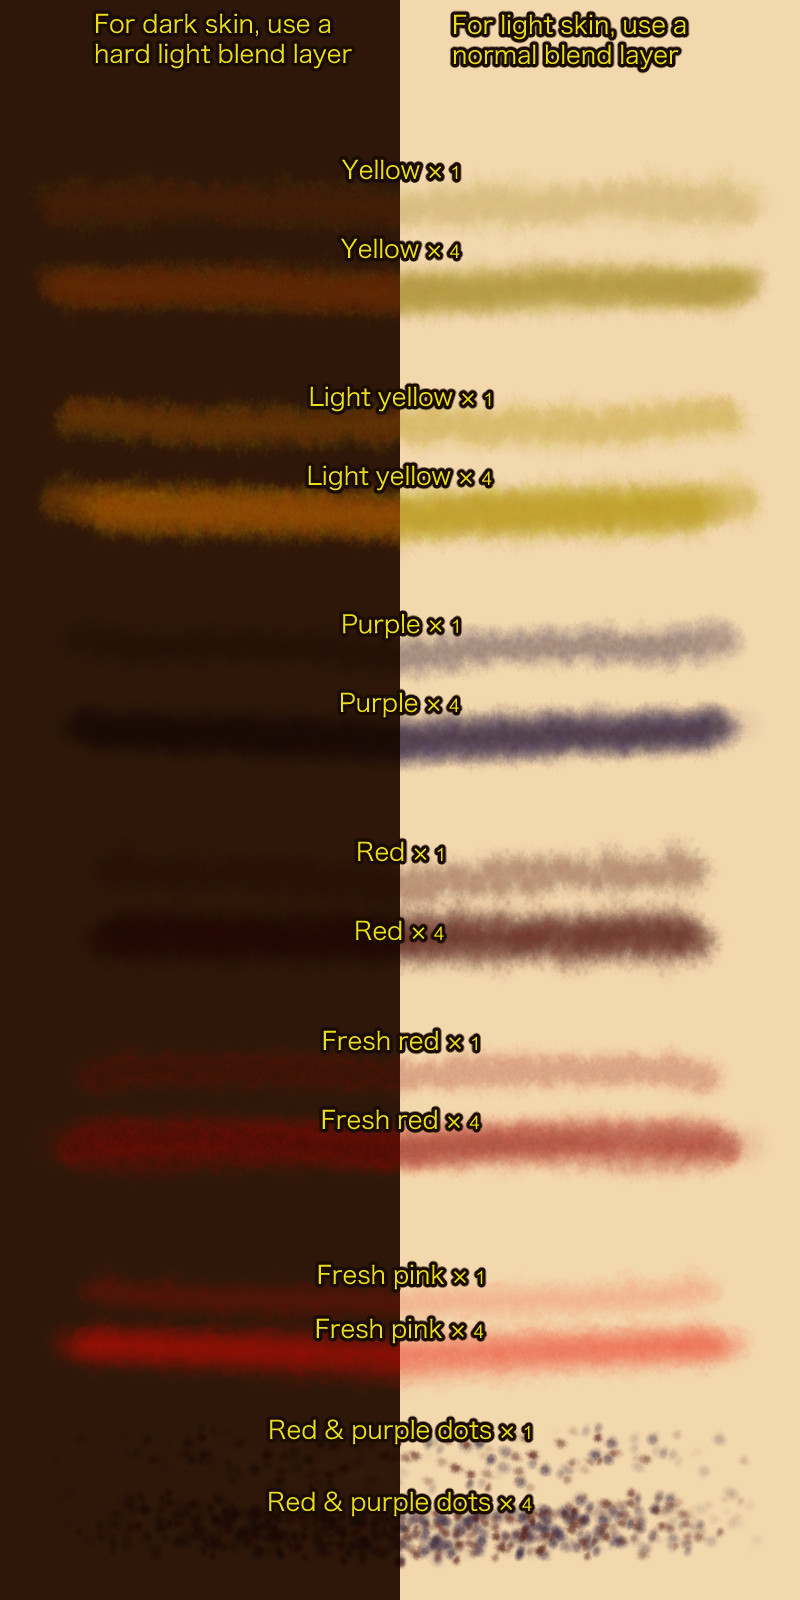
このパックには、6つの基本的なあざ大粒ブラシと3つの追加ブラシの合計9つのブラシが含まれています。6色:
1.黄ばんだあざ。これは、血が分解し始めた打撲傷の縁が通常どのように見えるかです。
2.薄黄色のあざ。 これは、肌の色が薄い人の術後のあざを描きたい場合に必要なものです。あの痣はほぼ蛍光黄色で、あれを含むブラシセットは見たことがありません。というわけで、こちらです!
3.紫色のあざ。これは、あざについて考えるときに人々が思い浮かべる色ですが、それ自体は本当に奇妙に見えます。他の色を少なくとも少しは使用することをお勧めします。
4.鈍い赤いあざ。これは、現れ始めたばかりのあざの色です。また、絨毯の火傷など、擦り傷や吸引による怪我もあります。
5.新鮮な赤いあざ。これは、誰かが平手打ちされたように、叩かれて赤くなる明るい色の肌の色です。暗い色調にも使用できますが、不透明度を下げる必要があります。
6.新鮮なピンクのあざ。これは、軽く平手打ちされた極端に肌の色、またはより強く平手打ちされた端の周りの領域です。暗い肌の色ではかなり奇妙に見えますが、私が知らなかったブレンディングモードの秘密が見つかるかもしれません。
追加の 3 つのブラシは次のとおりです。
1.コンボブラシ:これはCSPのデュアルブラシ機能を使用して、あざ全体を一度にペイントします。状況によっては、無料のブラシよりもうまく機能しますが、非常に軽い手が必要であり、非常に速く奇妙に見える可能性があります。
2.紫とピンクのドット。非常に肌の色が薄い人では、毛包の底に閉じ込められた血液がこの斑点状の効果を引き起こします。また、肌の色が濃い人のあざにもう少し質感を持たせるためにも使用できます。
3.イエローライトブレンダー。このブラシは、少し鋭すぎる傷を負った場合に備えてここにありますが、すべてをやり直したくないです。使いすぎるととても奇妙で偽物に見えますが、少量であれば問題を解決するのに役立ちます。これは、名前にもかかわらず、選択したメインカラーで非常に淡い色になるため、使用する前に適切な色を選択する必要があります。
それぞれの色は決まっており、それぞれの先端はユニークです。
これにより、繰り返しが少なくなるため、あざが少しリアルに感じられ、使用する色についてそれほど心配する必要がなくなります。(あなたがエイリアン👽を描いていない限り、私はあなたを助けることはできません。リアルなあざを重ねるのに使えるブラシは、6色ブラシとドットブラシです。

これは、さまざまな肌の色調で両方のブレンドモードで示されたコンボブラシです。

ここでは、不透明度を下げる方法を示します。側面は互いの鏡像ですが、背景の肌の色調とレイヤーのブレンド設定が異なります。

ストレスを抑えてリアルな痣を描けるようになるといいですね!
These are a set of brushes intended for people who want to paint bruises but care about getting the apparent age of the bruises right, getting the shape exactly right, or who need to depict post-surgical bruising.
There is a free version which has basic all-in-one bruise brushes for light skin and dark skin. They are much easier to use than these, and are probably fine for almost everything. The number for that material is: 2077682
A note about the dark skinned depictions: I personally have incredibly light-colored skin, and I wasn't able to find references for anyone darker than a mid-toned African-American person. So if you are using these for a very very dark skin tone, you might need to make some adjustments to the blending modes.
Also, although dead blood is the same color on humans no matter how much pigment is behind it, I had some trouble finding a way to make these look realistic on both light and dark skin. The best solution I found for dark skin is to put them on a layer that's set to Hard Light blending mode, and then decrease the opacity until it looks right. I did my best to make them work for all skin tones, but the free pack has a brush that is specifically for dark skinned people that you might find easier to use.
Lastly, these are for human bruises, if you need to paint aliens who are bruised, you're on your own. 😂
How to use them:
These brushes should be used on their own layer and then merged down if necessary. This is because they use the Darken blending mode to get the right texture for bruises, but if there's something already on the layer, it'll look really weird. Also, for dark skin, you'll need to mess around with opacity a lot.
As is usual for my brushes, tilt controls size. This means you can, for example, build up the yellow bruise edges with very soft flat strokes, get the meat of the bruising in with the purple, and then add some areas of deeper trauma with the red. The combo brush looks a little weird if used fully upright, so try to use it at a tilt until you get used to it. For the red & purple dots brush, tilt does not affect the size of the individual dots, only how spread out they are, so you'll need to change the overall brush size if you want a different size of dog.
There are nine brushes included in this pack in total: six basic bruise colof brushes and three additional brushes. The six colors:
1. Yellowed bruising. This is what the edges of bruises usually look like, where the blood has started to break down.
2. Light yellow bruising. This is what you need if you want to depict post-surgical bruising on light-skinned people. Those bruises are almost fluorescent yellow, and I haven't seen a brush set that includes that. So here it is!
3. Purple bruising. This is the color people think of when they think of bruises, but it looks really weird by itself. You'll want to use at least a little of the other colors with it.
4. Dull red bruising. This is the color of bruises that have just started to show. Also rug burns and other such abrasion and suction injuries.
5. Fresh red bruising. This is the color of light-toned skin that's reddened from being struck, like if someone has been slapped. It can be used on darker tones too but you'll want to crank down the opacity.
6. Fresh pink bruising. This is the color of extremely light-skinned people who have been lightly slapped, or the area around the edges of a harder slap. Looks pretty weird on darker skin tones but maybe you'll find a blending mode secret I didn't.
The three additional brushes are:
1. Combo brush: this uses CSP's dual brush feature to paint an entire bruise at one go. For some situations it works better than the free brushes, but it needs a very light hand and can look bizarre really fast.
2. Purple & pink dots. On very light-skinned people, the blood that gets trapped in the bottom of hair follicles causes this mottled effect. It can also be used to get a bit more texture into bruises on dark-skinned people.
3. Yellow light blender. This brush is here in case you get a bit of bruise that's just a little too sharp-edged but you don't want to redo the whole thing. It looks super weird and fake if you use it too much, but in small doses it can help fix things. This one tints things very lightly with your selected main color despite the name, so you'll want to select an appropriate color before you use it.
The colors of each of them are fixed, and each tip is unique. This helps the bruise feel a little more real, because there's less repetition, and means you don't need to worry as much about what color to use. (Unless you're painting an alien 👽, and then I can't help you.)
Here are the brushes that you might want to use to layer up a realistic bruise: the six color brushes and the dots brush.
Here is the combo brush demonstrated with both blend modes on a range of skin tones.
Here I'm demonstrating how you might want to decrease the opacity. The sides are mirror images of each other, just with a different background skin tone and layer blend settings.
I hope this helps you paint realistic bruises with less stress!
基本的なあざの色 Basic bruise colors


追加効果 Additional effects


"kalany"さんの別の素材


"素材集"の人気素材


新着素材


バッジ
-
 MVP ◆質問に対して適切な回答を数多く投稿し、コミュニティの運営に大きく貢献したユーザーです。MVPは3ヶ月に一度、その間に獲得したポイントを元に決定し、表彰を行っています。
 -
 NVP (New Valuable Player) ◆MVPに次いでコミュニティの運営に貢献したユーザーです。これまでMVPの受賞経験のない方から、獲得したポイントを元に決定し、表彰を行なっています。
 -
 公式エキスパート ◆優れた回答者の証であるMVP受賞者の中からさらに選ばれた、コミュニティで最も優良な回答者の証です。審査を経て当社から依頼し就任いただいています。※旧名称「エバンジェリスト」
 -
 セルシス公認モデレーター ◆モデレーターは、日本語とその他の言語が話せるセルシス公認のスタッフです。ソフトウェアや創作のエキスパートではないので、直接疑問を解決することはできませんが、みなさんがスムーズにコミュニケーションできるように、言葉やコミュニケーションの側面からサポートします。
 -
 セルシス公式運営に関連した公式アカウントです。