テクスチャブラシのハッチング(+カーブハッチング!) (Hatching Texture Brushes (+Curve Hatch!)) Hatching Texture Brushes (+Curve Hatch!)

コンテンツID:2075389

  • 24,146
  • 無料
この素材集はスタジオモードでご利用いただける素材が含まれています。(スタジオモードとは?

ハッチングは、次のセットで高速に行われました。
- 7ハッチングテクスチャブラシ
- 2つの「トーンスクレイピング」ツール(線幅を調整)
- 19 ダイレクトハッチブラシ/スネーク/スプレー
- 5つの垂直ハッチングブラシ
- 塗りつぶしツールで便利にハッチングするための役立つヒント
-新機能!!!3 カーブ ハッチング ブラシ
(更新日: 07.04.24)
Hatching made fast with a set of:
- 7 Hatch Texture Brushes
- 2 "Tone Scraping“ Tools (adjust linewidth)
- 19 Direct Hatch Brushes / Snakes / Sprays
- 5 Vertical Hatching Brushes
- A hopefully useful tip about conveniently hatching with fill tools
- NEW!!! 3 Curve Hatch Brushes
(Updated: 07.04.24)

このカタログには何が含まれていますか?
新しいブラシ:垂直ハッチング (06.04.24) とカーブハッチング(07.04.24)
タダア、これ!⤵

_ _ _ _ _ _ _ _ _ _ _ _ _ _ _ _

これは 、Hatching Texture Brush 1 の動作です。


(オーバーフロー防止がオンになっていますが、気に入らない場合は調整したりオフにしたりできます^^)

_ _ _ _ _ _ _ _ _ _ _ _ _ _ _ _

以下では、ハッチングテクスチャブラシの使用 方法について説明します。

この場合、乗算と減算が実際に同じことをしたことに気付いたので、gifXDで行ったようにではなく、消去/ネガティブカラーモード(背景に使用)のために乗算のままにしておくことができます...


_ _ _ _ _ _ _ _ _ _ _ _ _ _ _ _

次の説明は、 塗り潰しツールを使用して超高速ハッチングする方法に関するものです。

塗りつぶしツール(なげなわ、バケツなど)を、すべての ハッチングテクスチャブラシ垂直ハッチブラシのテクスチャで使用できます。

  • テクスチャをレイヤーにドラッグして、黒く塗りつぶされたマスクを追加するだけです(テクスチャの名前は、高度なツールプロパティの「テクスチャ」の下にあります)。
  • 次に、マスクを描画してテクスチャを元に戻します^^


最もクールなのは、テクスチャレイヤーがまだそのままなので、このようにハッチングを描画した後でも、ハッチのサイズと角度を調整できることです。


_ _ _ _ _ _ _ _ _ _ _ _ _ _ _ _


ここでは、「トーンスクレイピング」ツール(線幅調整)の使い 方について解説します。

これらは、ハッチング テクスチャ ブラシ  とダイレクト ハッチング ブラシの両方で 使用できます。 ハッチを厚くしたり狭めたりします。
 インク のものは目に見える境界線がありますが、均一に太くなったり狭くなったりします、 のものは滑らかですが、 こすったり追加したりするほど砂の質感を見ることができます。

下の図は、標準のCSP調整ラインツールの一般的な効果を示しているため、それが何をするかを明確に確認できます。(カラー:白地に黒を塗り、黒のレイヤーからネガを消します。


背景の場合:

テクスチャをキャンバスにドラッグするか、ブラシの 1 つでペイントします (領域が大きいほど時間がかかるため、ドラッグする方が速い場合があります)。

ドラッグした場合は、レイヤーをラスターレイヤーに変換します。

これで、テクスチャの線を好きなように太くしたり狭くしたりできます。
(やりすぎは禁物です、線は変えれば変えるほど少し不安定になることがあります...)

(色を変更するには、レイヤーの色を設定するか(1)、レイヤーの式を 色 に変更して透明度をロックし、その上にペイントできるようにします(2)^^)

1)


2)

(例のテクスチャ: Wonky Hatch Texture 4、「 トーンスクレイピング」インク(線幅の調整)で変更)。

_ _ _ _ _ _ _ _ _ _ _ _ _ _ _ _


ダイレクトハッチブラシ  は たくさんあるので詳しく説明しません...
ブラシサイズ、粒子サイズ、粒子密度、スプレー偏差、ブラシ先端角度、粒子角度など、見つけたものを試してみてください^^
たくさんのオプションがあります!

_ _ _ _ _ _ _ _ _ _ _ _ _ _ _ _


  • ハッチングテクスチャのサイズと角度/回転は、ツールのプロパティパネルで変更できます。
  • アンチオーバーフローがオンになっていますが、やりたいことを台無しにしている場合はオフにすることができます。
  • ブラシの部分が少し透明になっているものもあるので、これが気に入らない場合はレイヤーをモノクロに設定してください。

  • _ _ _ _ _ _ _ _ _ _ _ _ _ _ _ _


    更新!


    上のスケッチをした短い時間で、とても好きになりました^^

    奇妙なハッチングは、ブラシの先端よりも小さい小さな円を描くと発生します...ちょっとカッコいいと思います。水の波紋に使えますよ!-最初に円を描画>、次に遠近法でレイヤーを変換します...

    _ _ _ _ _ _ _ _ _ _ _ _ _ _ _ _


    さて、これで^^すべてです(私は知っています、それはたくさんあります...)
    楽しんでください!
    What’s in this catalog?
    New brushes: Vertical Hatch (06.04.24) and Curve Hatch (07.04.24)
    Tadaaa, these! ⤵

    _ _ _ _ _ _ _ _ _ _ _ _ _ _ _ _

    This is Hatching Texture Brush 1 in action:


    (Anti overflow is on, but you can adjust it or turn it off if you don’t like it ^^)

    _ _ _ _ _ _ _ _ _ _ _ _ _ _ _ _

    The following explanations are about how to use the Hatch Texture Brushes:

    I noticed that multiply and subtract actually did the same thing in this case, so you can leave it on multiply for erasing / negative color mode (used for background) not like i did in the gif XD…


    _ _ _ _ _ _ _ _ _ _ _ _ _ _ _ _

    The following explanations are about how to hatch super fast using fill tools:

    You can use fill tools (lasso, bucket or whatever) with the textures of all the Hatch Texture Brushes and Vertical Hatch Brushes!

    • Just drag the texture on a layer and add a blacked out mask (You can find the name of the textures in the advanced tool properties under „Texture“.)
    • Then draw on the mask to add the texture back ^^


    Coolest thing is that you can still adjust the size and angle of the hatches after drawing them like this, since the texture layer is still intact!


    _ _ _ _ _ _ _ _ _ _ _ _ _ _ _ _


    The following explanations are about how to use the „Tone Scraping“ Tools (adjust linewidth):

    You can use these on both the Hatch Texture Brushes and the Direct Hatch Brushes. They either thicken or narrow the hatches.
    The Ink one has a visible border but thickens or narrows evenly, the Sand one is smoother but you can see the sand texture the more you scrape or add.

    The pictures below show the general effect of the standard CSP adjust linewith tool, so you can see clearly what it does. (Color: black is painted on white, color: negative is erased from a black layer.)


    For Backgrounds:

    Drag a texture onto the canvas or paint it in with one of the brushes (the bigger the area the longer that takes so you might be faster to just drag it in).

    If you dragged it in, convert the layer into a raster layer.

    Now you can thicken and narrow the lines of the texture however you want!
    (Don’t overdo it, the lines can get a bit wonky the more you change them…)

    (To change colors you can either set a layer color (1) or change the layer expression to color and lock transparency so you can paint over it (2) ^^)

    1)


    2)

    (Texture in the example: Wonky Hatch Texture 4, changed with "Tone Scraping" Ink (adjust line width)).

    _ _ _ _ _ _ _ _ _ _ _ _ _ _ _ _


    I won’t explain the Direct Hatch Brushes in detail as there are so many…
    Just experiment with brush size, particle size, particle density, spray deviation, brushtip angle, particle angle and what ever else you find ^^
    There’s tons of options!

    _ _ _ _ _ _ _ _ _ _ _ _ _ _ _ _


  • You can change the size and angle / rotation of the hatching texture in the tool property panel.
  • Anti overflow is turned on, you can turn it off if it’s messing with what you want to do.
  • Some of the brushes have slightly transparent parts, if you don’t like this, set the layer to monochrome.

  • _ _ _ _ _ _ _ _ _ _ _ _ _ _ _ _


    UPDATE!


    I came to like those very much in the short time I did the sketch above ^^

    The weird hatches happen when you draw tiny circles smaller then the brushtip… I think it can look kinda cool. You could use this for water ripples! -> draw circles first, then perspective transform the layer...

    _ _ _ _ _ _ _ _ _ _ _ _ _ _ _ _


    Alright, that’s everything ^^ (I know, it’s a lot…)
    Have fun!

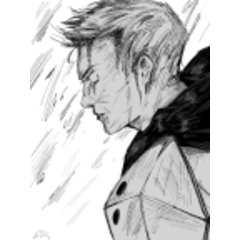
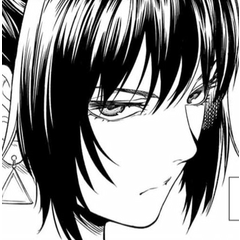
    ハッチング テクスチャ ブラシ Hatch Texture Brushes

    トーンスクレイピングツール(線幅の調整) Tone Scraping Tools (adjust line width)

    ダイレクトハッチブラシ/スネーク/スプレー Direct Hatch Brushes / Snakes / Sprays

    垂直ハッチングブラシ Vertical Hatch Brushes

    カーブ ハッチング ブラシ Curve Hatch Brushes

    旧バージョン

    コンテンツID:2075389

    公開日 : 1年前

    更新日 : 1年前

    Rainy3さんのプロフィール ...もっと詳しく

    出品中の素材を検索