

4つのブラシは、現実的な羽を描くために。葉や葉を描くにも使えます。 FOUR brushes to draw realistic feathers. They also can be used for drawing leaves and foliage.
私はクリップスタジオで2羽の羽を描き、これらの2つのブラシを作成するためにそれらを使用しました。
あなたは現実的に見えるストライプの羽、または単に固体色の羽を得るために設定で遊ぶことができます。また、ブラシストロークやブラシ先端自体の中で、色相を変更するように設定することもできます。
いくつかの例を次に示します。
ブラシ#1:

羽はペンの線に従うので、羽の円形の線を作ることができます。
私は私が持っているジュエリーの一部に触発されました - 耳の袖口 - それは少しこのように見えます:

これらのブラシは、葉や葉だけでなく、鳥の羽を表すために使用することができます。
ブラシ#2:

ブラシ設定オプションは明確にする必要がありますので、簡単に遊ぶのが簡単です。各羽の大きさと角度は、可能な限り自然に見えるので、変化します。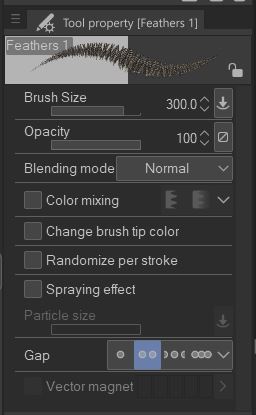
「スプレー効果」をチェックし、羽の大きさを変更したい場合は、(単に「ブラシサイズ」を変更するのではなく、(スプレー効果がチェックされているブラシに対して行く)のではなく、「パーティクルサイズ」を使用してブラシサイズを変更してください。

また、個々の羽を描くことができるように、リボンブラシを2本作りました。

私はイメージ素材として、私の2つの羽の図面も含めてきました。おそらく、あなたは彼らのために使用を見つけるのだろうか?
楽しむ!
I painted two feathers in Clip Studio and used them to create these two brushes.
You can play with the settings to get realistic-looking striped feathers, or just solid coloured feathers. You can also set the hues to change with each brush stroke and within the brush tip itself.
Here are some examples:
BRUSH #1:
The feathers follow the line of the pen, so you can make nice sweeping circular lines of feathers.
I was inspired by a piece of jewellery I have - an ear cuff - it looks a bit like this:
These brushes can be used to represent leaves and foliage as well as birds' feathers.
Brush #2:
The brush setting options should be clear so it should be easy enough to play around with them. The size and angle of each feather varies, so that it looks as natural as possible.
If you've checked 'spraying effect', and you want to change the size of the feathers, please be sure to change the brush size using 'particle size' (rather than just changing 'brush size' (that goes for any brush that has 'spraying effect' checked).
I also made two ribbon brushes so that you can draw individual feathers.
I've included my two feather drawings too, as image material. Perhaps you will find a use for them?
Enjoy!
カテゴリー1 Category 1


更新履歴
個々の羽を描くために2つのリボンブラシを追加しました!☺ Added two ribbon brushes to draw individual feathers! ☺


"ooak_leaf"さんの別の素材


"素材集"の人気素材


新着素材


バッジ
-
 MVP ◆質問に対して適切な回答を数多く投稿し、コミュニティの運営に大きく貢献したユーザーです。MVPは3ヶ月に一度、その間に獲得したポイントを元に決定し、表彰を行っています。
 -
 NVP (New Valuable Player) ◆MVPに次いでコミュニティの運営に貢献したユーザーです。これまでMVPの受賞経験のない方から、獲得したポイントを元に決定し、表彰を行なっています。
 -
 公式エキスパート ◆優れた回答者の証であるMVP受賞者の中からさらに選ばれた、コミュニティで最も優良な回答者の証です。審査を経て当社から依頼し就任いただいています。※旧名称「エバンジェリスト」
 -
 セルシス公認モデレーター ◆モデレーターは、日本語とその他の言語が話せるセルシス公認のスタッフです。ソフトウェアや創作のエキスパートではないので、直接疑問を解決することはできませんが、みなさんがスムーズにコミュニケーションできるように、言葉やコミュニケーションの側面からサポートします。
 -
 セルシス公式運営に関連した公式アカウントです。