

He rediseñado mi antigua plantilla elaborada de capas para webtoons después de ver que algunas cosas eran confusas o no funcionaban como pensaba.

Si quieres una plantilla de capas muuy elaborada, busca "Plantilla de capa: Webtoon (muy elaborada)" o ve a la primera publicación en mi perfil :)
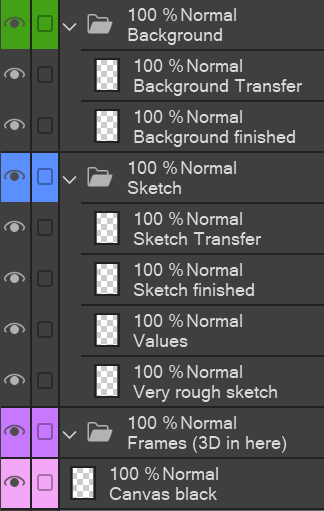
Cómo usar:
- Recoge todas tus capas de fotogramas en la carpeta "Frames (3D in here)". Usa la herramienta de selección inteligente para dibujar dentro de los Marcos (pero en las otras capas, así no necesitas pegar la plantilla de cada viñeta). Como los modelos 3D no pueden quedarse en la zona seleccionada, tienes que incorporarlos al encuadre.
- En la carpeta "Boceto", me gusta primero hacer el storyboard en la capa de "boceto muy aproximado" y pensar los valores, antes de pasar al boceto más elaborado.
- Trabajo con un sistema de "X terminado" y "X Transferir" (que se encuentra en las carpetas Sketch, Background y Characters ). Dibujo primero en la capa "Transferir" y, una vez satisfecho, uso la función "Transferir a la capa inferior" (bajo "Capa") para transferirlo a la capa "terminada". De esta manera, puedo centrarme en dibujar, por ejemplo, solo el dibujo del cabello y no preocuparme por borrar partes del dibujo del rostro. [Prefiero la función de "transferir" a la de "fusionar capas", porque así no necesito crear una capa nueva cada vez.
- Explicaciones sobre las capas de efectos especiales: "Pluma de contorno" es para cualquier efecto para la que usaría el bolígrafo de contorno, por ejemplo, charla/risas, molestia, líneas de movimiento, palabras sonoras como risita , etc. "Onomatopeya" es para los efectos de sonido grandes como ¡BOOM! y la versión "clip" es para si quieres hacer degradados o patrones dentro.
- El negro de lienzo es para aquellas escenas en las que el lienzo debería ser negro pero no puedes hacer que el papel sea negro porque no es toda la página; Solo usa la herramienta cubo.
- en Texto, fusiono todos mis textos y burbujas de diálogo en una sola capa para que no se vuelva abrumador; De todas formas, puedes mover cada parte por separado.


I´ve reworked my old elaborate layer template for webtoons after seeing how some things were confusing/ not working how I thought they would.
If you want a veeeery elaborate layer template, search for "Layer Template: Webtoon (very elaborate)" or go to the first post on my profile :)
How to use:
- Pull all your frame layers into the "Frames (3D in here)" folder. Use the Smart selection tool to draw inside the Frames (but on the other layers, so you don´t need to paste the template for every panel). Since 3D models can´t stay in the selected area, you have to pull those into the frame.
- In the "Sketch" folder, I like to first do the storyboard on the "very rough sketch" layer, and think the values through, before I move on to the more elaborate sketch.
- I work with a system of "X finished" and "X Transfer" (to be found in Sketch, Background, and Characters folders). I draw on the "Transfer" layer first, and once I´m satisfied, I use the "Transfer to lower layer" function (under "Layer") to transfer it onto the "finished" layer. This way, I can focus on drawing e.g. only the hair lineart first and not worry about erasing parts of the face lineart. [I prefer the "transfer" function to the "merge layers" function, because this way, I don´t need to create a new layer every time.
- Explanations to the Special Effects layers: "Outline pen" is for every effect I would use the outline pen for, e.g. chatter/ laughing, annoyed, movement lines, sound words like snicker etc. "Onomatopoeia" is for the big sound effects like BOOM! and the "clip" version is in case you want to do gradients or patterns inside.
- Canvas black is for those scenes where your canvas should be black but you can´t make the paper black because it´s not the entire page; just use the bucket tool.
- in Text, I merge all my texts and speech bubbles into one layer so it doesn´t get overwhelming; you can still move each part separately anyway.


Más materiales de Arifryer

Materiales populares de Plantillas de capas


Nuevos materiales


Insignias
-
 MVP ◆Estos usuarios han contribuido en gran medida a la gestión de la comunidad, al publicar multitud de útiles respuestas a las preguntas planteadas. Una vez cada tres meses, los MVP son seleccionados en base a los puntos obtenidos durante ese período y, en consecuencia, son reconocidos por su esfuerzo.
 -
 New Valuable Player (NVP) ◆Son las personas que más han contribuido a la comunidad después de los MVP. Este galardón se otorga según los puntos conseguidos a los usuarios que aún no han obtenido ningún premio MVP.
 -
 Especialista oficial ◆Elegidos de entre todos los MVP, quienes ya han demostrado ser de inestimable ayuda, esto es un testimonio de su excepcional apoyo para con la comunidad. Tras un minucioso escrutinio, son nombrados por Celsys para ocupar dicho cargo.Nota: Anteriormente denominados "evangelistas".
 -
 Moderador oficial de Celsys ◆Los moderadores son miembros del personal de Celsys que pueden comunicarse en japonés y otros idiomas. No son expertos en software o ilustración, por lo que no pueden responder directamente a las preguntas. Sin embargo, tratarán de asegurarse de que la comunicación entre usuarios de distintas lenguas sea tan fluida y comprensible como sea posible.
 -
 Cuenta oficial de CelsysCuenta oficial del administrador