

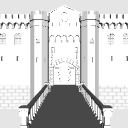
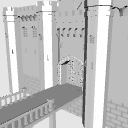
El puente levadizo tiene un ángulo de 0°, 30°, 60° y 90°.
También puede abrir y cerrar la puerta y subir y bajar la rejilla de caída.
跳ね橋は0°、30°、60°、90°の角度が付きます。
門の開閉や落とし格子の上下もできます。
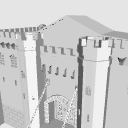
Dado que esto fue creado a una escala de 1/5, tu personaje debería encajar bien si también estableces su tamaño en 1/5.
Aun así, el modelo puede parecer un poco grande cuando se coloca tal cual, por lo que puede ajustarlo fácilmente a su tamaño preferido usando la opción "Escala de objeto".
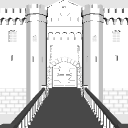
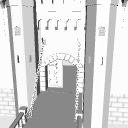
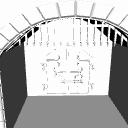
(El siguiente ejemplo muestra que se coloca en una hoja A4).

Partes móviles
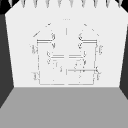
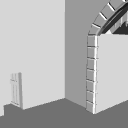
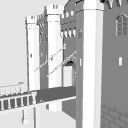
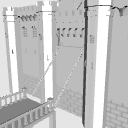
Haga clic en el botón "Piezas móviles preestablecidas" que se muestra en el círculo rojo de la imagen a continuación.


- Haz que el ángulo de visión sea visible detrás de la puerta
- gate_bolt_on con ajustes preestablecidos de diseño
- Mover gate_bolt barras con preajustes de partes de pose
De forma predeterminada, esta parte está oculta.
Para que se mueva, siga estos pasos:
-
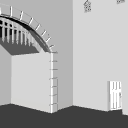
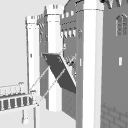
Ajuste la cámara para que pueda ver la parte posterior de la puerta.
-
Establezca el ajuste preestablecido de diseño en "gate_bolt_on".
-
En el preajuste de partes móviles, mueva la barra "gate_bolt".
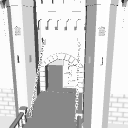
★ Al abrir la puerta, vuelva a cambiar el ajuste preestablecido de diseño a "Diseño predeterminado".
(De lo contrario, el pestillo permanecerá en el centro cuando se abra la puerta).
La siguiente imagen muestra la puerta con el ajuste preestablecido de diseño establecido en "gate_bolt_on".

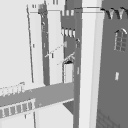
El puente levadizo se puede ajustar a 0° (predeterminado), 30°, 60° o 90°.
Los ajustes "drawbridge_30" y "chain_30" se corresponden entre sí.
- Ajuste con la barra de drawbridge_30 en "Ajustes preestablecidos de partes de pose"
Utilice la barra "drawbridge_30" en el ajuste preestablecido de piezas móviles para ajustarlo.

- Además, se ajusta con la barra en la chain_30.
A continuación, use la barra "chain_30" para ajustar el ajuste.


Si desea ocultarlo, simplemente seleccione "crest_off" en el ajuste preestablecido de diseño.


Since this was created at a 1/5 scale, your character should fit nicely if you set their size to 1/5 as well.
Even so, the model may still appear a bit large when placed as is, so you can easily adjust it to your preferred size using the “Object Scale” option.
(The example below shows it placed on an A4 sheet.)
Movable Parts
Click the “Movable Parts Preset” button shown in the red circle in the image below.
- 門の裏側が見える画角にする
- レイアウトのプリセットでgate_bolt_onにする
- 可動パーツのプリセットでgate_boltのバーを動かす
By default, this part is hidden.
To make it move, please follow these steps:
-
Adjust the camera so you can see the back side of the gate.
-
Set the layout preset to “gate_bolt_on.”
-
In the movable parts preset, move the “gate_bolt” bar.
★ When opening the gate, please switch the layout preset back to “Default Layout.”
(Otherwise, the latch will remain in the center when the gate opens.)
The image below shows the gate with the layout preset set to “gate_bolt_on.”
The drawbridge can be adjusted to 0° (default), 30°, 60°, or 90°.
The settings “drawbridge_30” and “chain_30” correspond to each other.
- 『可動パーツのプリセット』でdrawbridge_30のバーで調節する
Use the “drawbridge_30” bar in the Movable Parts Preset to adjust it.
- さらにchain_30のバーで調節する。
Next, use the “chain_30” bar to fine-tune the adjustment.
If you’d like to hide it, just select “crest_off” in the Layout Preset.
material マテリアル
-
Material por defecto 初期マテリアル

disposición 配置
-
Diseño predeterminado 初期レイアウト
-
gate_bolt_on gate_bolt_on
-
crest_off crest_off
ángulo アングル
-
front_view front_view
Poses de partes 可動パーツ
-
gate_door_R gate_door_R
-
gate_ddor_L gate_ddor_L
-
yard_door_R yard_door_R
-
yard_door_L yard_door_L
-
iron_fence iron_fence
-
gate_bolt gate_bolt
-
drawbridge_30 drawbridge_30
-
chain_30 chain_30
-
drawbridge_60 drawbridge_60
-
chain_60 chain_60
-
drawbridge_90 drawbridge_90
-
chain_90 chain_90


Más materiales de メロンポー


Materiales populares de Objetos 3D


Nuevos materiales


-
 MVP ◆Estos usuarios han contribuido en gran medida a la gestión de la comunidad, al publicar multitud de útiles respuestas a las preguntas planteadas. Una vez cada tres meses, los MVP son seleccionados en base a los puntos obtenidos durante ese período y, en consecuencia, son reconocidos por su esfuerzo.
 -
 New Valuable Player (NVP) ◆Son las personas que más han contribuido a la comunidad después de los MVP. Este galardón se otorga según los puntos conseguidos a los usuarios que aún no han obtenido ningún premio MVP.
 -
 Especialista oficial ◆Elegidos de entre todos los MVP, quienes ya han demostrado ser de inestimable ayuda, esto es un testimonio de su excepcional apoyo para con la comunidad. Tras un minucioso escrutinio, son nombrados por Celsys para ocupar dicho cargo.Nota: Anteriormente denominados "evangelistas".
 -
 Moderador oficial de Celsys ◆Los moderadores son miembros del personal de Celsys que pueden comunicarse en japonés y otros idiomas. No son expertos en software o ilustración, por lo que no pueden responder directamente a las preguntas. Sin embargo, tratarán de asegurarse de que la comunicación entre usuarios de distintas lenguas sea tan fluida y comprensible como sea posible.
 -
 Cuenta oficial de CelsysCuenta oficial del administrador