
Menudillo Mejores Bromos + Conjunto de Degradados (Fetlock Better Bromines + Gradient Set) Fetlock Better Bromines + Gradient Set
Content ID:2169088
-
412

Una acción automática para hacer el 'truco del bromo' con mapas de degradados, así como una pequeña selección de degradados para usar después. An auto action to do the 'bromine trick' with gradient maps, as well as a small selection of gradients to use afterwards.
¿Quieres un truco de bromo que te permita colorear debajo sin hacer un montón de tonterías para preparar tu arte?
¿Indeciso sobre qué color de bromo quieres?
¡Aquí tienes un paquete!
1. Una plantilla de capa que funcione bajo una premisa bastante sencilla: básicamente todos los trucos de bromo que existen son hacer cinco mil pasos para hacer lo que un mapa de degradado y un par de carpetas con los ajustes adecuados podrían hacer en... Dos segundos.
2. Un conjunto de gradientes ajustados específicamente a lo que hace el conjunto de carpetas, por si no tienes ya muchos conjuntos de mapas de gradiente y no te gusta el aspecto de los predeterminados de CSP. Para usar estos en lugar de lo que aparece inicialmente, simplemente cambia qué degradado se está usando en la carpeta.


Preguntas frecuentes:
P: Estoy usando la capa de bromo, pero los colores no funcionan bien.
R: Comprueba que usas negro puro en la capa de líneas de bromo. Además, los pinceles con grano o transparencia son los que mejor funcionan con este truco. Un G-pen o cualquier otra línea sólida similar con opacidad al 100% solo tendrá cambios de color leves. Dicho esto, eso podría funcionar bien para crear efectos de celdas tradicionales interesantes, si duplicas las líneas y desenfocas gaussian el duplicado que hay debajo.
P: No puedo usar color, todo está saliendo color bromo...

P: Me gusta este efecto, pero me gustaría poder hacer el efecto bromo en diferentes colores por obra de arte. ¿Hay alguna forma de hacerlo?
R: Sí, pero se va a saturar; Necesitarás tener varias carpetas, con cada 'pieza' (ropa, piel) separada. Así que tendrías una carpeta de trucos de bromo morada, y otra que tiene un color beige en otra, o algo así.
R: Configura las herramientas en 'Capa de referencia' en lugar de 'todas las capas', y pon 'Dibujar líneas aquí' como referencia, o desactiva temporalmente la visibilidad de la capa 'Mantener blanca' mientras usas la herramienta en cuestión, y vuelve a encenderla después de hacerlo. La capa 'Mantener Blanco' está configurada como Borrador por defecto para evitar estos problemas desde el principio.

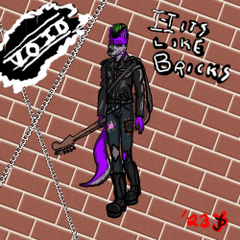
Con eso... ¡Diviértete! (El personaje que aparece en estos ejemplos es mío, y mi letra descuidada es mía)
Want a bromine hack that will allow you to do coloring underneath without doing a bunch of nonsense to get your artwork prepped?
Indecisive about what color of bromine you want?
Here's a pack for you!
1. A layer template that works under a pretty simple premise : basically every single bromine trick out there is doing five thousand steps to do what a gradient map and a couple folders with the right settings could do in like... two seconds.
2. A set of gradients specifically tuned to what the folder set does, just in case you don't have a lot of gradient map sets already, and don't like the look of CSP's default ones. To use these instead of what initially pops in just swap which gradient is being used in the folder.
FAQ :
Q: I'm using the bromine layer, but the colors aren't working right.
A: Check to make sure that you're using pure black on the bromine lines layer. Additionally, brushes with grain or transparency are the ones that work best with this trick! A G-pen or any other similar solid 100% opacity line will only have mild color changes. That being said, that could work well for making interesting traditional cel effects, if you duplicate the lines and gaussian blur the duplicate underneath.
Q: I'm not able to use color, everything is turning out bromine color...
Q: I like this effect, but I would like to be able to do the bromine effect in different colors per piece of art. Is there a way to do this?
A: Yes, but it will get cluttered; you will need to have multiple folders, with each 'piece' (clothes, skin) separated out. So you'd have a purple bromine trick linework folder, and one that has a tan color in another one, or whatnot.
A: Set the tools to 'Reference Layer' instead of 'all layers', and set 'Draw Lines Here' as the reference, or temporarily toggle the visibility of the 'Keep White' layer off while using the tool in question, and turn it back on after you do so. The 'Keep White' layer is set as a Draft by default to avoid these issues in the first place.
With that... Have fun! (Character depicted in these examples is mine, and my sloppy handwriting is mine)
Los bromos The Bromines


Historial de actualizaciones
Se añadió una explicación adicional sobre cómo solucionar problemas comunes para que el efecto bromo funcionara, ya que algunas partes de la explicación se olvidaron en la subida inicial. added further explanation of how to fix common problems with getting the bromine effect to work, as some portions of the explanation were forgotten on the initial upload.


Más materiales de AMORPHAGE


Materiales populares de Catálogos de materiales


Nuevos materiales


-
 MVP ◆Estos usuarios han contribuido en gran medida a la gestión de la comunidad, al publicar multitud de útiles respuestas a las preguntas planteadas. Una vez cada tres meses, los MVP son seleccionados en base a los puntos obtenidos durante ese período y, en consecuencia, son reconocidos por su esfuerzo.
 -
 New Valuable Player (NVP) ◆Son las personas que más han contribuido a la comunidad después de los MVP. Este galardón se otorga según los puntos conseguidos a los usuarios que aún no han obtenido ningún premio MVP.
 -
 Especialista oficial ◆Elegidos de entre todos los MVP, quienes ya han demostrado ser de inestimable ayuda, esto es un testimonio de su excepcional apoyo para con la comunidad. Tras un minucioso escrutinio, son nombrados por Celsys para ocupar dicho cargo.Nota: Anteriormente denominados "evangelistas".
 -
 Moderador oficial de Celsys ◆Los moderadores son miembros del personal de Celsys que pueden comunicarse en japonés y otros idiomas. No son expertos en software o ilustración, por lo que no pueden responder directamente a las preguntas. Sin embargo, tratarán de asegurarse de que la comunicación entre usuarios de distintas lenguas sea tan fluida y comprensible como sea posible.
 -
 Cuenta oficial de CelsysCuenta oficial del administrador