

Un conjunto de herramientas de acción automática que se creó para un proyecto de animación. ¡Pruébalo y ajústalo a tu flujo de trabajo!
conjunto de herramientas de acción automática que me gusta usar para anime. ¡Pruébalo y ajústalo a tu flujo de trabajo!
An auto-action toolset that was made for an animation project. Try it out and adjust it to your workflow!
私がアニメーションに好んで使っているオートアクションツールセット。使ってみて、あなたのワークフローに合わせて調整してください!

1. LN - Carpeta para Lineart
Esta carpeta se establece como una capa de referencia para trabajar con la herramienta de cubo de pintura en la capa FILL.
- LN_main capa en escala de grises para la línea principal
- LN_a capa roja marca el borde de los rellenos especiales
- LN_b capa azul marca el borde de los rellenos especiales
Puedes hacer cosas interesantes como filtrar por tipo de capa en varias celdas para, por ejemplo, cambiar el color de todas las líneas rojas, cambiar la capa de borrador a una capa de trabajo, etc.2. FILL - Capa de color ráster para ayudar a rellenar las líneas con color plano.
Hace referencia al contenido de la carpeta LN para los límites de relleno. Para obtener los mejores resultados: establezca la herramienta de cubo con los siguientes valores predeterminados para que llene completamente el arte lineal vectorial.

3. SK - una capa de borrador para un bocetoLas capas de borrador se pueden excluir de la exportación e ignorar mediante herramientas que hagan referencia a varias capas.
- ⚠️ Si la carpeta LN Lineart no es la carpeta superior debajo de la celda anidada, esto se romperá.
- ⚠️ Si la carpeta LN Lineart no es la carpeta superior debajo de la celda anidada, esto se romperá.
- ⚠️ Si el fotograma de inicio de la cel de animación NO está seleccionado en la línea de tiempo, este se interrumpirá.
- ⚠️ Si la Cel (carpeta de animación anidada que tiene el número de Cel) que desea eliminar no está seleccionada, esto se romperá
- ⚠️ Si alguna de las capas del Cel es el objetivo de edición (indicado por el icono de lápiz ✏️ junto al conmutador de 👁️ visibilidad), este se romperá


- Perfecto para cuando desea concentrarse en hojear rápidamente 1 tipo de capa, como en la fase de boceto (SK), tinta (LN) y pintura (FILL).
- Ahorra tiempo al seleccionar manualmente cada capa como objetivo de edición una a la vez.
- Trabaja de la mano con: Combinación de este conjunto de acciones automáticas con un atajo de teclado para seleccionar rápidamente las celdas siguiente y anterior

- ⚠️ Mantener los nombres de las capas es fundamental, o esta acción de ahorro de tiempo no funcionará.
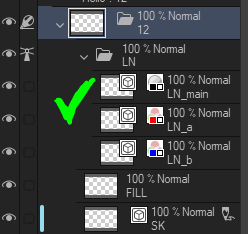
1. LN - Folder for Lineart
This folder is set as a Reference Layer to work with the paint bucket tool on FILL layer.
- LN_main grayscale layer for main linework
- LN_a red layer marks the border of special fills
- LN_b blue layer marks the border of special fills
You can do neat stuff like filter by layer type on multiple cels to, say, change the color of all red lines, change draft layer to a working layer, and so on.2. FILL - Raster Color Layer to assist with filling linework with flat color.
It references the contents of LN folder for fill boundaries. For best results: set bucket tool with the following defaults so it fills the vector line art completely.
3. SK - a Draft Layer for a sketchDraft layers can be excluded from export and ignored by tools that refer to multiple layers.
- ⚠️ If LN Lineart Folder is not the topmost folder under the nested cel, this will break.
- ⚠️ If LN Lineart Folder is not the topmost folder under the nested cel, this will break.
- ⚠️ If the start frame of the animation cel is NOT selected in the timeline, this will break.
- ⚠️ If the Cel (nested animation folder that has the Cel Number) you want to delete is not selected, this will break
- ⚠️ If any of the layers in the Cel are the Editing Target (indicated by pencil ✏️ icon next to 👁️ visibility toggle), this will break
- Perfect for when you want to focus on quickly flipping through 1 layer type, such as in the sketch phase (SK), ink (LN), and paint (FILL).
- It saves time of manually selecting each layer as the editing target one at a time.
- It works hand in hand with: Combining this Auto Action Set with a Keyboard Shortcut for quickly selecting Next and Previous Cels
- ⚠️ Maintaining the layer names is critical, or this time-saving action will not work.


Más materiales de Ghalban

Materiales populares de Acciones automáticas


Nuevos materiales


-
 MVP ◆Estos usuarios han contribuido en gran medida a la gestión de la comunidad, al publicar multitud de útiles respuestas a las preguntas planteadas. Una vez cada tres meses, los MVP son seleccionados en base a los puntos obtenidos durante ese período y, en consecuencia, son reconocidos por su esfuerzo.
 -
 New Valuable Player (NVP) ◆Son las personas que más han contribuido a la comunidad después de los MVP. Este galardón se otorga según los puntos conseguidos a los usuarios que aún no han obtenido ningún premio MVP.
 -
 Especialista oficial ◆Elegidos de entre todos los MVP, quienes ya han demostrado ser de inestimable ayuda, esto es un testimonio de su excepcional apoyo para con la comunidad. Tras un minucioso escrutinio, son nombrados por Celsys para ocupar dicho cargo.Nota: Anteriormente denominados "evangelistas".
 -
 Moderador oficial de Celsys ◆Los moderadores son miembros del personal de Celsys que pueden comunicarse en japonés y otros idiomas. No son expertos en software o ilustración, por lo que no pueden responder directamente a las preguntas. Sin embargo, tratarán de asegurarse de que la comunicación entre usuarios de distintas lenguas sea tan fluida y comprensible como sea posible.
 -
 Cuenta oficial de CelsysCuenta oficial del administrador