
Pinceles de textura de sombreado (+Sombreado de curvas) (Hatching Texture Brushes (+Curve Hatch!)) Hatching Texture Brushes (+Curve Hatch!)
Content ID:2075389
-
24 158

La eclosión se realiza rápidamente con un conjunto de:
- 7 pinceles de textura de sombreado
- 2 herramientas de "raspado de tono" (ajustar el ancho de línea)
- 19 Pinceles de Escotilla Directa / Serpientes / Sprays
- 5 pinceles de sombreado vertical
- Un consejo útil sobre cómo eclosionar convenientemente con herramientas de relleno
-¡¡¡NUEVO!!! 3 pinceles de sombreado curvo
(Actualizado: 07.04.24)
Hatching made fast with a set of:
- 7 Hatch Texture Brushes
- 2 "Tone Scraping“ Tools (adjust linewidth)
- 19 Direct Hatch Brushes / Snakes / Sprays
- 5 Vertical Hatching Brushes
- A hopefully useful tip about conveniently hatching with fill tools
- NEW!!! 3 Curve Hatch Brushes
(Updated: 07.04.24)


- Simplemente arrastre la textura en una capa y agregue una máscara oscurecida (puede encontrar el nombre de las texturas en las propiedades avanzadas de la herramienta en "Textura").
- A continuación, dibuja sobre la máscara para volver a añadir la textura ^^


- Just drag the texture on a layer and add a blacked out mask (You can find the name of the textures in the advanced tool properties under „Texture“.)
- Then draw on the mask to add the texture back ^^
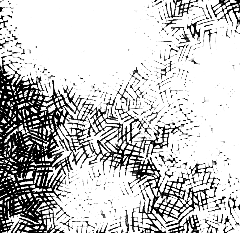
Pinceles de textura de sombreado Hatch Texture Brushes
-
Pincel de textura de sombreado 1 Hatching Texture Brush 1
-
Pincel de textura de sombreado 2 Hatching Texture Brush 2
-
Pincel de textura de sombreado 3 Hatching Texture Brush 3
-
Pincel de textura de sombreado 4 Hatching Texture Brush 4
-
Pincel de textura de sombreado 5 Hatching Texture Brush 5
-
Pincel de textura de sombreado 6 Hatching Texture Brush 6
-
Pincel de textura de sombreado 7 Hatching Texture Brush 7


Herramientas de raspado de tonos (ajustar el ancho de línea) Tone Scraping Tools (adjust line width)

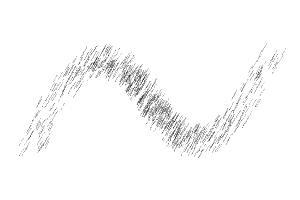
Pinceles de Sombreado Directo / Serpientes / Sprays Direct Hatch Brushes / Snakes / Sprays
-
Serpiente de escotilla 1 Hatchsnake 1
-
Serpiente de escotilla 2 Hatchsnake 2
-
Serpiente de escotilla 3 Hatchsnake 3
-
Serpiente de eclosión en solitario (perpendicular) Solo Hatch Snake (perpendicular)
-
Serpiente de eclosión en solitario (perpendicular) 2 Solo Hatch Snake (perpendicular) 2
-
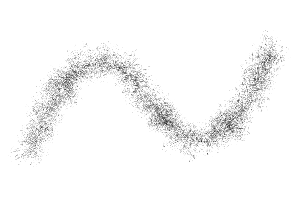
Serpiente rociadora de escotilla individual Solo Hatch Spray Snake
-
Solo Hatch Spray (una dirección) Solo Hatch Spray (one direction)
-
Spray de escotilla en solitario (aleatorio) Solo Hatch Spray (random)
-
Escotilla 1 Hatchspray 1
-
Escotilla 2 Hatchspray 2
-
Escotilla 3 Hatchspray 3
-
Nube de escotilla 1 Hatch Cloud 1
-
Nube de escotilla 2 Hatch Cloud 2
-
Nube de escotilla 3 Hatch Cloud 3
-
Nube de escotilla 4 Hatch Cloud 4
-
Nube de escotilla 5 Hatch Cloud 5
-
Nube de escotilla 6 Hatch Cloud 6
-
Nube de arena (raspado o tonificación) Sand Cloud (scraping or toning)
-
Ruido de arena (raspado o tonificación) Sand Noise (scraping or toning)


Pinceles de sombreado vertical Vertical Hatch Brushes


Pinceles de sombreado curvo Curve Hatch Brushes


Versión antigua


Más materiales de Rainy3


Materiales populares de Catálogos de materiales


Nuevos materiales


-
 MVP ◆Estos usuarios han contribuido en gran medida a la gestión de la comunidad, al publicar multitud de útiles respuestas a las preguntas planteadas. Una vez cada tres meses, los MVP son seleccionados en base a los puntos obtenidos durante ese período y, en consecuencia, son reconocidos por su esfuerzo.
 -
 New Valuable Player (NVP) ◆Son las personas que más han contribuido a la comunidad después de los MVP. Este galardón se otorga según los puntos conseguidos a los usuarios que aún no han obtenido ningún premio MVP.
 -
 Especialista oficial ◆Elegidos de entre todos los MVP, quienes ya han demostrado ser de inestimable ayuda, esto es un testimonio de su excepcional apoyo para con la comunidad. Tras un minucioso escrutinio, son nombrados por Celsys para ocupar dicho cargo.Nota: Anteriormente denominados "evangelistas".
 -
 Moderador oficial de Celsys ◆Los moderadores son miembros del personal de Celsys que pueden comunicarse en japonés y otros idiomas. No son expertos en software o ilustración, por lo que no pueden responder directamente a las preguntas. Sin embargo, tratarán de asegurarse de que la comunicación entre usuarios de distintas lenguas sea tan fluida y comprensible como sea posible.
 -
 Cuenta oficial de CelsysCuenta oficial del administrador