
DIVISIONES DE PAGINA para Cómics Verticales (PAGE DIVISIONS for Vertical Comics) PAGE DIVISIONS for Vertical Comics
Content ID:1779507
-
515

¡Una forma ligera y fácil de dividir tus largos cómics verticales con este activo! A light-weight and easy-fix way to dividing your long vertical comics with this asset!
Descargo de responsabilidad: Si usted nota la versión que estoy usando, es porque reinstalé recientemente una versión anterior de CSP para probar y comparar algunas cosas. (razones personales). A pesar de todo, las funciones CSP de versiones antiguas y nuevas siguen siendo las mismas.
Básico
- Este catálogo tiene 3 ACTIVOS
- [5] DIVISIONES - tiene 5 divisiones/capas de selección
- [10] DIVISIONES - tiene 10 divisiones/capas de selección
- [35] DIVISIONES - tiene 35 divisiones/capas de selección
- Cada capa de selección tiene 800 píxeles de ancho y 1280 píxeles de alto (este no es el tamaño total de cada uno de los 3 activos)
- Esto se utiliza mejor para los cómics verticales largos o cómics como Webtoons, tapas, etc. Me basó el tamaño de los requisitos de Webtoons (Link for source: https://www.webtoons.com/en/challenge/webtoon-format/list?title_no=109936&page=1) y porque creo que 700 píxeles de ancho es pequeño.
- ¡Este activo también es mejor para dividir tu cómic largo y exportarlo en partes! Con la nueva versión de clipstudiopaint (1.10.5) hay un nuevo ajuste que puede hacer esto en su lugar, pero todavía puede usarlo.
- Una vez que descargues el recurso, lo verás en tu ventana de Materiales (pestaña menú>WINDOW> Material> Descargas).
- Elige cuántas divisiones quieres
- Arrastre y suelte esto en el lienzo.
- Ajuste las divisiones como un todo usando Transformación Libre, (importante! seleccione la carpeta cuando utilice la herramienta de transformación). A continuación, alinee con la parte superior izquierda de su lienzo. (leer a continuación para obtener más información)
- También puede soltar y arrastrar divisiones adicionales [5] o [10] para obtener el número deseado y, a continuación, ajustar de nuevo.
- Puede desactivar la visibilidad de la carpeta para ocultar la vista previa.
- Incluso puede cambiar el color de las Capas de Selección, simplemente compruebe su Propiedad de Capa.
- Dado que las divisiones de página son Capas de selección, puede hacer doble clic o Ctrl+Clic en la capa de selección para seleccionar una página determinada para exportar.
- Mayús+Doble clic en las capas para obtener varias selecciones.
- La carpeta divisiones estará encima de todas las capas, si la arrastra y suelta en el archivo de clip. Pero si hace clic en el botón "Pegar material en lienzo" en la ventana Materiales, es posible que no se muestre en la parte superior.
- He creado carpetas de 5, 10 y 35 divisiones para que pueda agregar y ajustar dependiendo de sus necesidades. Porque a veces el número de páginas en un cómic vertical depende de los requisitos de un sitio web (por ejemplo. Webtoon, Tapas, Lezhin, Comico, etc.), por favor, tenga la libertad de ajustarse.
- Estas son las longitudes exactas de cada carpeta de divisiones en total (todas ellas de 800 píxeles de ancho):
- 5 DIVISIONES totales a 6.400 píxeles de altura
- 10 DIVISIONES totales a 12.800 píxeles de altura
- 35 DIVISIONES en total a 44.800 píxeles de altura
- Si desea que las divisiones se alineen correctamente al arrastrar y soltar el activo, es mejor comenzar con un lienzo que sea tan alto como los números anteriores.
Y después de eso, solo puedes agregar más páginas usando cambiar el tamaño del lienzo (pestaña de menú>EDIT>Cambiar tamaño de lienzo, ver la imagen de abajo)

- Todavía puede ajustar el ancho y alto de las divisiones manualmente utilizando la transformación libre. Lea a continuación sobre cómo hacerlo.
- Después de arrastrar y soltar el número deseado de divisiones...
- SELECCIONE la propia FOLDER DIVISIONS (¡importante!)
- Usar TRANSFORM GRATUITA (EDIT>Transform> Transformación Libre)
- (¡muy importante!) UNTICK "Mantener relación de aspecto" y "Mantener imagen original"; y luego vaya a "Centro de Rotación" y SELECT Center
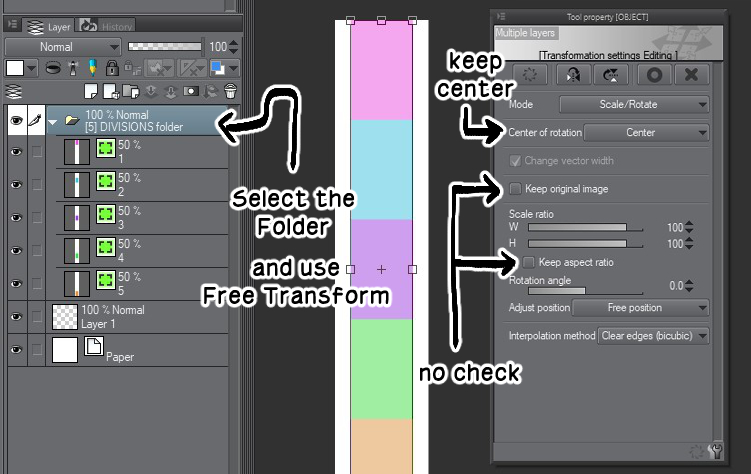

(Importante acercar para ver que la transformación está perfectamente alineada con el borde superior izquierdo)


Gracias por leer hasta aquí y descargar el activo! Creé esto para mí y luego quería compartirlo en beneficio de otro. Inicialmente planeé hacer acciones automáticas para los pasos que mencioné anteriormente, pero las condiciones son demasiado circunstanciales para que los usuarios diversos los usen; las acciones automáticas que hago podrían traducirse de manera diferente en su csp debido a diferentes factores.
Si tienes problemas para usar esto o encuentras algún error, ponte en contacto conmigo en twitter (twitter.com/AndromedaVaine). Y si quieres apoyarme, por favor: (ko-fi.com/ivaisevol)
Disclaimer: If you notice the version I'm using, it is because I reinstalled recently an older version of CSP to test & compare some things. (personal reasons). Regardless, CSP functions of old and new versions are still the same.
BASICS
- This Catalogue has 3 ASSETS
- [5] DIVISIONS - has 5 divisions/selection layers
- [10] DIVISIONS - has 10 divisions/selection layers
- [35] DIVISIONS - has 35 divisions/selection layers
- Each Selection Layer is 800 pixels wide and 1280 pixels high (this is not the total size of each of the 3 assets)
- This is best used for Long Vertical Comics or comics like Webtoons, Tapas, etc.. I based the size from Webtoons's requirements (Link for source: https://www.webtoons.com/en/challenge/webtoon-format/list?title_no=109936&page=1) and because I think 700 pixels wide is small.
- This asset is also best for dividing your long comic and exporting it in parts! With clipstudiopaint's new version (1.10.5) there's a new setting that can do this instead, but you can still use this.
- Once you download the asset, you'll see it in your Materials Window (menu tab>WINDOW> Material> Downloads).
- Pick how many divisions you want
- Drag and Drop this to your canvas.
- Adjust the Divisions as a whole using Free Transform, (important! select the folder when using the transformation tool). Then align it to the top left of your canvas. (read below for more info)
- You can also drop and drag additional [5] or [10] Divisions to get your desired number, and then adjust again.
- You can turn off the visibility of the folder to hide the preview.
- You can even change the colour of the Selection Layers, just check your Layer Property.
- Because the page divisions are Selection Layers, you can Double-Click or Ctrl+Click on the selection layer to select a certain page for exporting.
- Shift+Double-Click on the layers for multiple selections.
- The divisions folder will be on top of all your layers, if you drag and drop it into your clip file. But if you click the "Paste Material to Canvas" button in the Materials window, then it might not show on top.
- I created folders of 5, 10, and 35 divisions so that you can add & adjust depending on your needs. Because sometimes the number of pages in a vertical comic depends on a website's requirements (eg. Webtoon, Tapas, Lezhin, Comico, etc.), please bear with the freedom of adjusting.
- These are the exact lengths of each divisions folder in total (all of them 800 pixels wide):
- 5 DIVISIONS total = 6,400 pixels height
- 10 DIVISIONS total = 12,800 pixels height
- 35 DIVISIONS total = 44,800 pixels height
- If you want the divisions to be properly aligned when you drag & drop the asset, it's best to start with a canvas that is as tall as the numbers above.
And then after that you could just add more pages by using the Change Canvas Size (menu tab>EDIT>Change Canvas Size, see image below▼)
- You can still adjust the width & height of the Divisions manually using the Free Transform. Read below on how to do that ▼
- After you drag & drop your desired number of divisions...
- SELECT the DIVISIONS FOLDER itself (important!)
- Use FREE TRANSFORM (EDIT>Transform> Free Transform)
- (very important!) UNTICK "Keep Aspect Ratio"and "Keep Original Image"; and then go to "Center of Rotation" and SELECT Center
- ADJUST the width and/or height using the sliders.
(Important to zoom in to see that the transformation is perfectly aligned to the top left edge)
- Click OK

Thank you for reading up to here and downloading the asset! I created this for myself and then wanted to share it for another's benefit. I initially planned to make auto-actions for the steps I listed above, but the conditions are too circumstantial for diverse users to use; the auto-actions I make might translate differently in your csp because of different factors.
If you have problems using this or you find any errors, do contact me in twitter (twitter.com/AndromedaVaine). And if yo'd like to support me, then please: (ko-fi.com/ivaisevol)
Número de divisiones Number of Divisions


Historial de actualizaciones
2021.02.01 - ha cambiado la información 2021.02.01 ~ changed the info


Más materiales de carmina


Materiales populares de Catálogos de materiales


Nuevos materiales


-
 MVP ◆Estos usuarios han contribuido en gran medida a la gestión de la comunidad, al publicar multitud de útiles respuestas a las preguntas planteadas. Una vez cada tres meses, los MVP son seleccionados en base a los puntos obtenidos durante ese período y, en consecuencia, son reconocidos por su esfuerzo.
 -
 New Valuable Player (NVP) ◆Son las personas que más han contribuido a la comunidad después de los MVP. Este galardón se otorga según los puntos conseguidos a los usuarios que aún no han obtenido ningún premio MVP.
 -
 Especialista oficial ◆Elegidos de entre todos los MVP, quienes ya han demostrado ser de inestimable ayuda, esto es un testimonio de su excepcional apoyo para con la comunidad. Tras un minucioso escrutinio, son nombrados por Celsys para ocupar dicho cargo.Nota: Anteriormente denominados "evangelistas".
 -
 Moderador oficial de Celsys ◆Los moderadores son miembros del personal de Celsys que pueden comunicarse en japonés y otros idiomas. No son expertos en software o ilustración, por lo que no pueden responder directamente a las preguntas. Sin embargo, tratarán de asegurarse de que la comunicación entre usuarios de distintas lenguas sea tan fluida y comprensible como sea posible.
 -
 Cuenta oficial de CelsysCuenta oficial del administrador