
¡Brillo! Acción automática (actualización) (Shimmer! Auto Action (Update)) Shimmer! Auto Action (Update)
Content ID:1775374
-
15 340

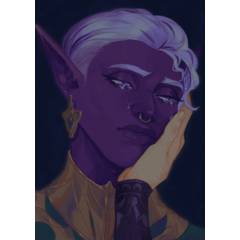
Esta acción automática crea un efecto brillante para la piel. Por favor, haga el acciones en orden de arriba a abajo:


Esta acción crea una nueva capa llamada "Shimmer" y Establece el modo de fusión en Añadir resplandor. Ahora puede crear su brillo efecto con cualquier color en esta capa. Recomiendo usar un color que es el rubor o el tono de la piel.


- Esta acción simplemente duplica la capa Shimmer y lo renombra "Outline". Usted debe colocar esta capa debajo de la Capa de Brillo para prepararse para el siguiente paso. Si usted no, no obtendrá el efecto deseado.


- Esta acción oscurece el área brillante con el modo de fusión Color Burn. Se le da la opción de transformar el contorno para que cree un efecto en relieve. Tú también se le dio la opción de ajustar el Tono/Saturación/Valor de la Contorno. Puede transformar el contorno una vez más si el grabado efecto no es de su agrado.


Esta acción aumenta el tamaño de la área brillante, aclara la piel alrededor de la zona, y utiliza Desenfoque gaussiano. Normalmente aumento el tamaño en 5 píxeles, pero depende del tamaño del lienzo. La opción de ajustar la Se proporciona Tono/Saturación/Valor. La opción de ajustar la cantidad de borroso se da.


- Si no está satisfecho con la resultados, Fix Shimmer y Soften Outline Las acciones son acciones opcionales.
- Haga clic en la Capa de Brillo y use la Acción Corregir Brillo para cambiar el color de la Brillo.
- Haga clic en la Capa de Esquema y utilice la Acción Suavizar Esquema para suavizar la Contorno.
![]()

![]()

This auto action creates a shimmery effect for skin. Please do the actions in order from top to bottom:
This action creates a new layer named "Shimmer" and sets the blending mode to Add Glow. You can now create your shimmery effect with any color on this layer. I recommend using a color that is the blush or undertone of the skin.
- This action simply duplicates the Shimmer layer and renames it "Outline." You should place this layer below the Shimmer Layer to prepare for the next step. If you don't, you will not get the desired effect.
- This action darkens the shimmery area with the Color Burn blending mode. You are given the option to transform the outline so that it creates an embossed effect. You are also given the option to adjust the Hue/Saturation/Value of the outline. You can transform the outline once again if the embossed effect is not to your liking.
This action increases the size of the shimmery area, lightens the skin around the area, and uses Gaussian Blur. I usually increase the size by 5 pixels, but it depends on the size of the canvas. The option to adjust the Hue/Saturation/Value is given. The option to adjust the amount of blurring is given.
- If you are not happy with the results, the Fix Shimmer and Soften Outline Actions are optional actions.
- Click on the Shimmer Layer and use the Fix Shimmer Action to change the color of the shimmer.
- Click on the Outline Layer and use the Soften Outline Action to soften the outline.
![]()
![]()
¡Brillo! Acción automática + 2 pinceles Shimmer! Auto Action + 2 Brushes


Versión antigua


Más materiales de tojibon


Materiales populares de Catálogos de materiales


Nuevos materiales


-
 MVP ◆Estos usuarios han contribuido en gran medida a la gestión de la comunidad, al publicar multitud de útiles respuestas a las preguntas planteadas. Una vez cada tres meses, los MVP son seleccionados en base a los puntos obtenidos durante ese período y, en consecuencia, son reconocidos por su esfuerzo.
 -
 New Valuable Player (NVP) ◆Son las personas que más han contribuido a la comunidad después de los MVP. Este galardón se otorga según los puntos conseguidos a los usuarios que aún no han obtenido ningún premio MVP.
 -
 Especialista oficial ◆Elegidos de entre todos los MVP, quienes ya han demostrado ser de inestimable ayuda, esto es un testimonio de su excepcional apoyo para con la comunidad. Tras un minucioso escrutinio, son nombrados por Celsys para ocupar dicho cargo.Nota: Anteriormente denominados "evangelistas".
 -
 Moderador oficial de Celsys ◆Los moderadores son miembros del personal de Celsys que pueden comunicarse en japonés y otros idiomas. No son expertos en software o ilustración, por lo que no pueden responder directamente a las preguntas. Sin embargo, tratarán de asegurarse de que la comunicación entre usuarios de distintas lenguas sea tan fluida y comprensible como sea posible.
 -
 Cuenta oficial de CelsysCuenta oficial del administrador