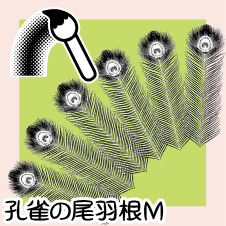
• Material Data
Monochrome 2-value/600 dpi, main color: black, sub color: White
Five types of brushes including variations
• Original width: 9-30mm Height: 8-100mm, drawing on main line 0.1-0.5.
(Depending on the brush)
I made it thinking whether it was easy to draw the state that a peacock spread the tail.
There is white so that it does not become black even if piling it up a lot.
It is beautiful when I try to draw a big arc.
[Tail root of the peacock] and [peacock tail root M]
Two different feather axis lengths
Initial setting brush size: [L] 100, [M] 60
Original size
Width: 20 mm Height: [L] 100 mm, [M] 60 mm
[Tail root of Peacock]
Only the characteristic tip part
Initial setup brush size: [S] 20
Original size
Width: 20mm Height: 20 mm
[Obi Feathers of Peacock]
A part close to the back
It becomes it like the scale when piling up finely.
Initial setup brush size: 6
Original size
Width: 9 mm Height: 8 mm
※ [Tail root L, M, S] has become a number that matches the eye you saw.
【 Tail root of the peacock 】
You could continue extending the feather axis endlessly.
Initial setup brush size: 30
Original size
Width: 30 mm Height: 70 mm
Sample
Draw with a concentric ruler.
By default, orientation → effect source settings → Random: 3 》
The spacing of the feather is a little rose, and it becomes a natural feeling.
Main color, I tried to change sub color.
In addition, I think that I finish it more realistically by coloring it.
Orientation → effect source settings → Random: off
The spacing between the arrays is uniform.
[Tail of the peacock root S] is also recommended for decoration such as fans and accessories.
The tail wing of the peacock will continue to stretch the wing axis while bending freely.
If you are concerned about distortion, please try to set the number of "stabilization" to a large.
Please the one point such as a background, a decorative feather such as a hat ♪

• 素材データ
モノクロ二値・600 dpi 、メインカラー:黒、サブカラー:白
バリエーションを含むブラシ 5 種類
• 原画は、幅:9 〜 30 mm 高さ:8 〜 100 mm、主線 0.1 〜 0.5 で描画。
(ブラシによって異なります)
孔雀が尾羽を広げた状態を簡単に描けないかなと思って作りました。
たくさん重ねても真っ黒にならないようホワイトが入っています。
大きな弧を描くようにするとキレイです。
【孔雀の尾羽根L】と【孔雀の尾羽根M】
羽軸の長さが異なる 2 種類
初期設定ブラシサイズ:【L】100 、【M】60
原画サイズ
幅:20 mm 高さ:【L】100 mm、【M】60 mm
【孔雀の尾羽根S】
特徴的な先端部分のみ
初期設定ブラシサイズ:【S】20
【孔雀の小尾羽根】
背中に近い部位
ウロコのように細かく重ねると、それっぽくなります。
初期設定ブラシサイズ:6
※【尾羽根L、M、S】と見た目を合わせた数値になっています。
【のびる孔雀の尾羽根】
羽軸を果てしなくのばし続けて描ける
初期設定ブラシサイズ:30
サンプル
同心円の定規を利用して描画。
初期設定では《向き→影響元設定→ランダム: 3 》
羽根の間隔が多少バラつき、自然な感じになります。
メインカラー、サブカラーを変更してみました。
さらに彩色すれば、よりリアルに仕上がると思います。
配列の間隔が均一になります。
【孔雀の尾羽根S】は、扇やアクセサリーなどの装飾にもオススメです。
【のびる孔雀の尾羽根】は、自由に曲げながら羽軸をのばし続けられます。
歪みが気になる場合は《手ブレ補正》の数値を大きめに設定してみてください。
背景などのワンポイントや、帽子などの飾り羽根にどうぞ♪


