



3D-Schwanz-Asset für Charaktere und Webtoons 3D Tail Asset for Characters and Webtoons
Beschleunige deinen Zeichenprozess für Webtoons, Manhwa, Comics oder Illustrationen!
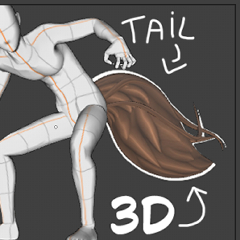
Dieses 3D-Schwanz-Asset soll dir helfen, schnell Charakterposen einzurichten und knifflige Perspektivwinkel zu überwinden.

Wichtige Merkmale:
Workflow: Posieren und Tails in jeder Szene leicht positionieren und referenzieren.
Winkel und Perspektive: Perfekt für konsistente Schwanzformen aus schwierigen Kamerawinkeln.
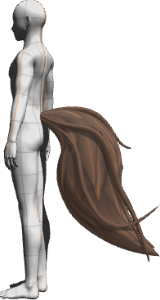
Gebrauchsfertiges Preset: Enthält eine vorkonfigurierte Schicht, bei der der Schwanz bereits an der Standard-3D-Karosseriepuppe befestigt ist!
Ideal für Fantasy und Webtoons: Ideal für Fuchs-, Wolf- oder andere Charakterdesigns .
EINFACHES TUTORIAL
Wie man den Schwanz an einen 3D-Charakter befestigt
1. Ziehe die 3D-Körperpuppe auf deine Leinwand und dann das 3D-Tail-Asset auf dieselbe 3D-Schicht.
2. Wählen Sie den Schwanz aus und klicken Sie auf die Objekt-Launcher-Leiste unter dem Modell (oder öffnen Sie die Palette Sub Tool Detail -> Pose / Attachment).
3. Setzen Sie den Ansatzpunkt auf Hüfte (Becken).
4. Bewegen und drehen Sie den Schwanz so, dass er natürlich am Rücken der Taille oder Hüften sitzt.
(Du kannst den Schwanz auch skalieren, um besser zu deinem eigenen Charakter zu passen.)
Sobald du die Pose des Charakters änderst, bewegt sich der Schwanz mit dem Körper.

Hinweis: Dieses Asset beinhaltet das 3D-Tail-Modell. Der in der Vorschau gezeigte Gehäuse ist die Standard-Clip Studio Paint 3D-Mannequin, die als Referenz verwendet wird.
Speed up your drawing process for webtoons, manhwa, comics or illustrations!
This 3D tail asset is designed to help you quickly set up character poses and overcome tricky perspective angles.
Key Features:
Workflow: Easily pose and reference tails in any scene.
Angle and Perspective: Perfect for consistent tail shapes from difficult camera angles.
Ready-to-Use Preset: Includes a pre-configured layer with the tail already attached to the standard 3D body mannequin!
Ideal for Fantasy and Webtoons: Great for fox, wolf, or any character designs.
SIMPLE TUTORIAL
How to Attach the Tail to a 3D Character
1. Drag the 3D body mannequin onto your canvas, then drag the 3D Tail asset onto the same 3D layer.
2. Select the tail and click the Object Launcher bar below the model (or open the Sub Tool Detail palette -> Pose / Attachment).
3. Set the attachment point to Hip (Pelvis).
4. Move and rotate the tail so it sits naturally at the back of the waist/hips.
(you can also scale the tail to fit your own character better)
Now, whenever you change the character's pose, the tail will move along with the body.
Note: This asset includes the 3D tail model. The body shown in the preview is the standard Clip Studio Paint 3D mannequin used for reference.
3D-Objekt 3D Object
Preset Preset


Weitere Materialien von Horry baby


Beliebte Materialien zu „Materialkatalog“


Neue Materialien





Abzeichen
-
 MVP ◆Dieser Nutzer hat einen großen Beitrag zur Verwaltung der Community geleistet, indem er viele großartige Antworten auf die gestellten Fragen veröffentlicht hat. Alle drei Monate werden die MVPs auf der Grundlage der in diesem Zeitraum erworbenen Punkte ermittelt und entsprechend anerkannt.
 -
 New Valuable Player (NVP) ◆Die NVP-Auszeichnung geht an die Nutzer, die nach den MVP den größten Beitrag zur Community geleistet haben. Sie werden basierend auf den gesammelten Punkten unter denjenigen ausgewählt, die bisher noch nicht als MVP ausgezeichnet wurden.
 -
 Offizielle Experten ◆Ausgewählt aus allen MVP-Preisträgern, die bereits ein Zeichen für Exzellenz sind, zeugt diese Auszeichnung von herausragender Korrespondenz in der Community. Nach sorgfältiger Prüfung werden sie von CELSYS ernannt und übernehmen ihre Position.* Vorherige Bezichnung: Evangelist
 -
 Offizieller Moderator von CELSYS ◆Moderatoren sind offizielle CELSYS-Mitarbeiter, die fließend Japanisch und verschiedene andere Sprachen sprechen. Moderatoren sind keine Experten der Software oder Illustrationen und können daher nicht direkt auf Ihre Fragen antworten. Aber Moderatoren bieten Unterstützung in Kommunikation und Sprache, um sicherzustellen, dass alle reibungslos miteinander kommunizieren können.
 -
 Offizieller Account von CELSYSDer offizielle Administrator-Account